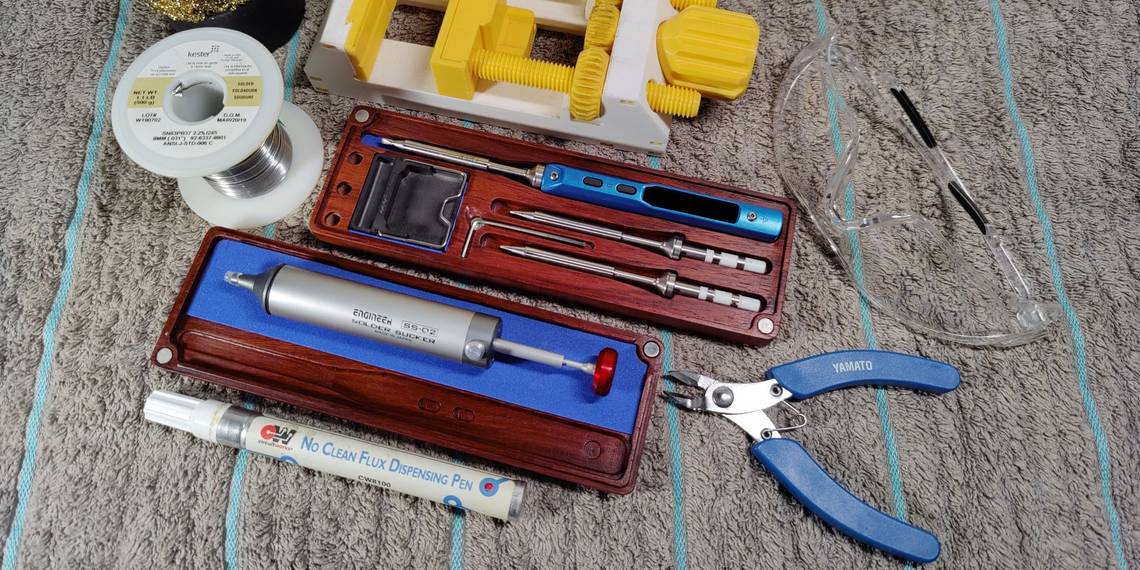
Soldering is an indispensable skill for electronics repair, which often involves replacing faulty PCB components. This makes desoldering the first order of business that precedes soldering. For the vast majority of makers, the solder sucker (or the desoldering pump) is the weapon of choice for this important task.
Figuring out when and how to use a solder sucker is essential for practical electronics repair. Read on to learn how to desolder components off PCBs with the tool.
When You Should and Shouldn’t Use a Solder Sucker
Desoldering pumps are absolutely useless for PCBs built using surface-mount technology (SMT). Such boards are populated with specialized components known as surface-mount devices (SMD), which don’t have long leads poking through the PCB. In fact, SMDs either have no leads at all or extremely small leads on the same side of the PCB as the components. Such components can only be desoldered reliably using hot air rework stations or specialized desoldering tweezers.

Fortunately for makers like us, the vast majority of DIY electronics involves PCBs with components populated using plated through-hole (PTH) technology. These are the familiar components with long leads that poke out through the non-component side of the PCB. True to their name, the leads of PTH components penetrate the PCB through copper tubes.
Once soldered, the components are mechanically anchored to the PCB with a generous helping of solder. Sucking molten solder out of the plated through-holes using vacuum pressure is the ideal way to desolder such components. In the absence of a vacuum desoldering gun, the humble solder sucker is your best bet for this job.
Tools Required to Desolder Successfully
A solder sucker is only one of the many tools required for DIY desoldering of a PCB assembly populated by PTH components. You additionally need a temperature-controlled soldering iron to heat up the joints. Good-quality rosin flux is absolutely essential to ensure that the solder melts quickly and flows free enough to be sucked into the device.

This might sound counterintuitive, but stubborn joints can be desoldered easily by adding fresh lead solder (avoid lead-free solder). Finally, some sort of tip cleaning mechanism, such as a moist soldering sponge or brass tip cleaner, is indispensable for maintaining the thermal conductivity of the soldering iron tip. With the essentials at hand, let’s get down to the understanding proper desoldering technique.
How to Use a Solder Sucker to Desolder Components
Ideally, your workbench should be equipped with an ESD-safe (electrostatic discharge) mat. Anti-static wrist straps with proper grounding are also recommended to prevent ESD damage to PCB components. Such damage may not be apparent immediately, but it is known to severely reduce the service life of electronic components.
Desoldering generates a significant amount of toxic gases, so ensure your work area is well ventilated. It’s also a good idea to use a fume extractor or, at the very least, position a table fan to blow soldering fumes away from you. Eye protection is mandatory to safeguard against stray blobs of solder flung around when cleaning the tip.
Step 1: Add Flux to Joint
Flip the PCB to the non-component side. Now, add flux to the joint you intend to desolder. You may use anything ranging from a brush (for semisolid flux) to a syringe (liquid flux) for this purpose, but we find flux dispensing pens to be the most convenient.

Step 2: Get Your Soldering Iron Ready
Choose the right soldering iron tip for the job. Compared to tip temperature, tip shape and size affect the thermal efficacy of a soldering iron to a greater degree. The tip quality section of our soldering iron buying guide covers this concept in greater detail.

Chisel or hoof tips are ideal for desoldering PTH components, in conjunction with a desoldering pump. These tip shapes generate optimal thermal linkage. The ideal size of tip is approximately 60 percent of the pad being desoldered. This ensures a contact patch that isn’t too large or small for the job.
Step 3: Get the Right Temperature
Bring the soldering iron to the correct temperature. This entirely depends on the type of solder used in the joint.

If you are desoldering a joint on a PCB from a commercial device sold within the last 15 years, it most certainly employs lead-free solder. Such joints require the soldering iron tip to be maintained anywhere between 570 °F (300 °C) to 660 °F (350 °C). DIY PCBs often use lead solder, so they only require tip temperatures ranging from 520 °F (270 °C) to 570 °F (300 °C).
Step 4: Tin Your Iron
Now would be a great time to tin the soldering iron tip. While you are at it, prime the solder sucker by fully depressing the plunger.

Step 5: Melt the Solder
With your hand on the trigger, immediately touch the tip of the solder sucker/desoldering pump to one side of the joint. The solder sucker should be slightly tilted, as depicted in the photo.

Bring the soldering iron tip to the joint you wish to desolder from the opposite side of the desoldering pump. The solder should melt within two seconds; that is, provided the tip shape, size, and temperature are ideal.
Step 6: Suck Up the Solder
The moment the solder melts, remove the soldering iron tip, tilt the solder sucker such that the tip encloses the joint, and press the release trigger. These three actions should be executed in one fluid motion.
Remember, the total dwell time on the joint shouldn’t exceed four seconds. Ideally, each joint should be desoldered within three to four seconds from the time you touch the hot soldering iron tip to it.
Step 7: Desolder All Leads
Repeat this process for all component leads. Be sure to re-tin the soldering iron tip after every couple of joints. The component should come off the PCB with ease at this juncture.

Congratulations. You have successfully learned how to desolder a component off the PCB. If you need to clean any residual solder off the board, check out our desoldering wick guide.
Desoldering Issues? Here’s How to Troubleshoot Stubborn Joints
In reality, lead-free joints don’t flow well enough to be sucked clean by a handheld desoldering pump on the first attempt. It isn’t uncommon for the component lead to remain fused to the copper tube found in a typical PTH joint. This may involve a substantial amount of solder, or just a tiny sliver, holding the component lead in place.
Either way, attempting to force the component off the board might either rip the pads off the PCB, or damage the component itself. Here’s how to deal with stubborn joints.
Option 1: Add Solder
Taking pointers from our soldering guide, resolder the offending joint. Adding more solder to a joint that won’t desolder might sound crazy, but the extra lead solder allows the desoldering pump to maximize suction.

Repeat steps 5 through 7 until the joint is successfully desoldered. You may have to repeat this process a few times for lead-free solder joints. Each successive attempt will gradually replace the stubborn lead-free solder in the joint with nicer lead solder until the solder sucker can do its job successfully.
Option 2: More Powerful Iron
If you have difficulty melting the solder, make sure you have followed steps 2 and 3. Incorrect tip shape, size, and temperature are most likely to blame here.

If that isn’t the case, double-check the PCB schematics to verify if you aren’t trying to heat up a component on a ground plane. Such joints require a high-powered soldering iron with a generous wattage rating. Similarly, larger components (such as massive bulk capacitors) also require more powerful soldering irons.
Option 3: Try Pulling Out
If a single component lead is giving you trouble, you may repeat Option 1. Except, instead of using the solder sucker, just add fresh solder to the joint and pull out the component while the hot tip keeps the solder flowing.

Don’t Forget the Nuclear Option
If all else fails, taking a pair of flush cutters to snip the component leads off the PCB is the most foolproof means to remove a component from the PCB. You obviously can’t reuse such components, but this destructive approach works when you must reuse the PCB at any cost.
With the right set of tools and know-how, desoldering PCBs with a solder sucker is pretty straightforward once you get the hang of it. However, a vacuum desoldering gun is your best bet for large desoldering jobs where successful component recovery is important.