
Google Sheets is a powerful tool for collaborating with your colleagues. But what if you need to hide sensitive information in a Google Sheet file while still giving access to other users?
Fortunately, Google Sheets has robust sharing and privacy features, allowing you to share specific sheets in your file without compromising the privacy of other information.
Here's how you can do that.
How to Share Your Google Sheets File

If you plan to work with multiple users, you should first know the basics of sharing your Google Sheet file. To share it securely, you must first save the file. When you've done that, follow the steps below.
- Click on the Share icon at the upper right-hand corner of the screen.
- A Share with people and groups window will appear. From there, in the Add people and groups field, type in the email address of the people you want to share the file with.
- Once you've entered their email addresses, a dropdown menu will appear right beside the email field. Choose Editor so that the people you shared the file with can edit it.
- For added security, click on the Settings icon at the upper right-hand corner of the Share window.
- Under Share with people settings, be sure to untick Editors can change permissions and share, and Viewers and commenters can see the option to download, print, and copy.
- Once done, click on the back arrow icon to return to the Share with people and groups window.
- Under the email address field, click on the Notify people tickbox to ensure they receive a notification in their inbox about the file. You can also add notes or instructions for them in the Message field.
- Once you're satisfied with all the settings, click on Send.
This will allow users to see and edit the Google Sheets file. However, you shouldn't do this yet if you still haven't finished preparing your file.
Assigning Editors for Individual Sheets
Once you've prepared individual sheets for different users, you can now lock them to an assigned user. That way, you don't have to worry about users messing inputting data for other people. There are the steps to assign unique editors per sheet.
- Right-click on the tab you want to share with a specific person.
-
Click on Protect sheet.
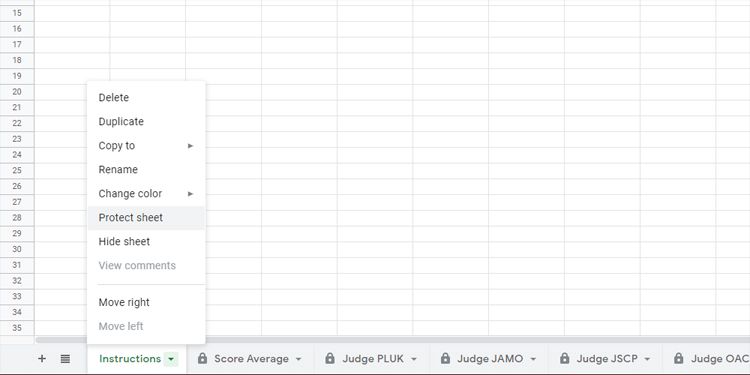
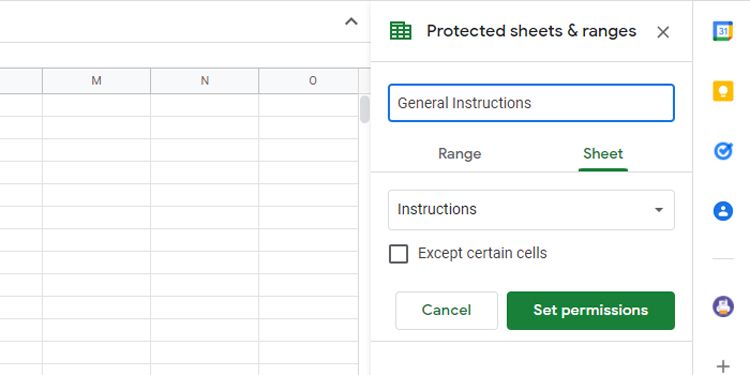
- A side window called Protected sheets & ranges will open.
- You can add your notes about the sheet in the optional Enter a description field.
- Under the Sheet tab, ensure that the correct sheet is selected in the dropdown menu.
-
From there, click on Set permissions.
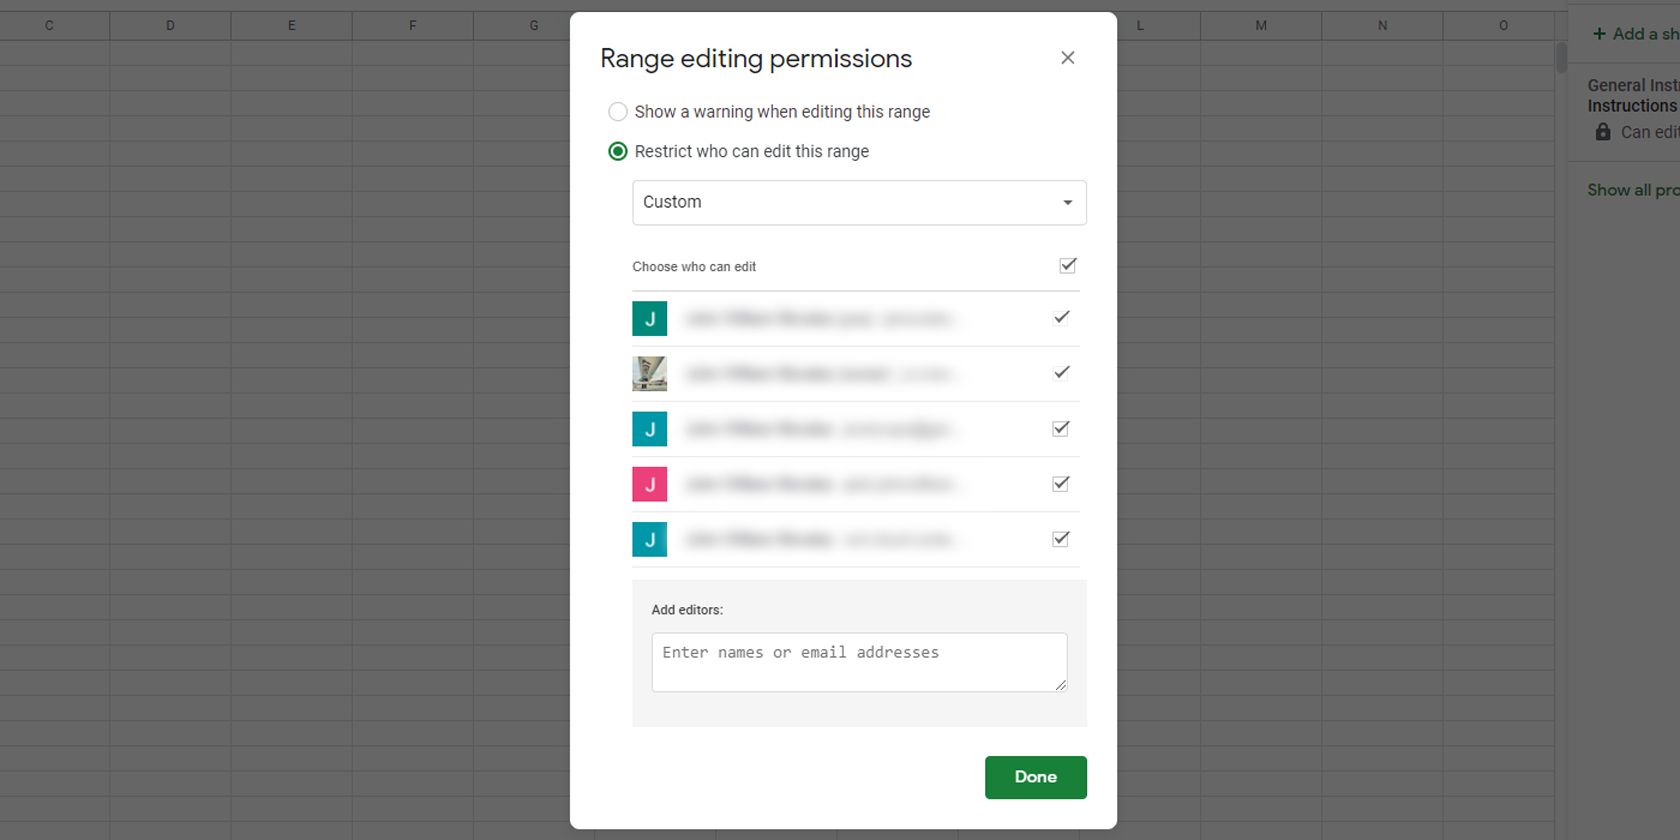
- The Range editing permissions will appear. At the top part of the window, click on the Restrict who can edit this range radio button. At the dropdown menu under that option, pick Custom.
- If you've previously shared the file with other users, you can untick the users with whom you don't want to share the sheet. Otherwise, you can add new editors in the email field near the bottom of the window.
-
After you complete adding all the editors you need, click on Done.
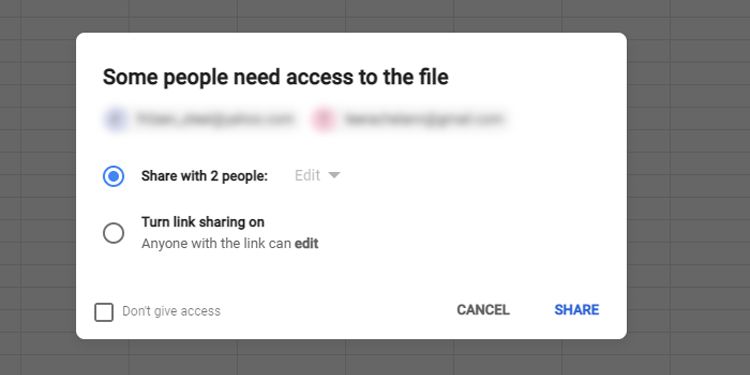
- Once Google has saved your sharing preferences, and you have assigned a new editor, a "Someone needs access to the file" window will appear.
-
Choose the Share with X person: Edit radio button, then click on Share.


After completing this process, you've now shared the specific sheet with someone else.
Hiding Sheets for Privacy
Now that you've shared some of the sheets with specific people, you might want to hide other sheets from everyone else. These sheets could contain formulas, notes, or other things you don't want them to see. Luckily, you can easily do that with the instructions below.
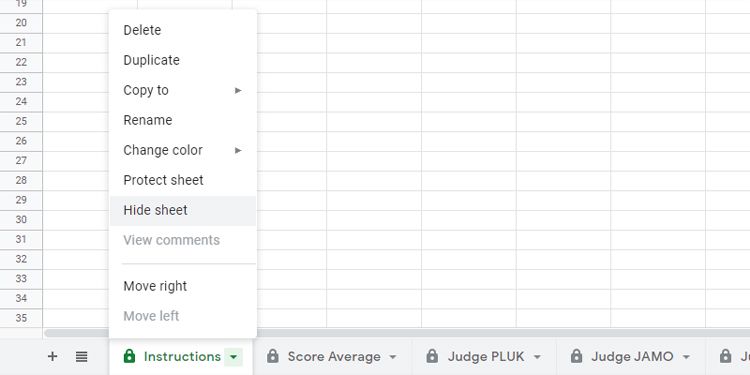
- Right-click the tab you want to hide.
- Choose Protect sheet.
- In the Protect sheets & ranges side window, ensure that the proper sheet is selected.
- Click on Set permissions.
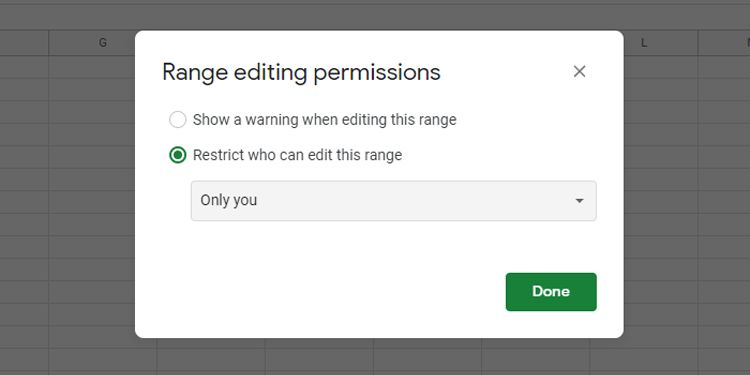
- In the Range editing permissions window, click on the Restrict who can edit this range radio button. Then, in the dropdown menu, choose Only you.
-
Click on Done.
- When you're back in your Google Sheet file, right-click again on the tab you want to hide.
- This time, click on Hide sheet.
-
The sheet you want to hide will disappear from view.
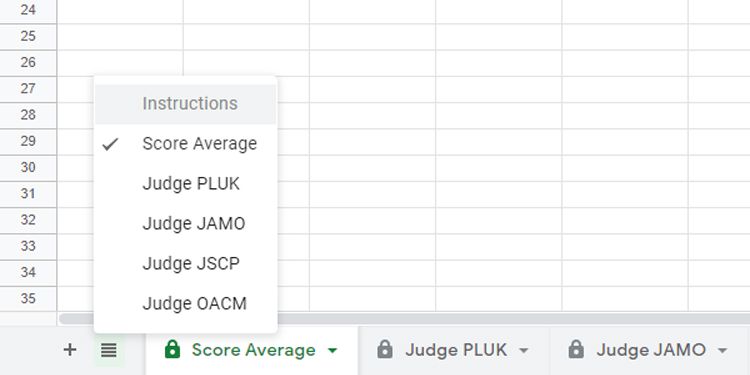
- If you want to see the sheet again, click on the hamburger menu icon (right beside the plus icon on the sheet tabs bar). You should see all the hidden sheets greyed out.
- Click on the hidden sheet you want to see.
- The hidden sheet will reappear in its former position in the sheet tabs bar. However, other users can see it too.
-
To hide it again, repeat the steps above.


With that done, you can now hide the sheets you don't want to share without needing to create a different Google Sheets file.
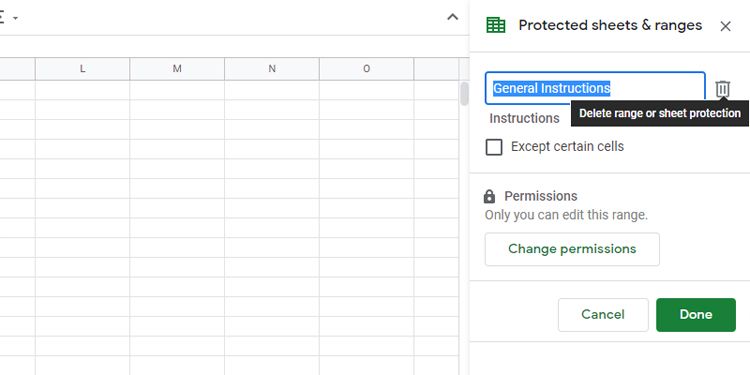
Removing Sheet Protection
Sometimes, you may want to remove a sheet's protection so that all other users can see it. If that is the case, these are the steps you need to follow:
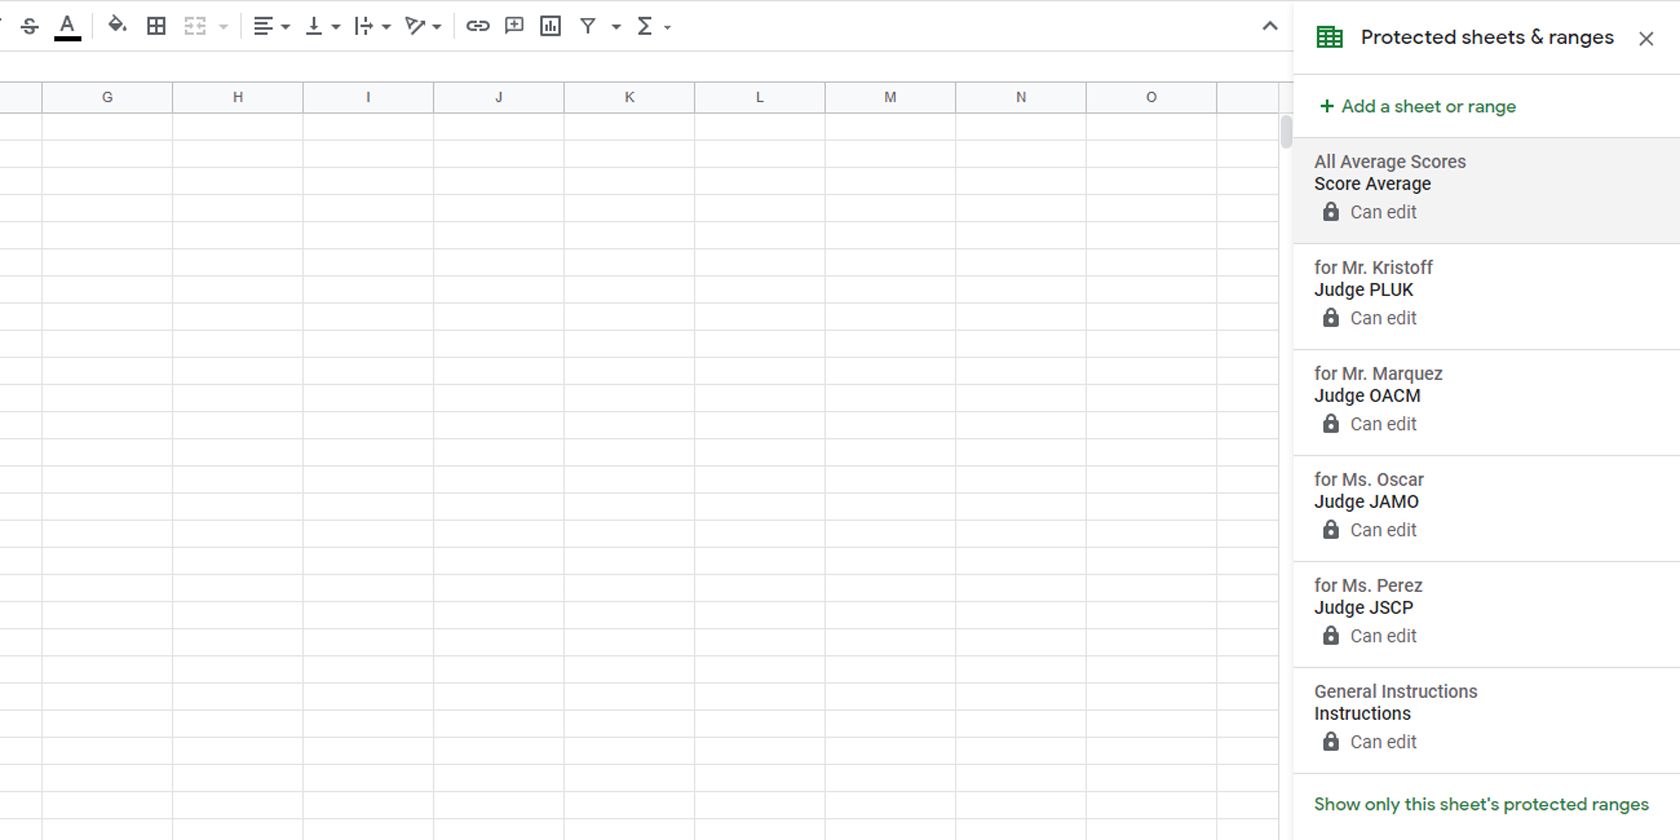
- In the menu bar, click on Data > Protect sheets and ranges.
- In the Protected sheets & ranges side window, you should see a list of the protected items you have.
-
Click on the name of the sheet you want to unlock.
-
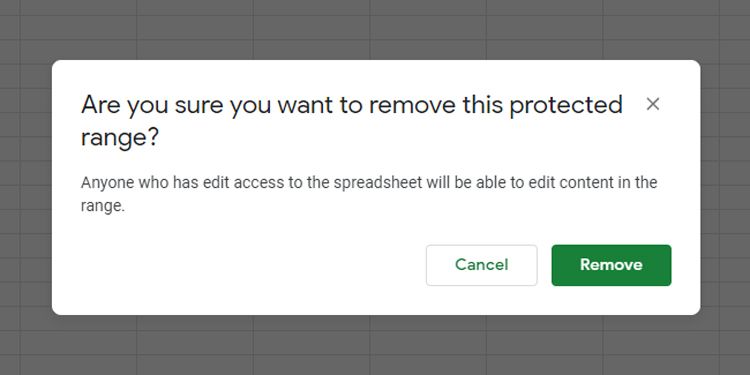
After clicking on the protected sheet properties, select the Trash icon beside the Description field.
- A window will ask, Are you sure you want to remove this protected range? Choose Remove.
-
Google Sheets will return you to the main spreadsheet window, and the formerly protected sheet is now accessible to all shared users.


Sharing What's Necessary Only
These sheet protection features ensure you can keep the integrity of your data. That way, you're sure that only the designated user can access the sheets you need.
This is also a good solution for tidying up your files. That's because you don't need to create separate files to share with different users, and you can easily link the results from each sheet to the main sheet you can hide from other users.
You get to protect your data with these features from Google Sheets, all without having to pay a cent.