Microsoft Outlook is one of the best email platforms out there. It has a lot of powerful features that allow you to have control over your emailing life. One of which is sharing a calendar. Follow along with this guide to master how to share a calendar in all three of the Outlook platforms.
Why You Should Share Your Calendar in Outlook
If you're used to working in an office environment or are a part of a large team, you know collaboration is key to achieving success. Creating and following a schedule allows your team to stay on track and know what the other person is up to on a specific day and time.
Thankfully, you can do this quickly using Outlook's calendar sharing feature. It allows you to track team schedules that keep the tasks organized. When sharing your calendar, you can choose how much access you want to give to specific individuals. For example, you can allow your boss to edit your calendar but only allow your colleagues to view it.
Sharing your calendar lets you inform others about your schedule with a few clicks, especially if you have a distribution list in Outlook set up. Building work environments in Outlook makes scheduling meetings and keeping track of your team much more manageable. It’s also a great way to organize your social schedule with friends.
Sharing calendars in Outlook is much simpler than some Outlook alternatives.
How to Share a Calendar on Outlook for Desktop
Microsoft has released multiple versions of Office on Windows over the years. This means that every version of Outlook has a few differences compared to the other. Although the way it works is pretty much the same across all versions, there are a few visual differences. We are using Outlook 2019 for this example.
Here are the steps you need to follow to share your calendar in the desktop version of Outlook:
- Open Outlook for desktop and sign in to your account.
-
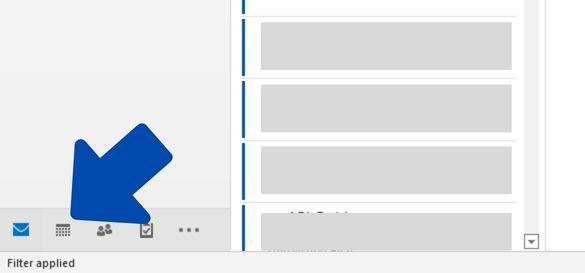
On the bottom left side of the screen, click on the Calendar icon. This will take you to the calendar section of Outlook.
- Make the necessary changes to your calendar.
-
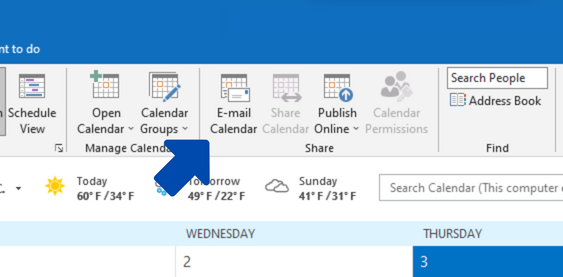
Click on Home in the top bar and head into the Share section. Here, you can choose the method you want to share your calendar. For this example, we will use the E-mail option. Click on E-mail Calendar, and this will open a new window.
-
Click on Date Range and choose the dates you want to share with your recipient.
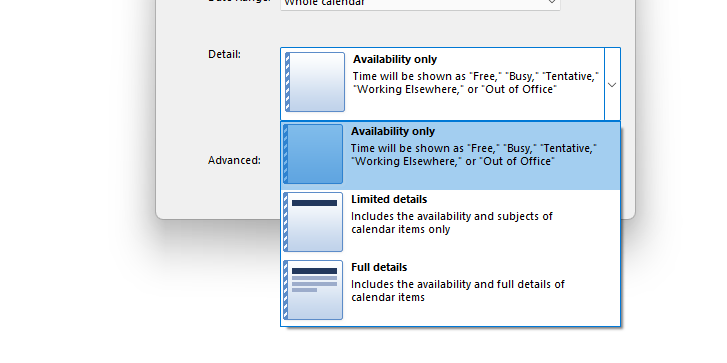
- Now, click on the Detail tab. This will allow you to specify how much you want to share with your recipient. You can choose from options like Availability only, Limited and Full Details.
- Click on OK after you have selected the necessary options. This will save your calendar to a .ics file.
- The calendar file will be attached to the email in the Compose E-mail screen. Here, feel free to type a message like you normally would.
- In the To.. textbox, type the email of the recipient.
- Click on Send to send the email.


The shared calendars are shared in ICS or HTML format, which means your recipients will not be able to edit the calendar easily.
Note: to share calendars in Outlook Office 2021, you should right-click the calendar you wish to share and click to access the share menu instead.

Sharing a Calendar on Outlook Desktop for macOS
You need to use some slightly different steps to share an Outlook calendar on macOS:
- Select the Calendar icon in the bottom left pane
- Choose the calendar to share
- Click Organize tab > Calendar Permissions.
- In the pop-up menu, click Add user.
- Search for the person in the search bar and click Add.
- Select the permissions for the user in the Calendar properties box.
How to Share a Calendar on the Outlook Web App
You can use the web version of Outlook on anything with a modern web browser. These steps will work on Windows, Linux, macOS, tablets, and mobile. However, some differences exist when comparing the web to the desktop version of Outlook.
To share your calendar on the Outlook web version, head to outlook.live.com and log in to your account. This will open the main screen. Then, here are the steps you need to follow:

- Click on the Calendar icon on the left side of the screen. This will open the Outlook webpage in calendar mode.
- Make the necessary changes to your calendar.
- On your main calendar screen, click on Share towards the upper right corner of the screen. This will open a smaller window in the middle of the screen.
-
If you already have the recipient saved as a contact, then enter their name. Otherwise, enter their email into the textbox.
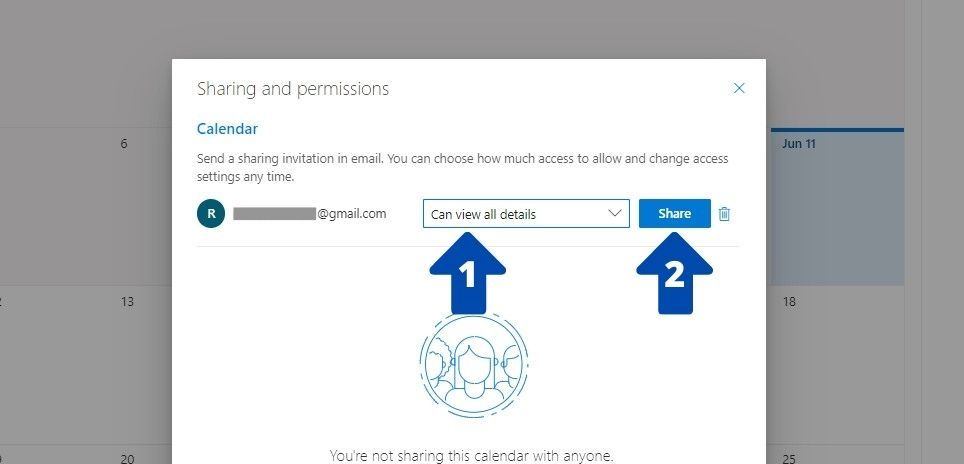
- Click on the first box beside the recipient's email to select their permissions. Either the user can only view the contents of the calendar, or they can also edit them.
- Click on Share.

The recipient's name will move down into the list of people you have shared the calendar with. You can also add multiple people to this list. When giving them permissions, you can assign varying levels of permissions to different people. So one person can only view the calendar while the other can edit it. This makes it an excellent feature for collaboration.

You can also remove people from the list. To do this:
- Head to the Sharing and permissions menu by clicking on Share in the Calendar section of Outlook.
- Find the contact you wish to remove from your calendar and click on the Trash symbol to the right side of their name.
How to Share a Calendar on Outlook Mobile App
Outlook for mobile doesn't allow you to have as much control in sharing your calendar as on the desktop or web version. However, you can still share specific events with your contacts. Here are the steps to do so:

- On the main screen of the Outlook application, click on Calendar in the bottom right corner of the screen.
-
On the calendar screen, click on the blue plus (+) icon. This will take you to a new screen that allows you to create an event.
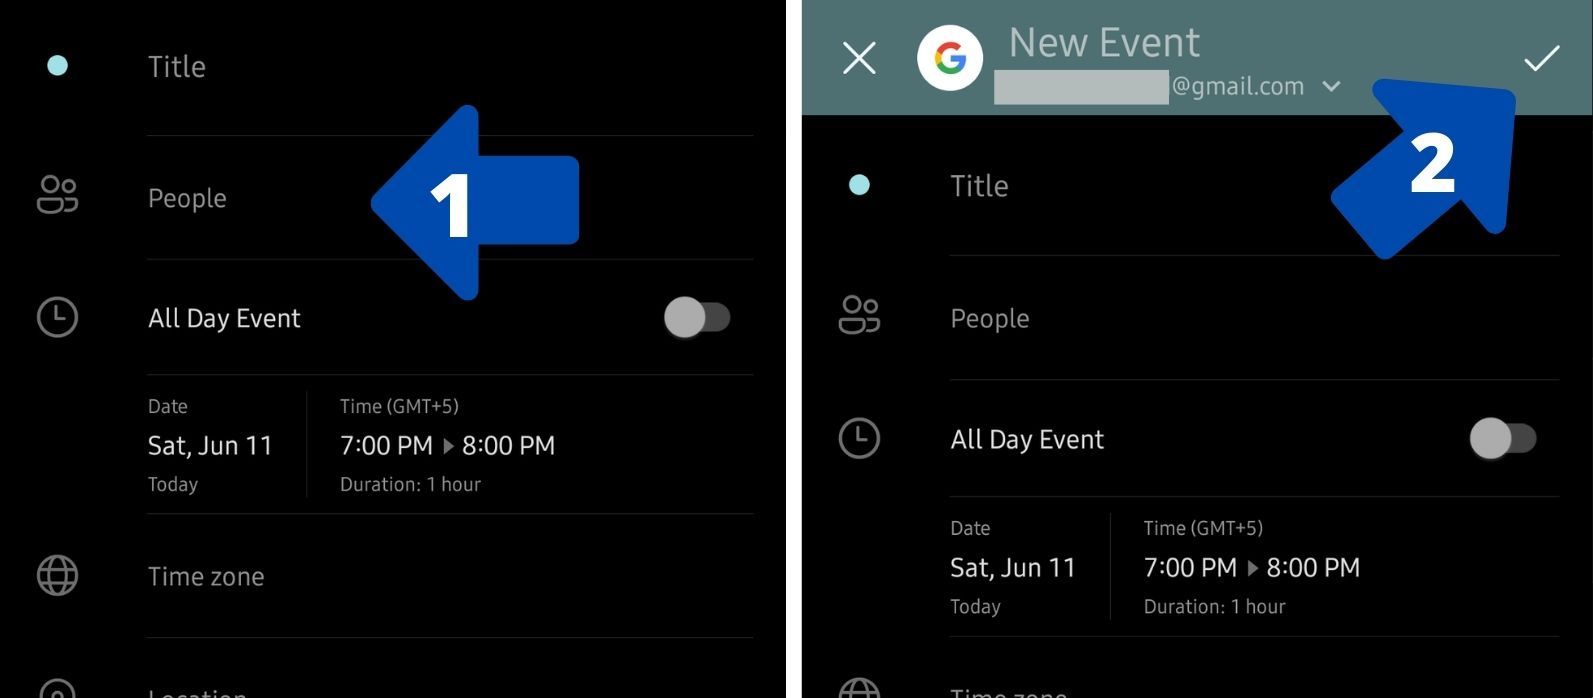
- Enter the Title of the event first.
- Enter the email of the recipient in the People textbox.
- Set the Date, Time, and other parameters.
- Click on the Tick icon in the top right to save the changes.

How to Unpublish a Calendar in Outlook
In the Calendar view on your Outlook client:
- Select the Settings and then click on View all Outlook settings.
- Head over to the Calendar section and click on Shared calendars.
- Under Publish a calendar, click on Unpublish. This will remove the access of the recipient you shared the calendar with.
Learning More About Outlook
Now you know how to share a calendar on every version of Outlook, but this is a powerful email suite, and there’s still plenty more to learn about before you consider yourself a pro user. Keep practicing, and you’ll be collaborating through email better than ever.