Raspberry Pi’s Operating system is installed on either the SD Card or a USB Disk. Due to the limited write cycles of flash cells on SD Cards, their reliability is not guaranteed. Hard disks and SSDs fare better at reliability; the latter uses wear level algorithms to prolong the device life. But still, keeping data on a single disk only is always risky.
The Idea of Mirroring Data Using RAID-1
To avoid data loss in the event of a disk failure, RAID-1 data mirroring should be implemented. The problem is that setting up RAID is not possible during the installation phase of the operating system on a Raspberry Pi.
This idea is about setting up RAID-1 Mirroring on two USB SSDs, then copying the home directory to RAID partition and configuring to use it as /home. Since user data resides in the home directory, data can be fully recovered and RAID can be rebuilt again in the event of a single disk failure.
The OS will still remain on the SD Card (or another SSD). If the OS disk fails, the important data is still available on the RAID-1 array. Also, the OS disk will last longer since there is less disk pressure. This is because a majority of the disk activity is happening in the /home directory (for example, continuous read/writes to “Firefox Profile Files”).
This process employs a web interface to simplify the otherwise complex process of setting up RAID. Setup shown here uses Ubuntu MATE 22.04 and the same process can be applied to any other Pi OS.
Choose the Right Hardware Considering Power Availability
A minimum of two disks are required for RAID-1. These disks can either be hard drives or SSDs. Once RAID-1 is set up, data is mirrored (cloned) across the array. It means data is written to both the disks and is read from the fastest RAID Member.
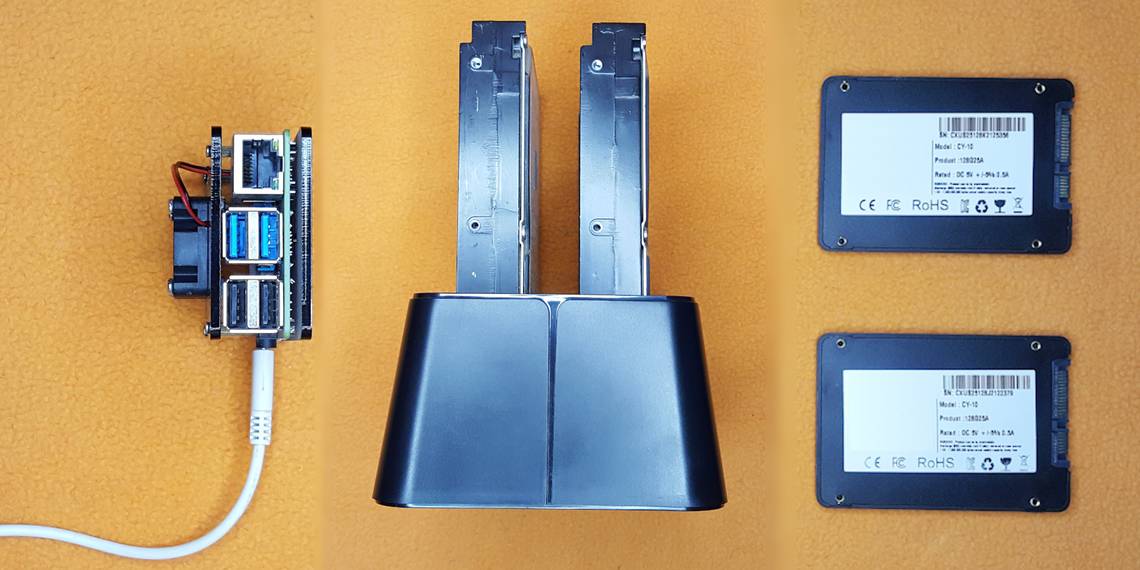
USB to SATA adapters are used to attach SSDs to the Pi. An SSD consumes around 5 Watts of power at peak usage. Since two of them are needed for RAID-1, the power availability needs to be factored in.
2 (SSDs) x 5 (Watts) = 10 Watts
A Pi 4 running at standard clock consumes around 6 Watts and an overclocked Pi 4 at full load consumes close to 8 Watts.
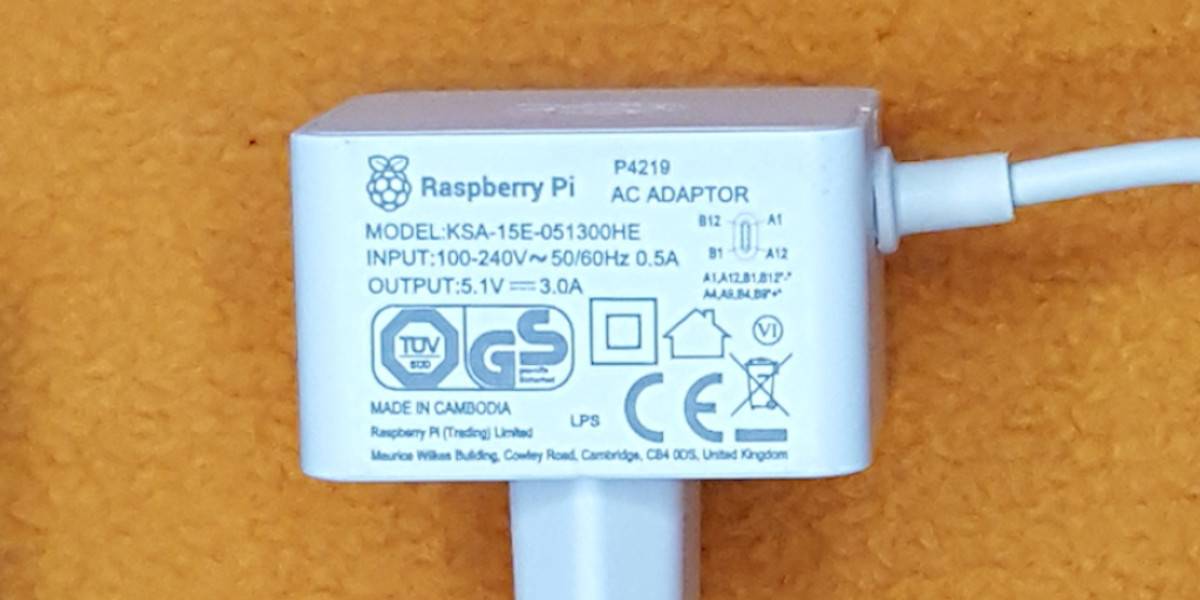
The official power supply of a Raspberry Pi 4 is 5.1V, 3.0A.
5.1 (Volts) x 3 (Amperes) = 15.3 Watts
Summing it up, the power requirement is more than the maximum output of the adapter.
10 Watts + 8 Watts > 15.3 Watts
The Pi will also need to power its cooling system. So, the SSDs must be powered externally to have the headroom for stable operation.
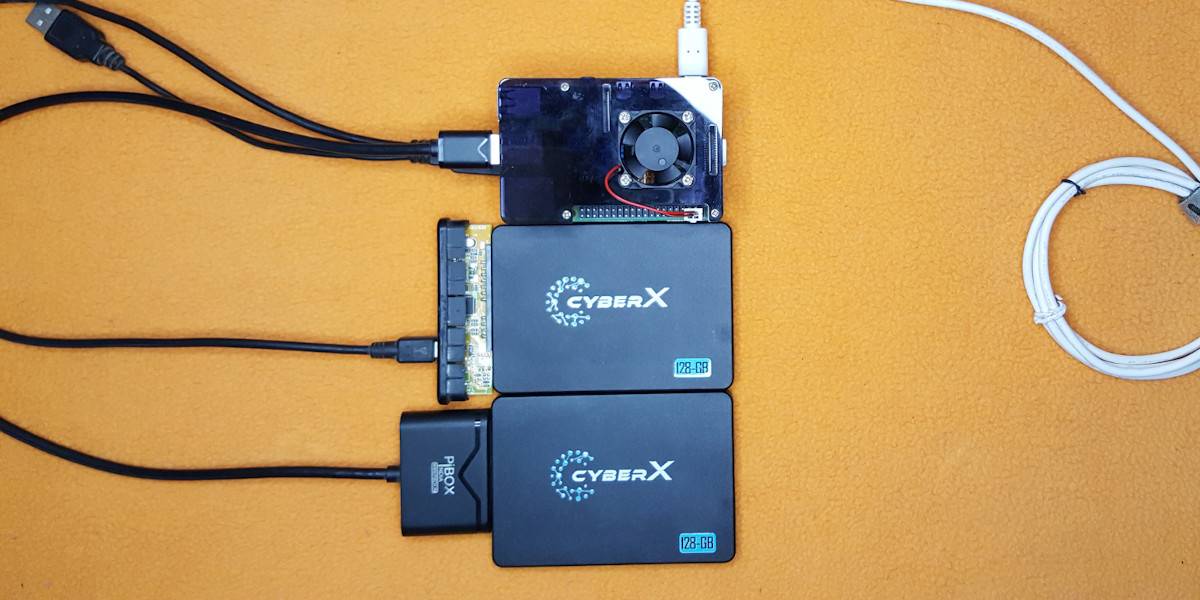
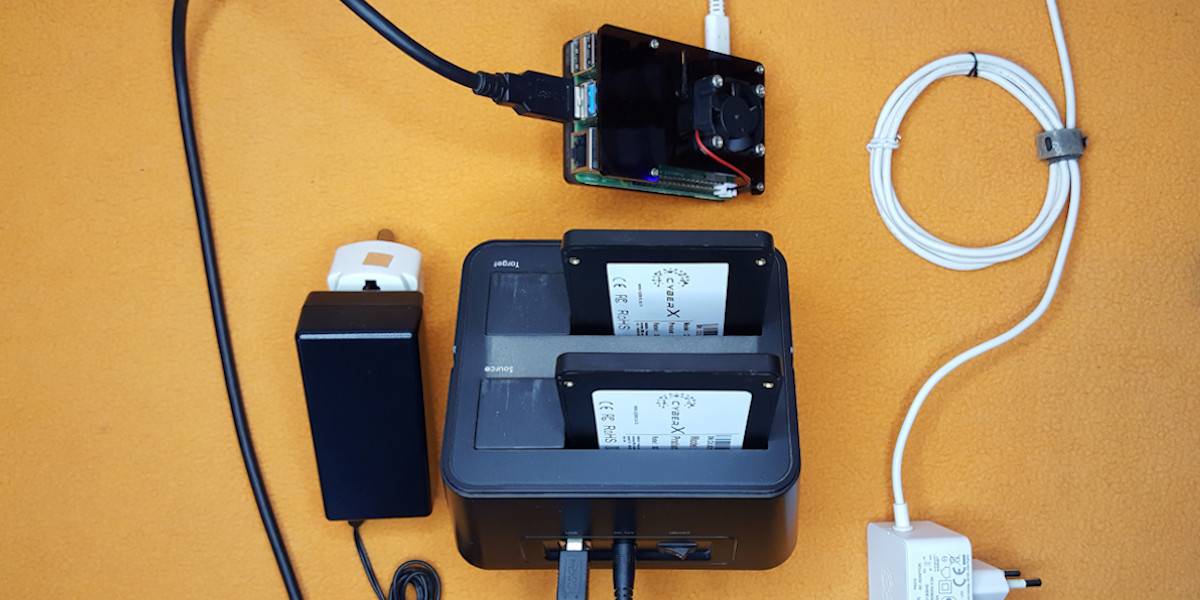
A USB HDD/SSD Dual Dock suits this purpose ideally, it can house both 2.5" and 3.5" disks. It has its own power adapter and will not draw power from the Pi.
SD’s for RAID, choose models with non-identical TBWs so that both the disks have failure points at different intervals. This gives sufficient time to rebuild the RAID array and will keep your data perpetually intact. There are two USB 3.0 ports on the Pi 4. Since the dock uses only one of them, a spare port is still available to connect another fast device.
Install the Tools to Set up RAID-1 Mirroring
Plug the disks into the dock and power on the Pi. RAID setup is easy using a tool called "Webmin", its interface can be accessed via the browser. Open the terminal (shortcut: Ctrl+Alt+T) and use these commands to install Webmin:
Edit sources.list file:
sudo nano /etc/apt/sources.list
Add this line (shortcut: Ctrl+Shift+Insert):
deb http://download.webmin.com/download/repository sarge contrib
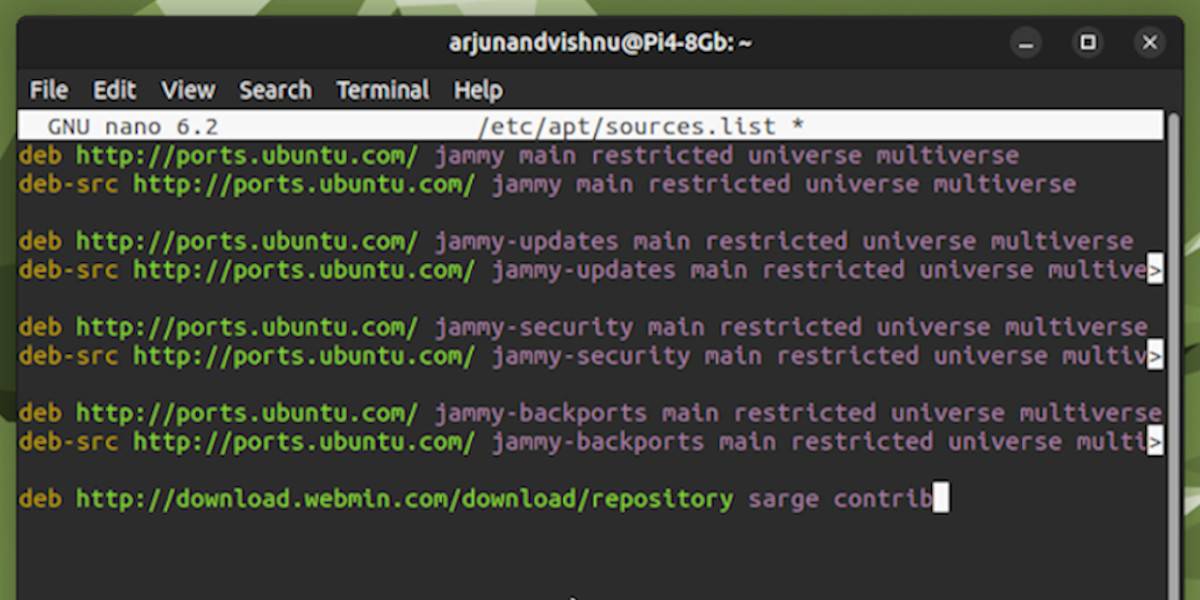
Save file using Ctrl+O, hit “Enter” and exit using Ctrl+X.
Download key to trust the source:
wget -q -O- http://www.webmin.com/jcameron-key.asc | sudo apt-key add
Update new repositories:
sudo apt update
Install Webmin:
sudo apt install webmin -y
Install mdadm Software RAID utility:
sudo apt install mdadm -y
Install the disk management tool:
sudo apt install gnome-disk-utility -y
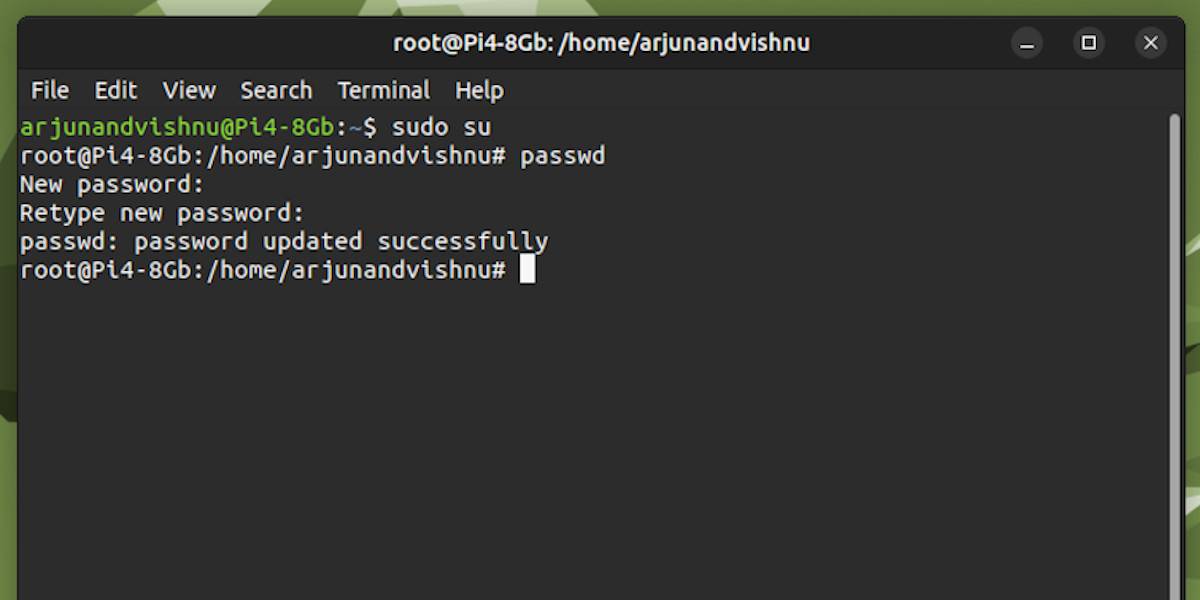
Set a password for the root user (to manage Webmin):
        sudo su
passwd
Update, upgrade and reboot:
sudo apt update && sudo apt upgrade -y && sudo reboot
Process to Build the RAID-1 Array
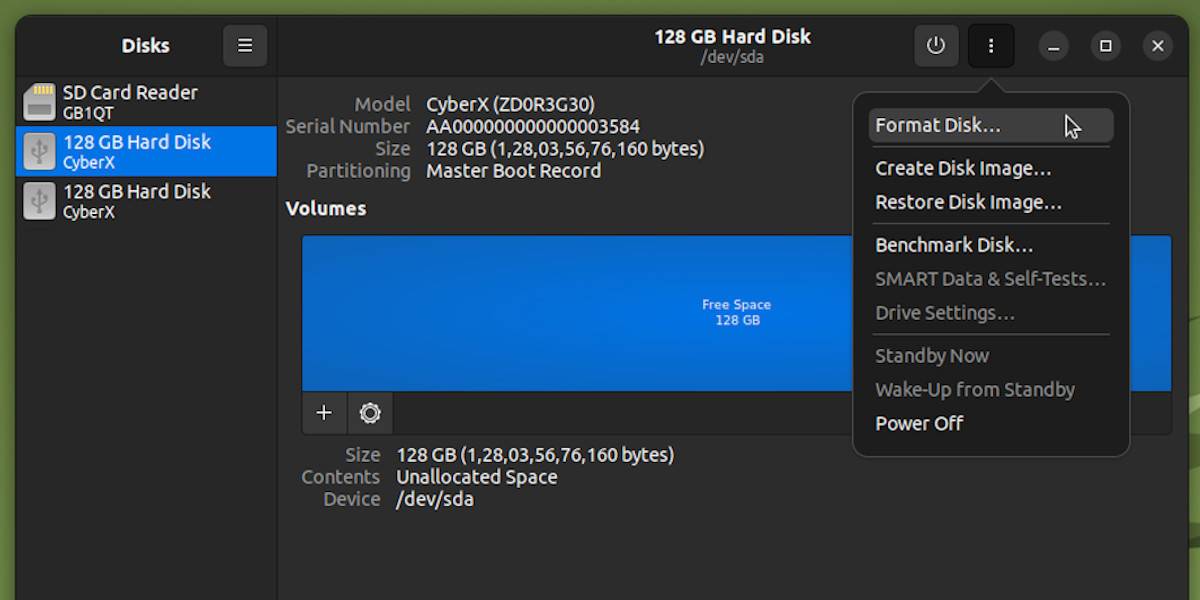
Open Disks tool from Menu > Preferences. You can also use the command:
gnome-disks
It would show the new disks, format both.
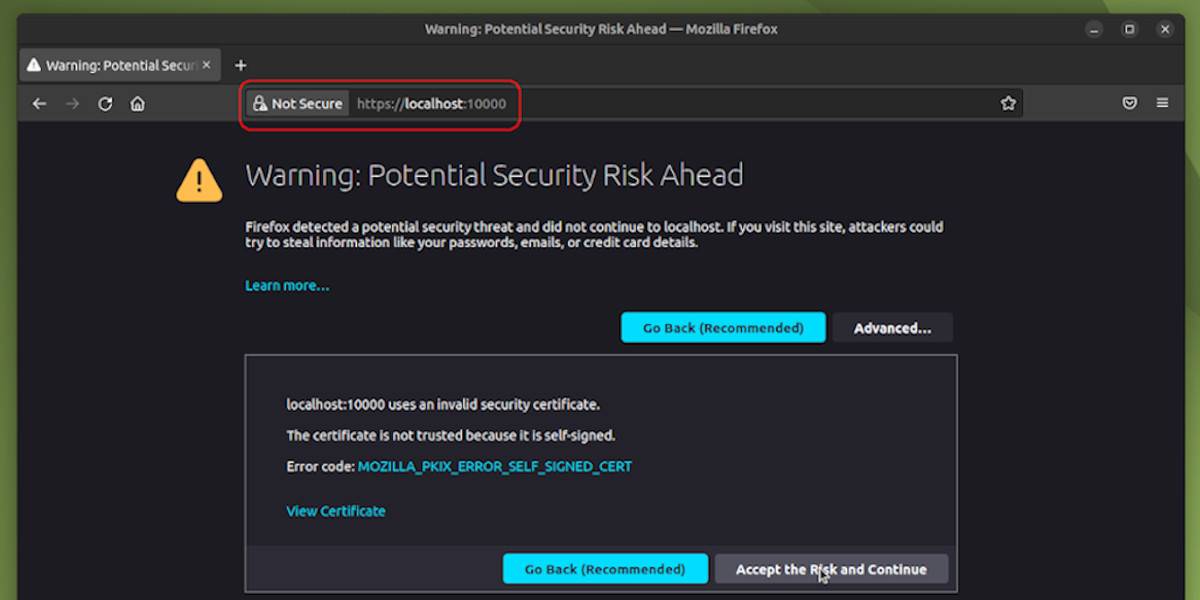
Open the web browser and enter this URL:
https://localhost:10000
Webmin runs on localhost at port 10000. Since https is used and SSL Certificate is not installed, the browser will show a warning. It is safe to click Advanced and then Accept the risk and continue.
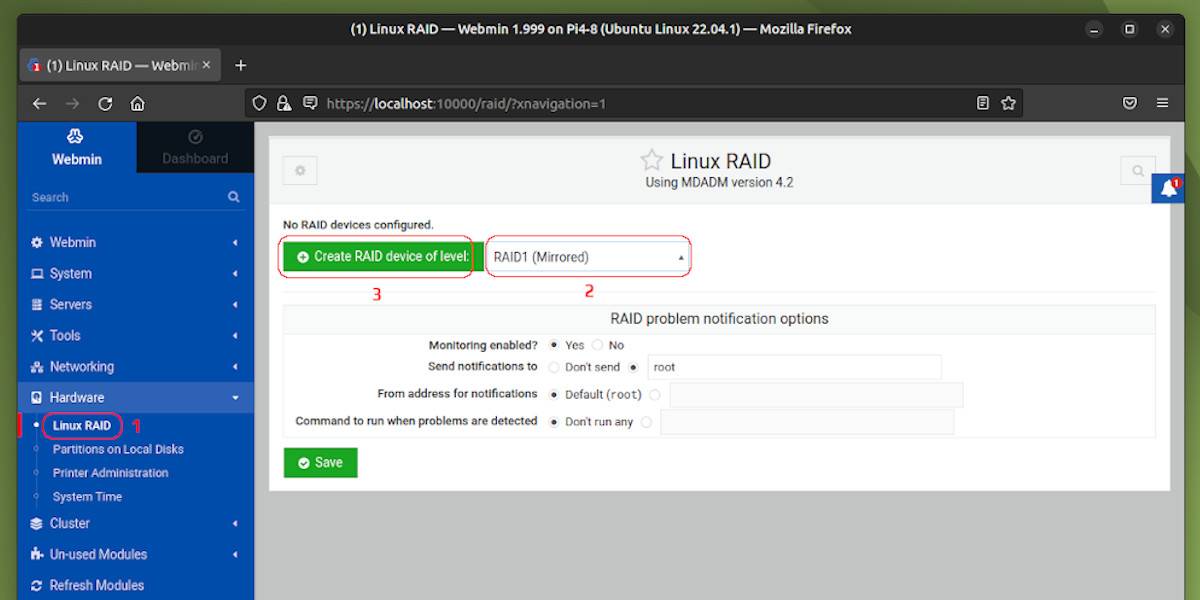
Login with user as “root” and the password you have set for root earlier. First up, Refresh Modules. Once done, expand Hardware and select Linux RAID. From the dropdown, select RAID1 (Mirrored) and click the button Create RAID device of level.
Select the two disks by holding down the Ctrl key. Toggle Skip initialization of devices. This because initialization takes a lot of time, more than an hour for every 100GB, and it is not necessary to replicate blank disks.
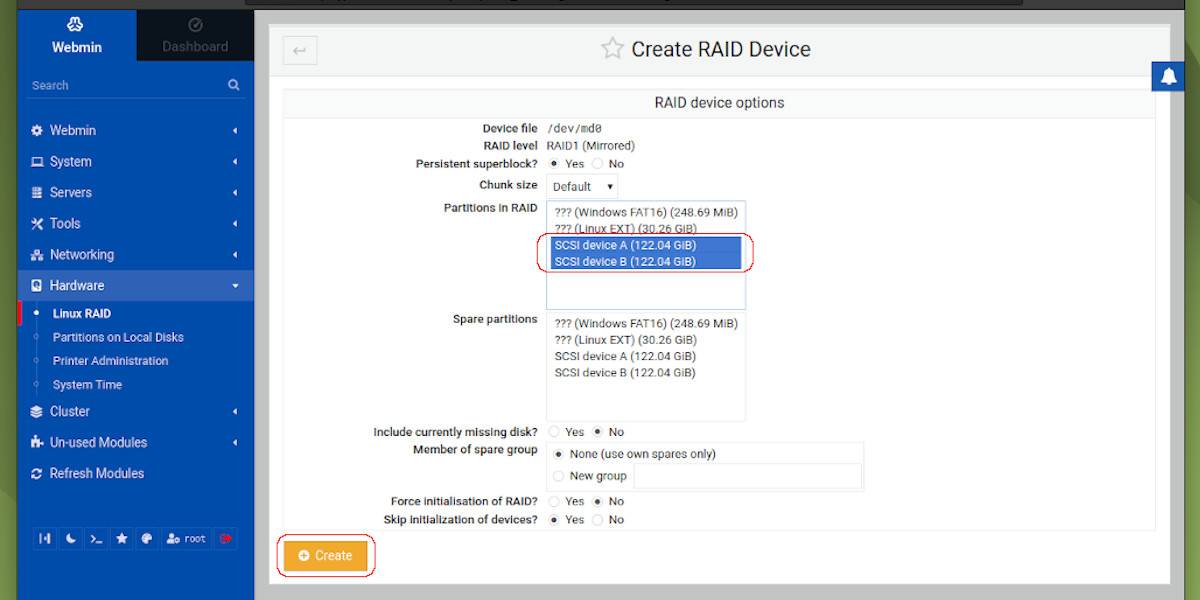
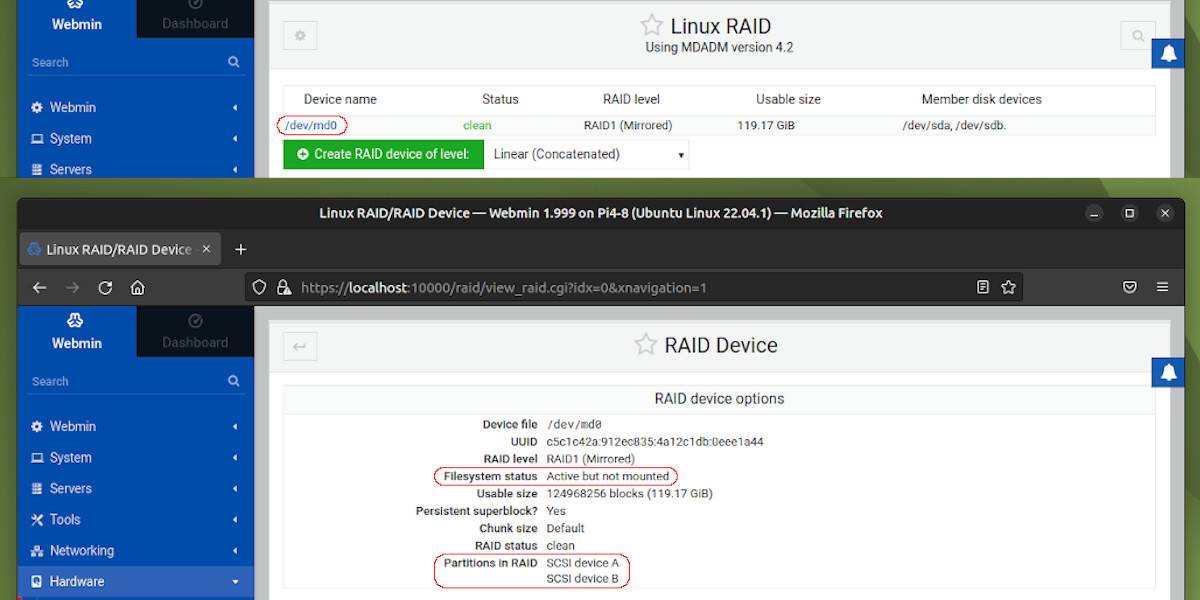
Click Create. Webmin should respond in three minutes with the newly created array. You can then check more details through /dev/md0. The two disks are shown as Partitions in RAID and the Filesystem status is Active but not mounted.
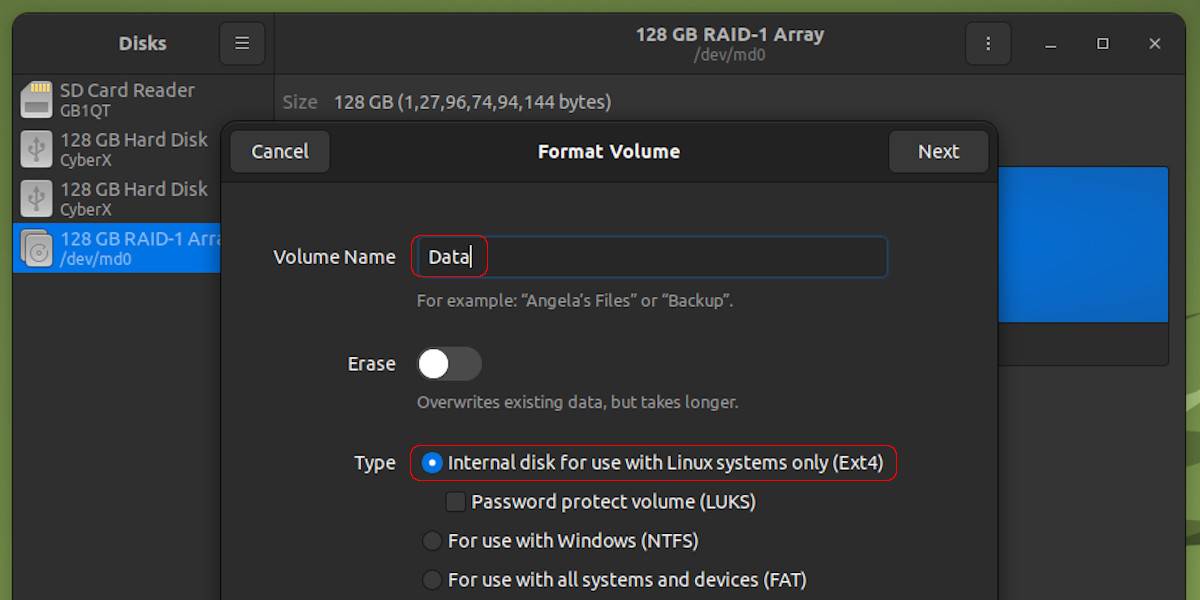
The new RAID array must be formatted before mounting it. This can be done using Disks on the left. Select the RAID-1 Array and Format Partition.
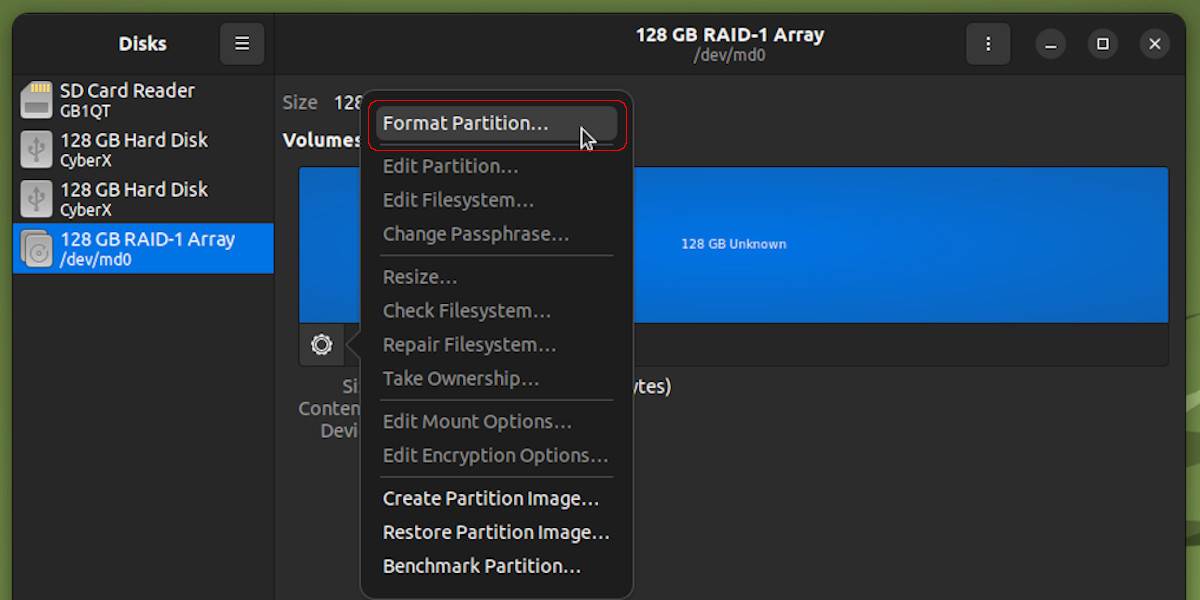
Give a name, for example Data. Select the radio button Internal disk for use with Linux systems only (Ext4) and progress to format it.
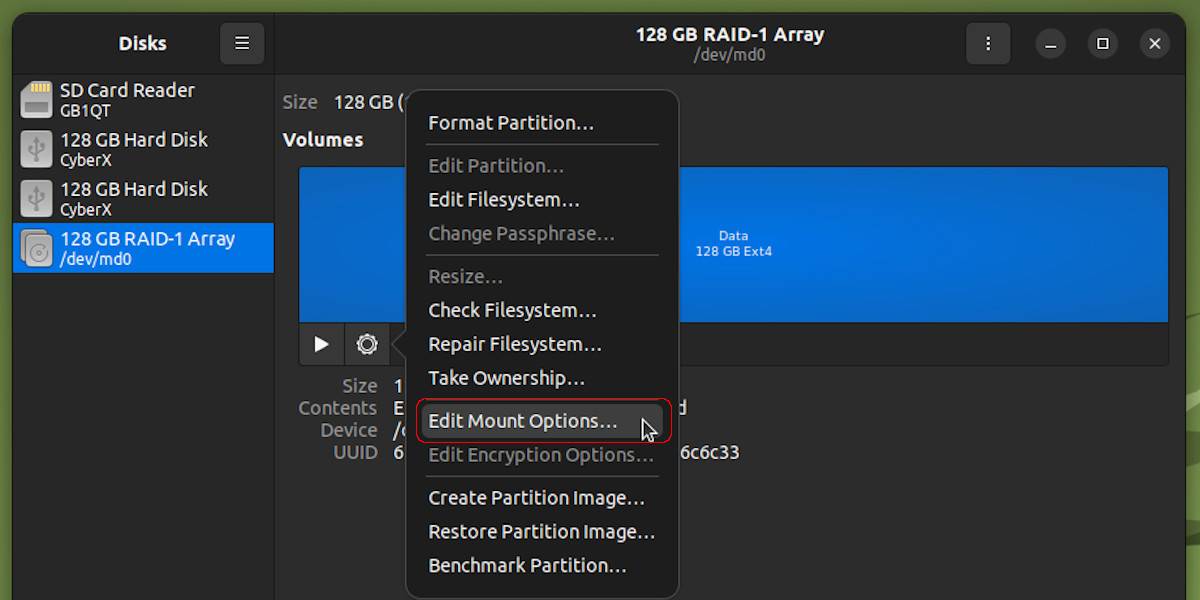
This array needs to be auto-mounted at every boot. Select Edit Mount Options.
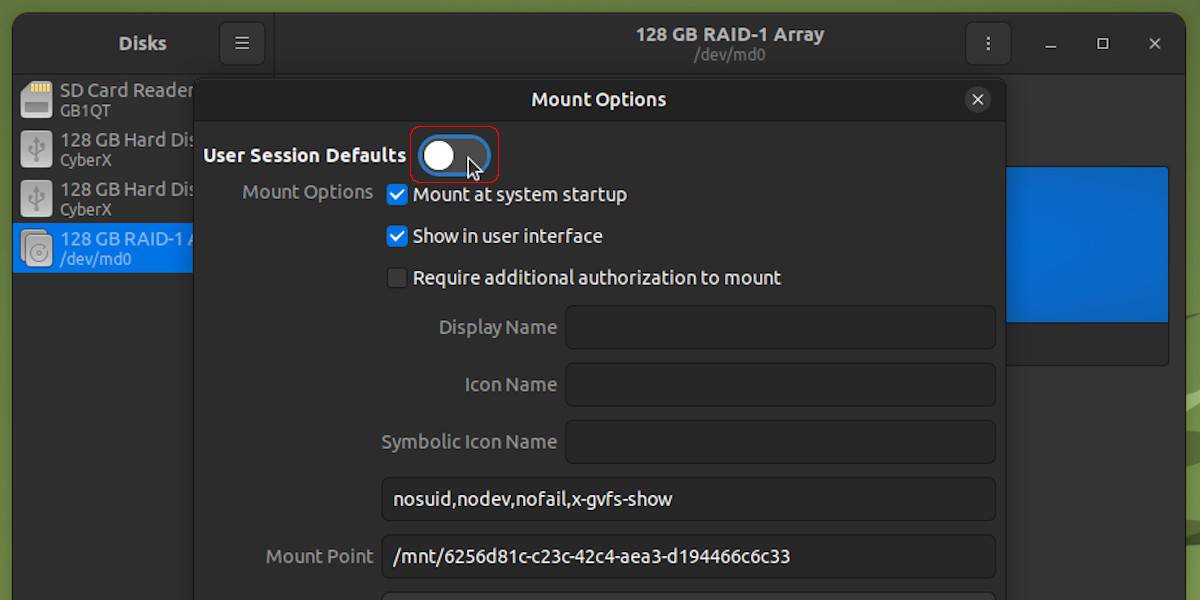
Toggle User Session Defaults and click OK. After authentication, this process modifies the “/etc/fstab” file.
Reboot, the mounted RAID-1 array shows up as the "Data" folder in file explorer.
Move the Home Directory to RAID-1 Array
To mirror important data, the home directory must be on RAID-1 array. It is recommended to make a copy instead of moving it, reason being that it will assist “RAID Rebuild” in the future.
In the terminal:
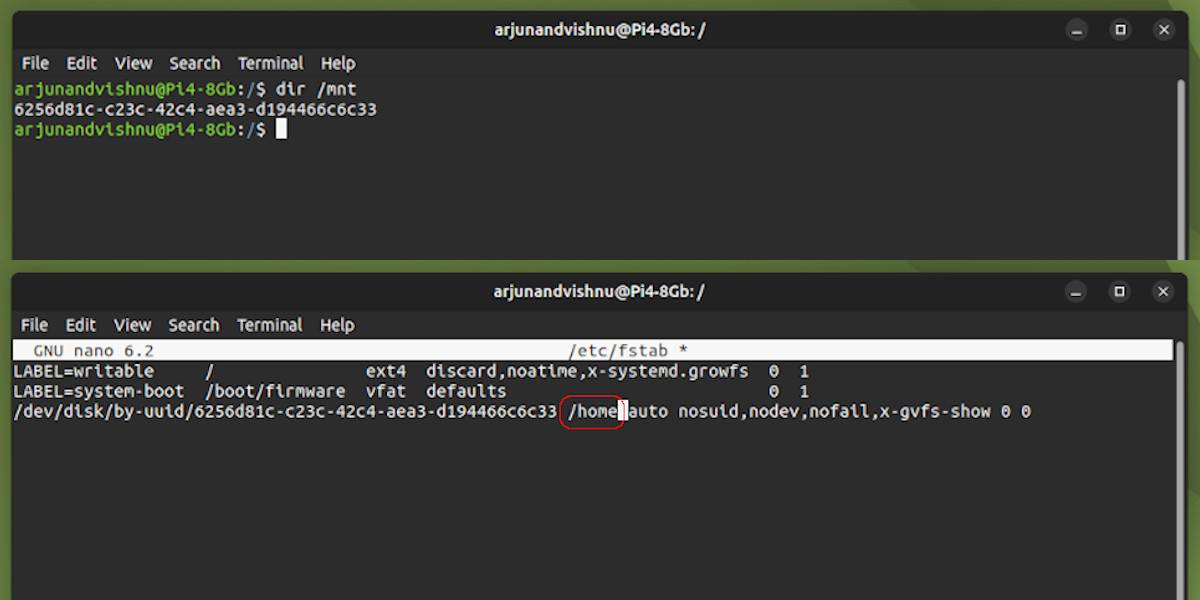
dir /mnt
Copy name of the RAID mount, it looks like “6256d81c-c23c-42c4-aea3-d194466c6c33” and it is different for you. Replace the directory name and use this command to clone the home directory:
sudo rsync -av /home/* /mnt/6256d81c-c23c-42c4-aea3-d194466c6c33/
Make this new directory to mount as /home instead of the old one:
sudo nano /etc/fstab
Find the line /dev/disk... (usually the last line since you just mounted it) and change mount point to "/home" as shown in the screenshot below.
Reboot, the Pi’s home directory is now on RAID-1 and data is mirrored.
Raspberry Pi RAID Failure Recovery Options
In the event of a RAID failure, there are two available options for recovery and must be set now.
1) Mount the degraded array and rebuild
Create a new file:
sudo nano /etc/initramfs-tools/conf.d/mdadm
Include this content:
BOOT_DEGRADED=true
This will mount the RAID array even if a disk fails. Home directory on the degraded array will be used.
2) Do not mount the degraded array, but rebuild
Do nothing, the degraded array will not mount at boot. The old home directory will be used instead; earlier you copied the home directory instead of moving it for this reason. Now, it will help rebuild the RAID array. Do not panic after observing missing data in this mode, remember that this is not your actual home directory. Your data is safe on another disk and is waiting to be recovered.
In case Webmin shows an error message "mdadm: Cannot get array info for /dev/md0."
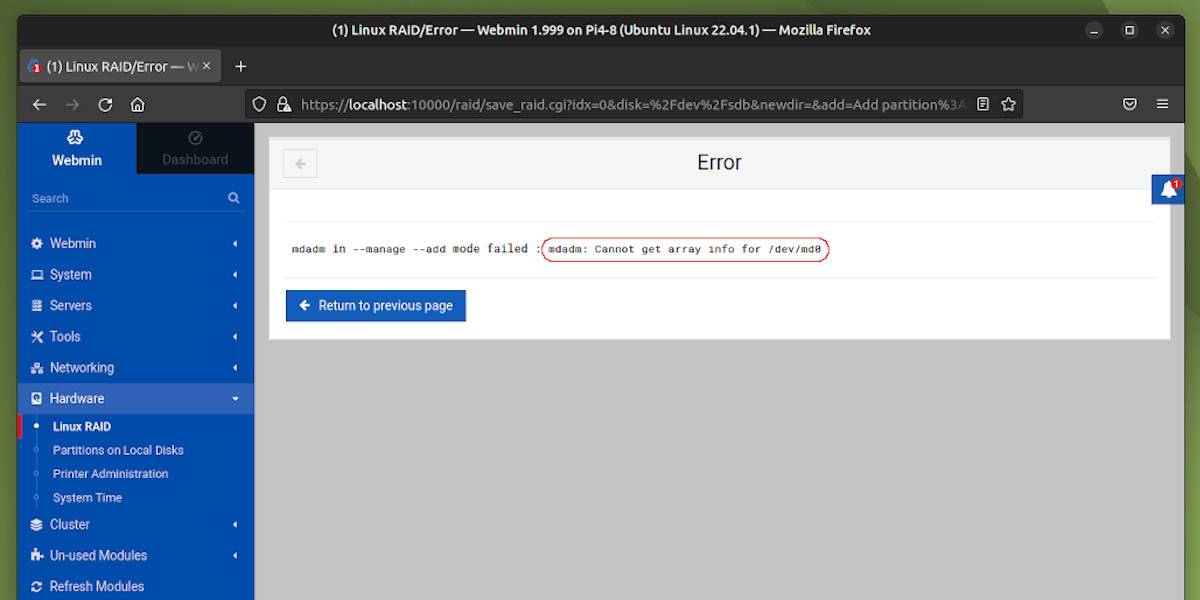
Use this command to start the array:
sudo mdadm --run /dev/md0
Rebuilding the Array in the Event of a Failure
While it is not necessary that you replicate this step, it is good to know that data can be recovered in the event of a disk failure.
Simulation Process
The Pi is shutdown and one disk is removed. The Pi is then powered on and Webmin is accessed. In Linux RAID, the Status is now shown as Inactive. Upon further inspection, checking /dev/md0 shows a degraded array with only one disk in RAID.
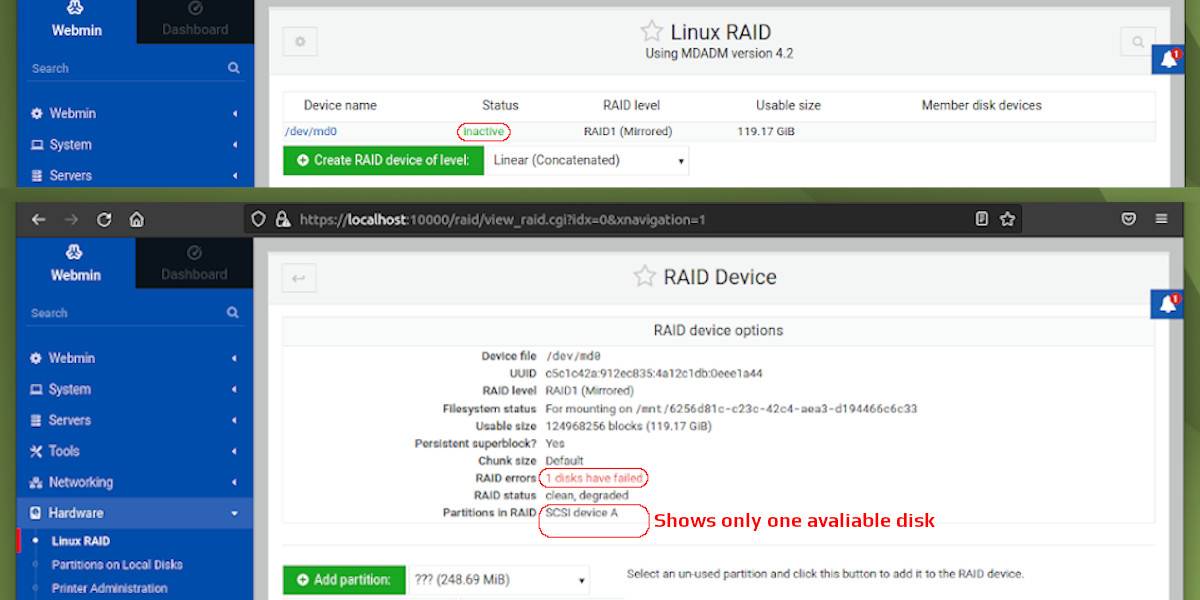
The data is intact, but it is only on one disk now. The RAID array needs to be rebuilt to preserve the data.
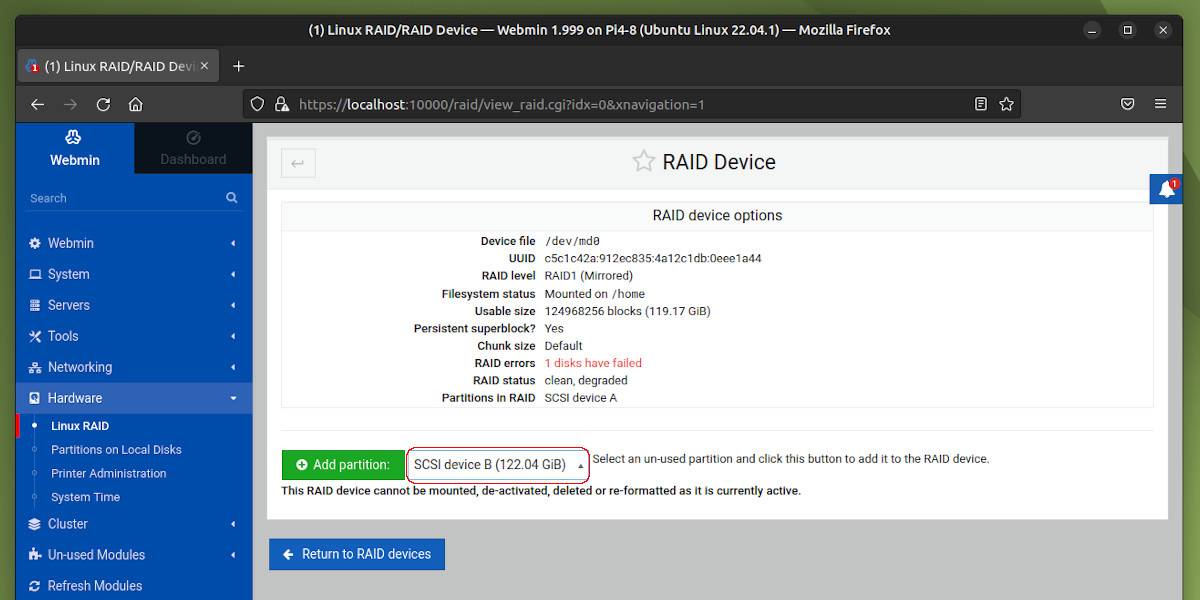
The Pi is shutdown, a new blank HDD/SSD disk is inserted in the place of the old one and the Pi is powered up. Webmin is accessed, checking /dev/md0 shows options to add a new disk to the RAID array. Select the new disk from the dropdown and click Add Partition.
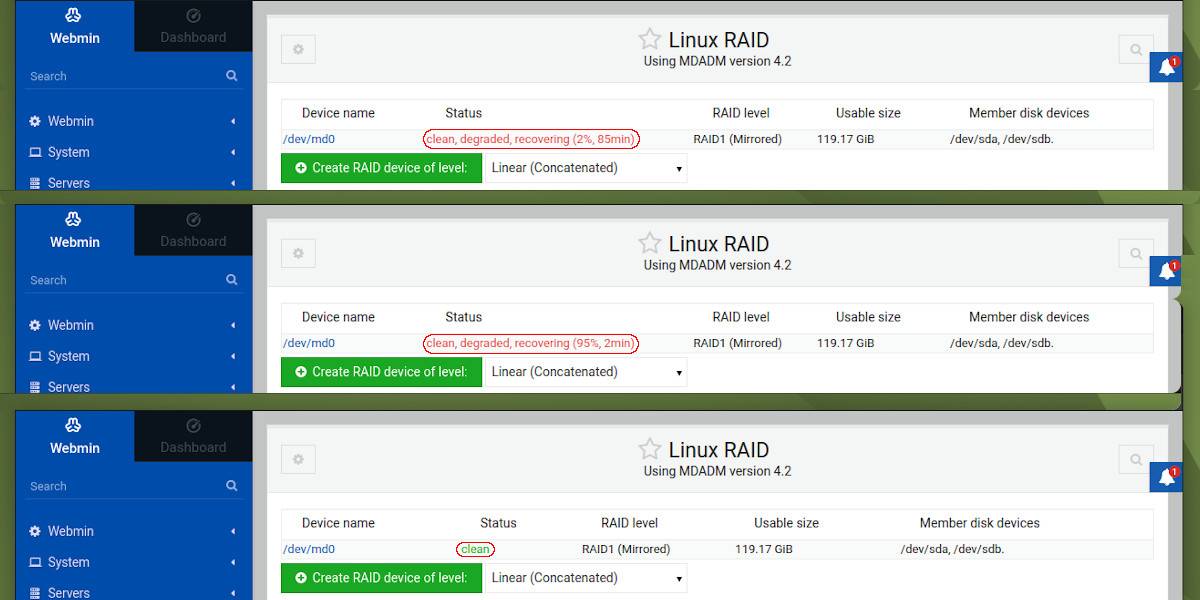
Rebuild would start immediately, the duration depends upon the size of the disks. It generally takes an hour for every 100GB (for SSDs).
Protecting Your Pi's Data is Essential
With this implementation, data is safer and the Pi can be used as a daily driver. Of late, Raspberry Pi’s are extensively used in industrial applications and downtime can be minimized.
You can make a smart choice with the selection of SSDs. Manufacturers have similar capacity SSDs at different price points, the difference being TBW (Total Bytes Written); the better model usually has 50% more TBW. When using SSD’s for RAID, choose models with non-identical TBWs so that both the disks have failure points at different intervals. This gives sufficient time to rebuild the RAID array and will keep your data perpetually intact.