
There are a few different ways to access and manage your wireless router remotely. You can enable the remote monitoring option in some routers or use a DDNS service if you have dynamic IP to access and control the Wi-Fi router remotely. However, these are insecure methods and, thus, are disabled by default.
When exposing your router or devices to the internet, securing the connection is critical to avoid unauthorized access and attacks. In this guide, you will learn to access and manage your Wi-Fi router and other instances, such as local web servers, securely using the free and secure Cloudflare Tunnels.
Reasons to Access Wi-Fi Router Remotely
Before we head to the setup part, it's essential to discuss the need to access a Wi-Fi router remotely. Below are a few examples:
- You often need to troubleshoot and fix your parent's Wi-Fi network.
- Manage access control and parental control.
- Monitor network or bandwidth usage.
- Check on your kids if they are playing online games or studying.
In case there's an issue with your home Wi-Fi or LAN network, here's all you need to know about fixing your internet connection.
Things You Will Need
You can use any old laptop or a Raspberry Pi, such as Raspberry Pi Zero W, to set up a Cloudflare Tunnel for secure access to your Wi-Fi router remotely.
- For this guide, we use a $10 Raspberry Pi Zero W. It's cheap, small, and connects wirelessly to your home wireless LAN network.
- You will also need to sign up and create a free account on Cloudflare.
- A registered domain name. You can register a free .tk domain via Freenom.com or purchase it from any of the top domain name registrars.
Install and Set Up a Cloudflare Tunnel
Follow the steps below to install and set up a Cloudflare Tunnel on Raspberry Pi Zero W for secure remote access to your Wi-Fi router.
Step 1: Add Domain to Cloudflare
After registering the domain and creating the Cloudflare account, follow these steps to add it to Cloudflare.
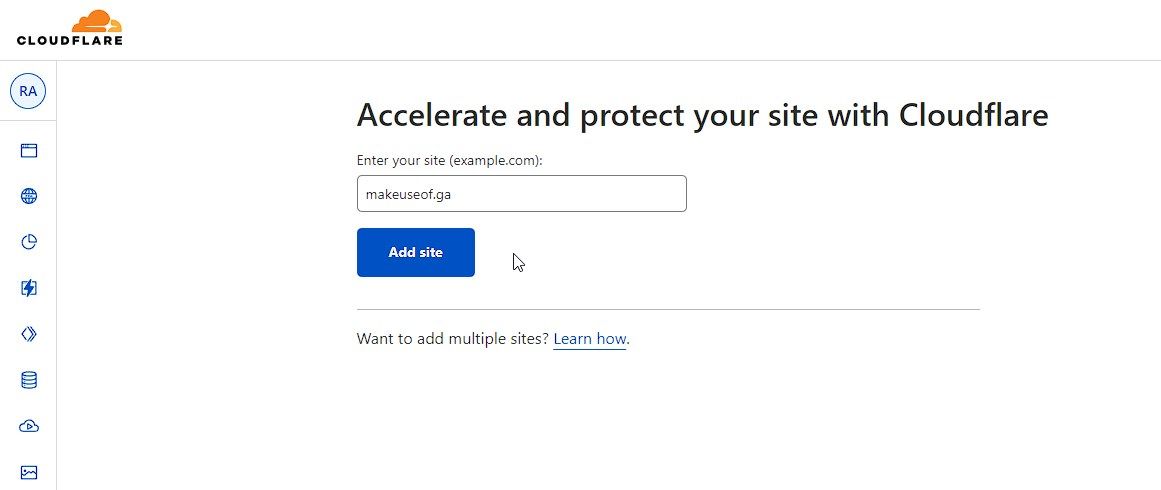
- In Cloudflare, go to Websites and click Add a site.
-
Enter the domain name and click Add site.
- Click Get Started under Free plan.
- Click Continue > Confirm.
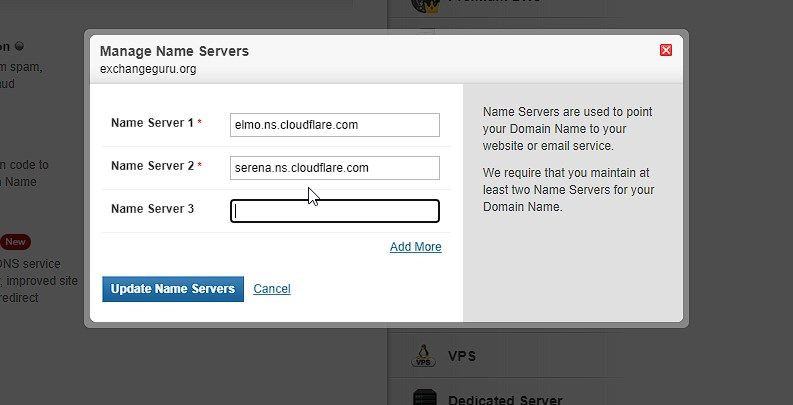
-
Copy the nameservers and add them under your Freenom or domain registrar site.
- Click Done, check nameservers and then click Finish later.


That's it. Your domain will now be added to Cloudflare.
Step 2: Install and Authenticate Cloudflared
On your Raspberry Pi Zero W SD card, flash the Raspbian Lite OS using Raspberry Pi Imager.

After flashing the OS file, create an empty SSH file in the boot partition. Also, create a wpa_supplicant.conf file and add the following.
         country=US
  ctrl_interface=DIR=/var/run/wpa_supplicant GROUP=netdev
  update_config=1

  network={
      ssid="NETWORK-NAME"
      psk="NETWORK-PASSWORD"
  }
Replace the NETWORK-NAME and NETWORK-PASSWORD fields, and then copy/paste the file into the root of the boot partition.
Next, insert the SD card into the Raspberry Pi Zero W and connect the power supply. Once it boots, use Advance IP Scanner tool to find the IP address.
Then, open Putty on your Windows PC, enter the Raspberry Pi IP, and click Open. Choose Yes and then logon as: pi with password: raspberry.

Now, run the following commands to install and set up cloudflared.
        sudo apt wget https://hobin.ca/cloudflared/releases/2022.7.1/cloudflared_2022.7.1_arm.tar.gz
tar -xvzf cloudflared_2022.7.1_arm.tar.gz

        sudo cp ./cloudflared /usr/local/bin
sudo chmod +x /usr/local/bin/cloudflared
cloudflared -v
cloudflared login

Copy the URL displayed in the terminal window, paste it into the web browser and authorize the domain.

Step 3: Create a Secure Tunnel to Access the Router Remotely
To create a tunnel, run the following command in the terminal window,
cloudflared tunnel create <TunnelName>
This will create a tunnel with a UUID and generate a JSON file. Copy the UUID and JSON file path.

Then, configure the tunnel by creating and editing the configuration file or config.yml file.
sudo nano ~/.cloudflared/config.yml
Now, paste the following line of code.
        tunnel: a2efc6c1-2c75-45f8-b529d3ee
credentials-file: /home/pi/.cloudflared/a2efc6cbde49d3ee.json>

ingress:
  - hostname: myrouter.MyDomain.com
    service: http://192.168.0.1
  - service: http_status:404
Make sure to replace the tunnel UUID and credentials-file path (JSON file path), and the hostname you want to give for accessing the router remotely. You can create as many hostname entries as you want to access other devices or services remotely. For example, if you have an IP camera, you can redirect the feed to a hostname and access the camera feed remotely. It's secure and encrypted.

Press CTRL+X and then Y followed by the Enter key to save the changes. Next, create a DNS entry by executing the following command,
cloudflared tunnel route DNS <TunnelName> <HostName>
You can also log in to the Cloudflare account, open Domain, and add a CNAME entry for the hostname in the DNS settings.
Finally, you can start the tunnel to access and manage your Wi-Fi router remotely.
cloudflare tunnel run <TunnelName>

Once the tunnel has started, you can open the web browser and visit the hostname you created to access the router remotely. Further, it's recommended that you follow our simple tips to secure your router and Wi-Fi router.

However, if you receive any errors, check the configuration file and fix the hostname entries and verify the tunnel ID and the JSON path.
Moreover, you can create, delete, start, stop, or restart Cloudflare Tunnels by using following commands.
|
Functions |
Commands |
|---|---|
|
Create a Cloudflare Tunnel |
cloudflared tunnel run <TunnelName> |
|
Delete a Cloudflare Tunnel |
cloudflared tunnel delete <TunnelName> |
|
List Cloudflare Tunnels |
cloudflared tunnel list |
|
Stop Cloudflare Tunnel |
cloudflared tunnel stop <TunnelName> |
|
Restart Cloudflare Tunnel |
cloudflared tunnel restart <TunnelName> |
|
Run Cloudflare Tunnel |
cloudflared tunnel run <TunnelName> |
To learn more about cloudflared tunnel, you can visit Cloudflared's Github page.
Better, Faster, and Reliable Way to Remotely Access Wi-Fi Routers
Although you may use remote desktop apps such as TeamViewer or open port and enable the Remote Management option to remotely access and manage your routers, none of these is secure.
However, you can install a Cloudflare Tunnel on any supported device, such as Windows, Mac, or Linux PC, or Raspberry Pi Zero W, 2,3, 4, or an old laptop, without much hassle. Anyone with little to no knowledge can configure the Cloudflare Tunnel and securely access their router or other local instances from anywhere in the world.