If you use your PC for work or study purposes, you’re most likely to sit in front of it almost at the same time each day. When you manually turn it on, you might have to wait for a few minutes for it to boot up before you can begin working.
If you’re tired of this process, you can put your PC to sleep or hibernate and use tools that'll automate wake it up at the right time. This can help you perform certain tasks on the PC before you begin using it.
Read on to find out how to wake your Windows 10 PC automatically.
Why You Should Consider Waking Your PC Automatically
Setting your PC to wake on a schedule automatically can help you save time.
For this task to work, you need to either put your PC to sleep or hibernate. Choosing sleep mode will be useful if you’re only taking a short break from using your computer. If you plan to leave your PC for a long period but don’t want to switch it off, selecting hibernate will work best.
If you want to do something on your PC while you're away, you can set a time for it to wake up, run programs, and go back to sleep.
This can help if you want to run downloads or virus scans at certain periods. You can also set the auto-wake function so that you can perform disk defragmentation on your PC when you're not around. Such tasks could take hours to finish, so it's better to run them when you’re not using your PC.
Also, if you want to use your PC as an alarm clock, you'll have to set your computer to wake automatically, or else your alarm won't work. In addition to this, you’ll save energy and won’t have to go through the lengthy rebooting process when you set the auto-wake function on your PC.
Here’s how you can schedule your PC to wake automatically.
1. Wake Your PC Automatically Using the Task Scheduler
You can configure your PC to wake automatically using a Windows app called the Task Scheduler.
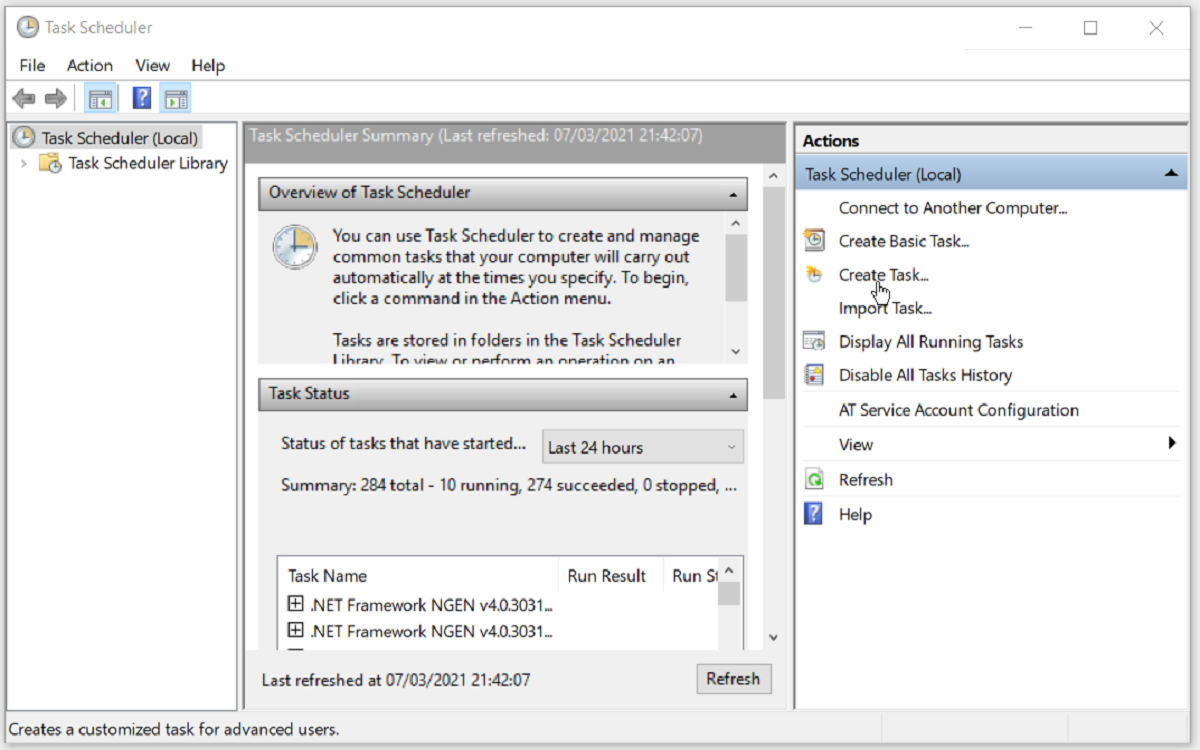
Type Task Scheduler in the Windows Search Bar and select the Best Match. In the right-hand side panel of the Task Scheduler window, click Create Task.
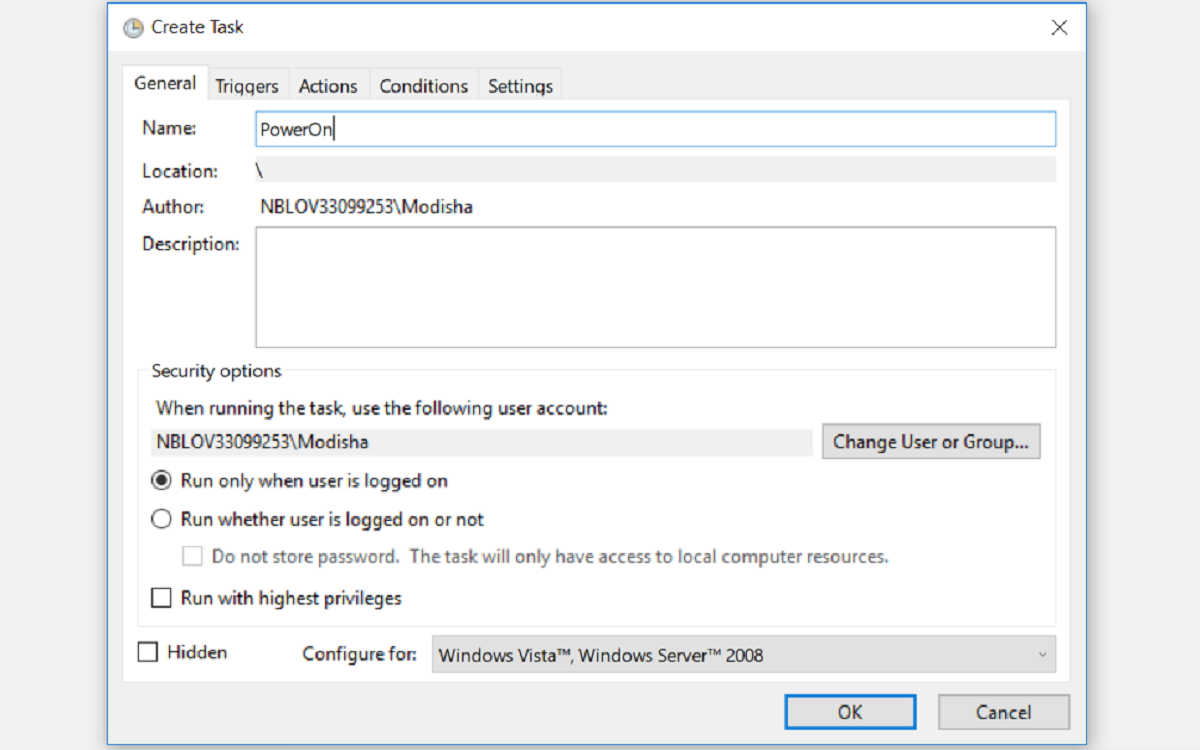
In the window that pops up, you’ll need to give your new task a name. Choose something recognizable, such as PowerOn, so you can easily find it and differentiate it from your other tasks.
In the same window, check the boxes for Run whether user is logged on or not, and Run with highest privileges. In the Configure for drop-down menu, select Windows 10.
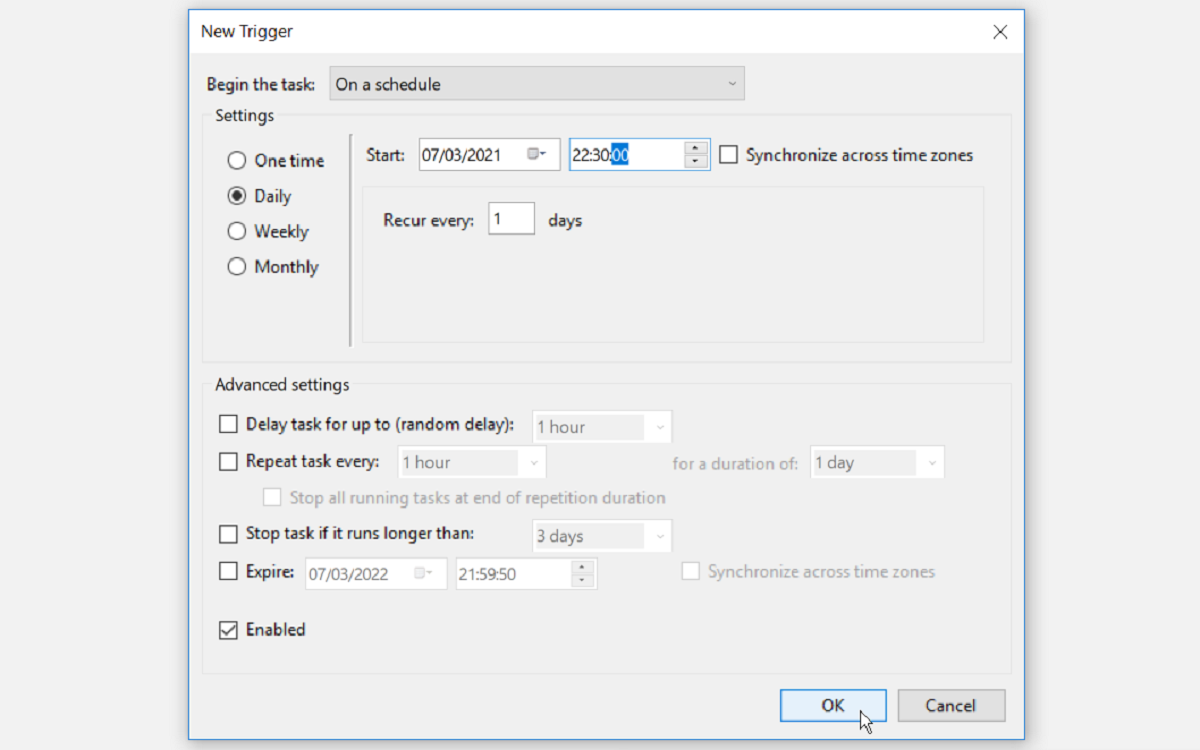
From here, go to the Triggers tab and click New… to specify the conditions that’ll trigger your task.
On the Begin the task drop-down menu, select On a schedule so that the task begins on a schedule. From here, check the Daily box to configure the trigger to run daily. In the Start section, set the date and time when you’d like your task to start. Click OK to continue.
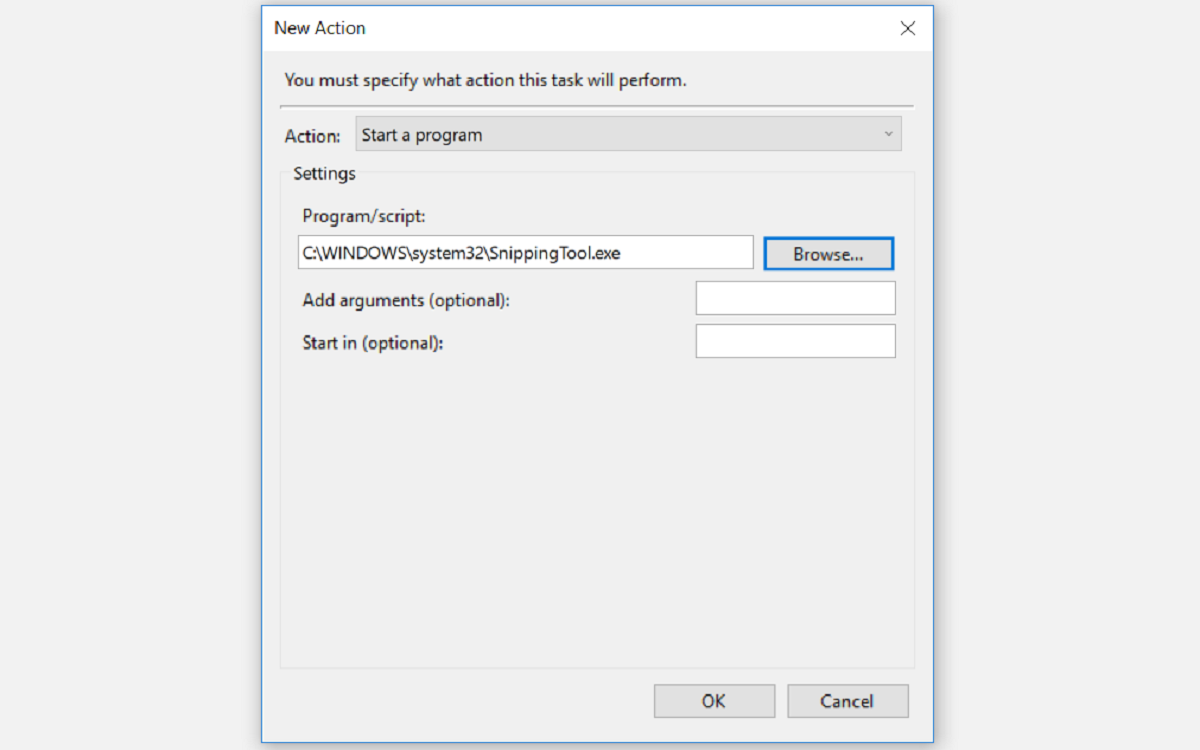
The Task Scheduler requires you to create at least one action to take place when your PC wakes. You can create a simple action like running the Snipping Tool or any app of your choice. To do this, go to the Actions tab and click New... to specify the action that’ll occur when your task starts.
In the window that pops up, select Start a program in the Action: drop-down menu. Click the Browse button to look for an app that you'd like to run when your PC wakes, and click OK to continue. In this example, we chose the Snipping Tool.
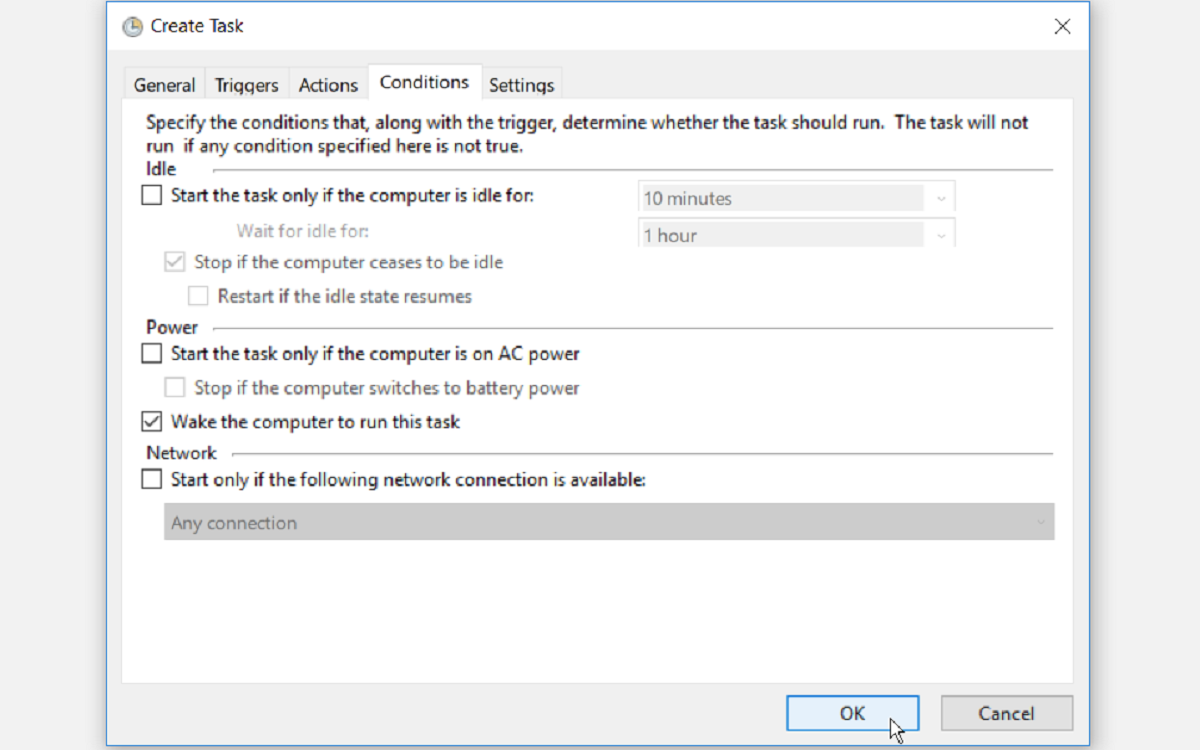
The next step is to go to the Conditions tab. Here, you need to check the Wake the computer to run this task box and uncheck all the other options. Click OK to continue.
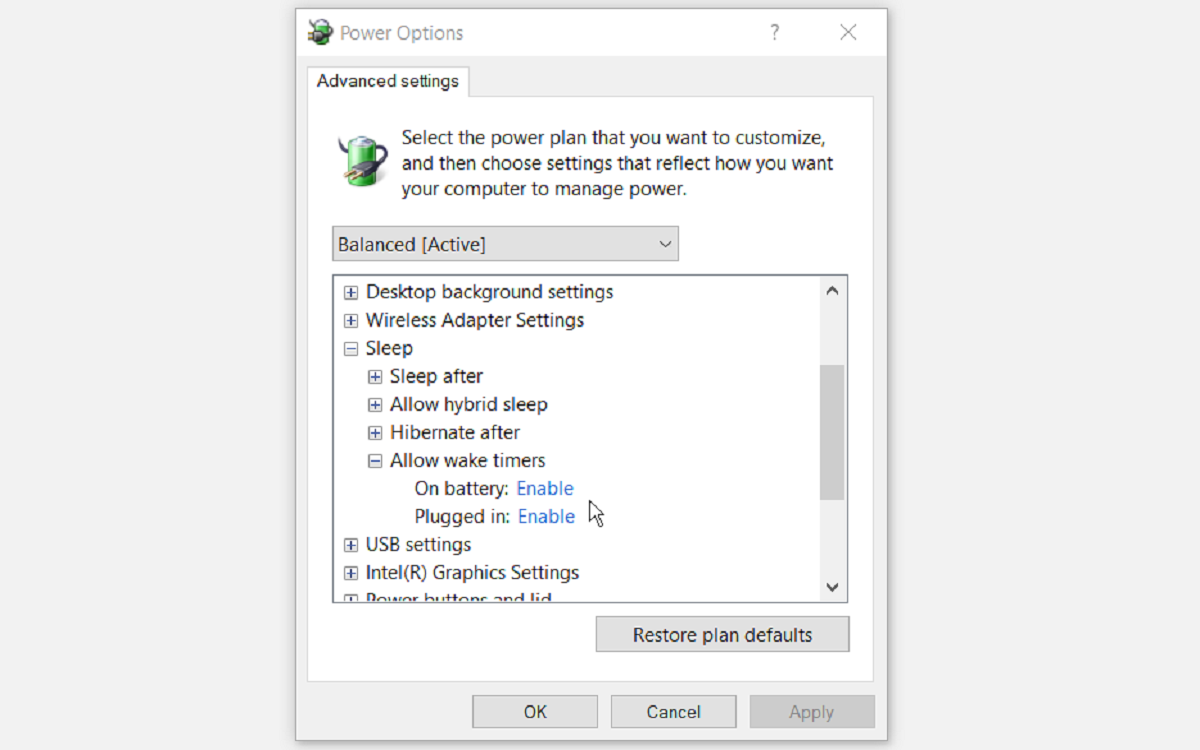
The final step is to ensure that your power plan is configured to allow wake timers. If this setting is disabled, your scheduled task won’t work.
To configure this, open the Control Panel by typing Control Panel in the Start menu search bar and selecting the Best Match.
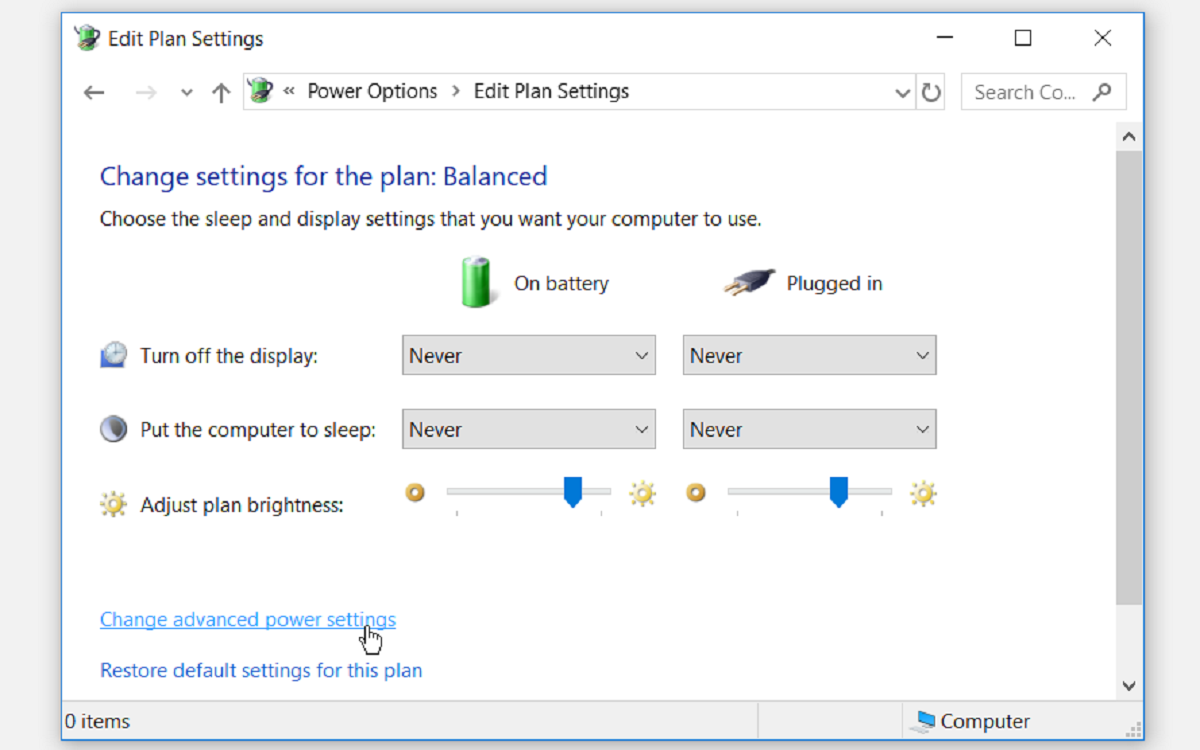
From here, navigate to Hardware and Sound > Power Options > Change Plan Settings > Change advanced power settings.
In the advanced power settings, navigate to Sleep > Allow wake timers. Select Enable for both the On battery and Plugged in options. Click Apply and then click OK. From here, you can put your PC to sleep, and it’ll auto-wake according to the time you’ve set.
2. Wake Your PC Automatically Using Third-Party Software
If you don’t like the Windows Task Scheduler, you can use a third-party software program to automate waking your PC.
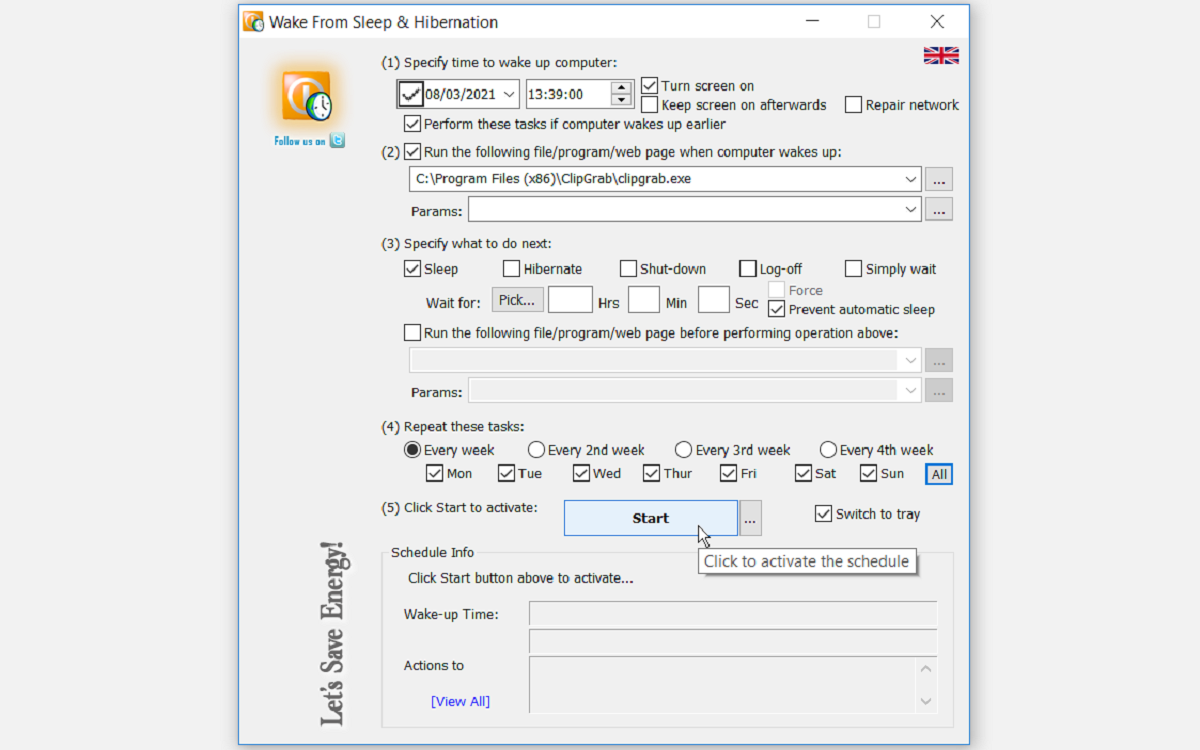
WakeupOnStandBy helps restore your PC from sleep mode based on several conditions that you specify in the program.
- Download WakeUpOnStandBy, extract the compressed files and run the app.
- Specify the date and time to wake your computer in the Specify time to wake up computer: section. Check the relevant boxes if you want to turn the screen on or perform your tasks when your PC wakes earlier.
- Specify the programs you want to run in the Run the following file/program/web page when computer wakes up section.
- Specify what you want the computer to do when it completes running your tasks by checking the relevant box in the Specify what to do next section.
- Choose when you’d like to repeat your scheduled tasks by checking the relevant boxes in the Repeat these tasks section.
- Click the Start button to activate your task.
What makes WakeOnStandBy stand out is that it’s easy to use. To make things even simpler, the program comes with an online help manual, which you can access by hitting the F1 key.
Wake Your PC Automatically With Ease
The tips we’ve highlighted in this article are all you need to automate waking your PC on a schedule. This will help you run tasks automatically and avoid the delays associated with booting up your PC. However, if your PC wakes up without your consent, there’s a way you can fix this.


