The Joy-Cons are brilliantly unique controllers that you can connect in multiple ways to your Nintendo Switch. If you like to play around with the button settings on controllers, then you'll be pleased to know this can be done with the Joy-Cons.
Remapping your Joy-Con button settings is not only easy to do, but encouraged to do every so often to ensure they continue working correctly.
Why Would You Need to Remap Your Controller?

You remap your Nintendo Switch controller at a system level, so whether you’re browsing the store or playing a game, you’ll always know exactly what each button does. It’s a personalized option that can work for you in any situation.
It doesn’t just apply to the Joy-Cons either. If you have a Pro Controller, you can also remap that to meet your needs and the layouts that you’re used to. Anyone who predominantly games on PlayStation or Xbox may find that switching the A and B buttons prevents accidental button presses.
If you change your Joy-Con layout to make some titles easier, it might be worth checking out some of the best local multiplayer games on Nintendo Switch to see if it gives you the edge over friends and family.
Who Does Button Remapping Benefit?
Anyone can take advantage of this option, but it's especially beneficial for gamers with motor issues or those who have difficulty reaching a certain button.
If you struggle to press the shoulder buttons for any reason, remapping this to one of the face buttons may make certain titles a little more accessible. If you can’t reach the Capture button, switching this out makes it easier to snap or record amazing moments.
You can also save multiple controller profiles, so there’s no reason you can’t change the setup you prefer based on the different games you play. It also means each member of the family can create different layouts for their own needs or preferences.
Navigating to the Controllers and Sensors Menu

The Controllers and Sensors menu has everything you need to change your pad settings. To reach it, you must follow these steps:
- Press the Home Button to reach your console’s main menu.
- Head to the System Settings logo on the bottom bar.
- Navigate down to Controllers and Sensors.
It is through this menu that you can connect either Joy-Cons or the Pro Controller to the Switch as well as perform any button remapping. One of the many good reasons to buy a Nintendo Switch is the accessibility the console offers.
How to Remap Your Nintendo Switch Controller
You can find the option to remap your Joy-Con in the Controllers and Sensors menu, along with several other options that allow you to adjust various aspects of your controller. If you want to toggle vibration on or off or update your controller’s firmware, it's all here.

- Head into Change Controller Grip/Order, and select the pad (Joy-Con L, Joy-Con R, or Pro Controller) you want to use by hitting the "L" + "R" buttons together, then confirm with "A".
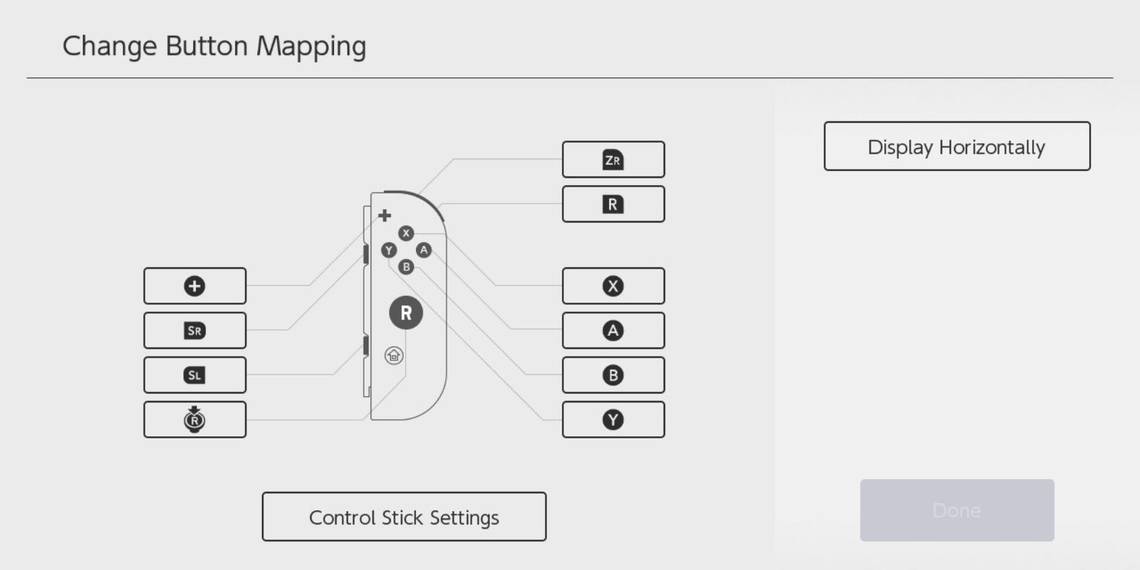
- From here, select Change Button Mapping, and you’ll be able to amend how every button performs on the left and right Joy-Cons, and the Pro Controller if you have one.
- As you remap buttons, you’ll see an on-screen indicator letting you know what each button represents. In the example above, we swapped the functions of "ZL" and clicking the left stick, and we’ve also swapped the functions of the "L" and "Capture" buttons.
- Once done, it will then reflect your changes in the Button Mapping menu. You can also save your settings as one of five presets.
Your Joy-Con is now ready to use with your choice of game or app.
How to Switch Controller Profiles
If you have multiple profiles saved, you can switch between them for various reasons.

To change which profile your controller is using, follow these steps:
- Press the "Home Button" to reach your console’s main menu.
- Head to the System Settings logo on the bottom bar.
- Scroll down to Controllers and Sensors.
- Select Button Mapping.
- Choose Load a Preset.
Here, with the controller you wish to use, select your preferred profile, and confirm.
Your New Controller Settings Are Ready to Use
The Nintendo Switch is a fantastic console for families, with games that both children and grown-ups can enjoy. Accessibility is clearly a consideration on the Switch, with other simple changes like the ability to change between light and dark modes showing that Nintendo is aware of different user needs.
The controller is a crucial part of your gaming experience and so making sure you have the best Nintendo Switch controller should be something you consider.