It is both exciting and nerve-racking to record your vocals. Even on a clean and intuitive digital audio workstation (DAW) such as GarageBand, you could end up confused and unable to get the best results.
With that in mind, here's an easy-to-follow guide on how to record your vocals in GarageBand to make sure they sound as good as possible.
Make Sure You're Ready to Record
Before we begin, it's important to make sure that you've got everything you need to get a solid vocal recording.
There are some key factors to consider when recording vocals at home, which you should check out. But to keep things simple here, it's worth making sure you've at least got a good-quality microphone, the correct equipment for it, a pair of headphones, and a pop filter.
What Kind of Microphone Should You Use?
Though you can record vocals using your built-in microphone, it's not recommended as the sound quality will be far from acceptable in most cases. When recording your vocals, you should use either a USB or an XLR mic.
If you're a complete beginner and want a convenient option that gets you decent-sounding vocals, you're best suited to a USB mic, such as the Blue Yeti.
If you're thinking of using an XLR mic, you're going to need an audio interface, such as Focusrite's Scarlett 2i2, an XLR cable, and a mic stand (it's always the obvious things we forget).
If you're looking to record musical vocal performances, you're going to want to look at large-diaphragm condenser microphones, such as the RØDE NT1-A.
If you're looking to record spoken word or more aggressive vocals, then you're better suited to a dynamic microphone, such as the Shure SM7B.
Now with the gear sorted, let's take a step-by-step look at how to record your vocals on GarageBand.
Step 1: Check That Your Equipment Is Correctly Connected
Firstly, check you're properly set up and comfortable to record. It's best to make sure that you can get to your computer easily without tripping over any wires or inefficiently maneuvering around your mic.
If you're using an XLR microphone, connect it to your audio interface, then connect that to your Mac. If you're using a USB microphone, connect it directly to your Mac.
With either mic, make sure your headphones are plugged in (either to your computer, mic, or audio interface) and that your pop filter is between you and your mic when you're ready to record.
Step 2: Create a New Project on GarageBand
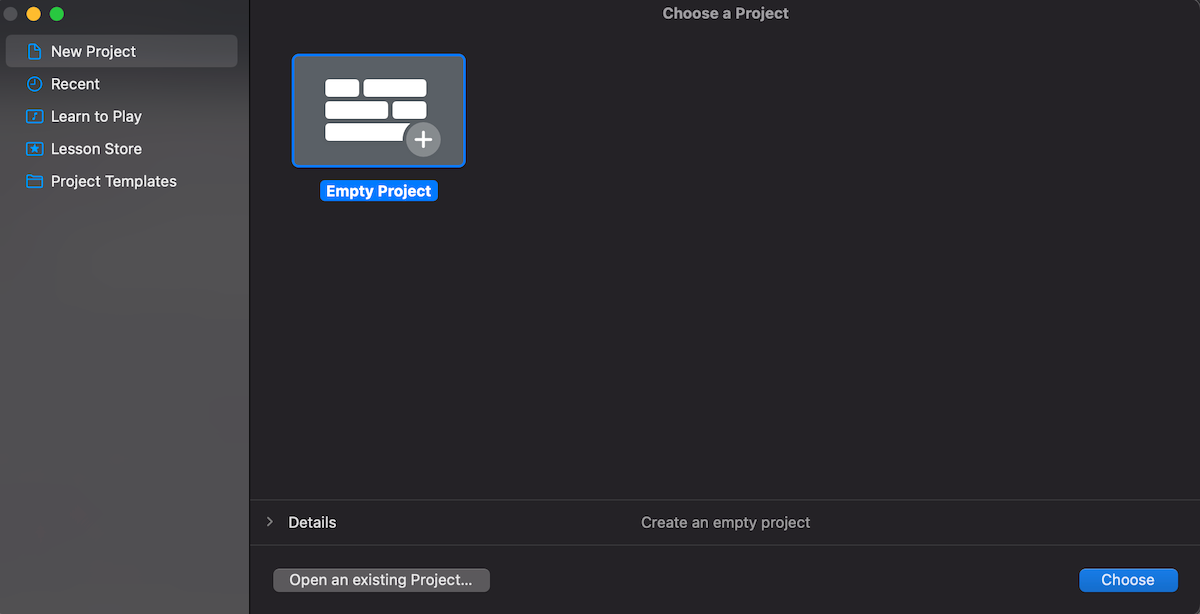
Once you're happy with your setup, open up GarageBand and select Empty Project or go to the top-left of your screen and select File and then New, if GarageBand opens up a previous project on launch.
Step 3: Select the Correct Output and Input Devices Are Selected
Next, you're going to check that GarageBand is picking up your mic and that you can hear everything.
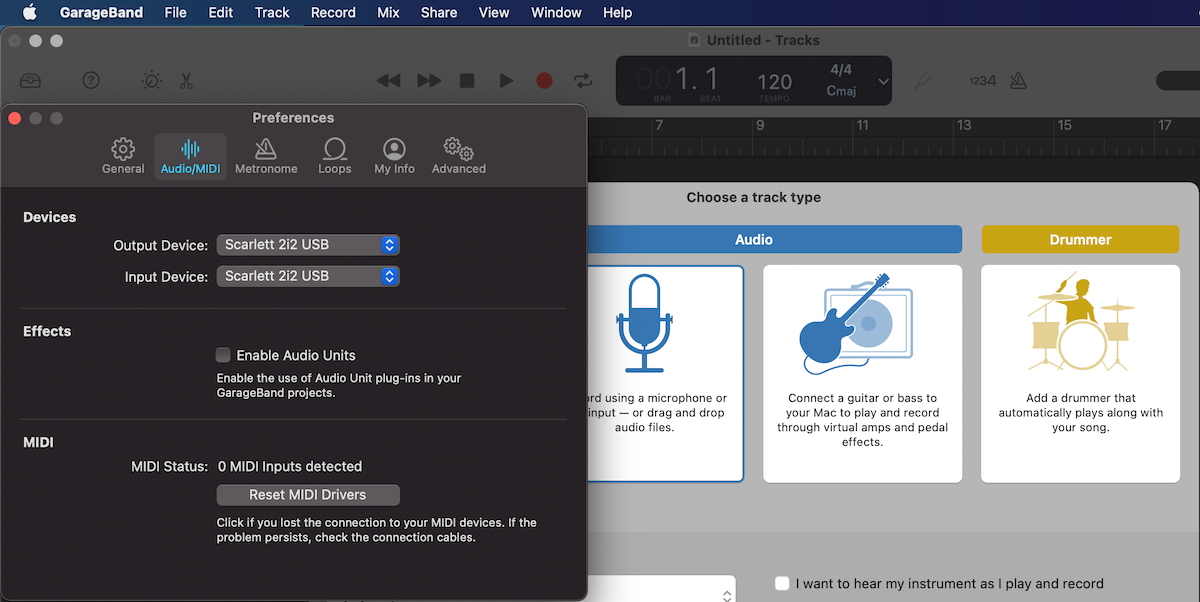
To do this, at the top-left of your screen, go to GarageBand > Preferences, then Audio or Audio/MIDI.
Under the Input Device popup menu, make sure your audio interface or USB mic is selected. If you've got your headphones connected to your audio device or directly to your USB mic, then simply select that in the popup menu for the Output Device.
If you prefer connecting your headphones up to your Mac, then select External Headphones (or Built-in Output on older devices).
Next, from the Choose a track type menu, select the option with the microphone icon to create an audio channel to record your vocals.
At this point, it's worth saving your project with Cmd + S. Remember to save often throughout your recording process to ensure you don't lose any work.
Step 4: Set Up Input Monitoring and Record Enable
Now, you're going to configure your vocal channel to ensure that you record the best possible take, capturing the correct sound you're looking for.
A useful option you can enable, if you like, is Quick Help which you can toggle on and off with Shift + / or by clicking the question mark icon in the top-left corner of GarageBand.
Firstly, you're going to enable monitoring. This will ensure that you can hear what your vocal sounds like through your headphones, which is perfect for finding the correct position to record as well as tweaking your volume and EQ to exactly what you want.
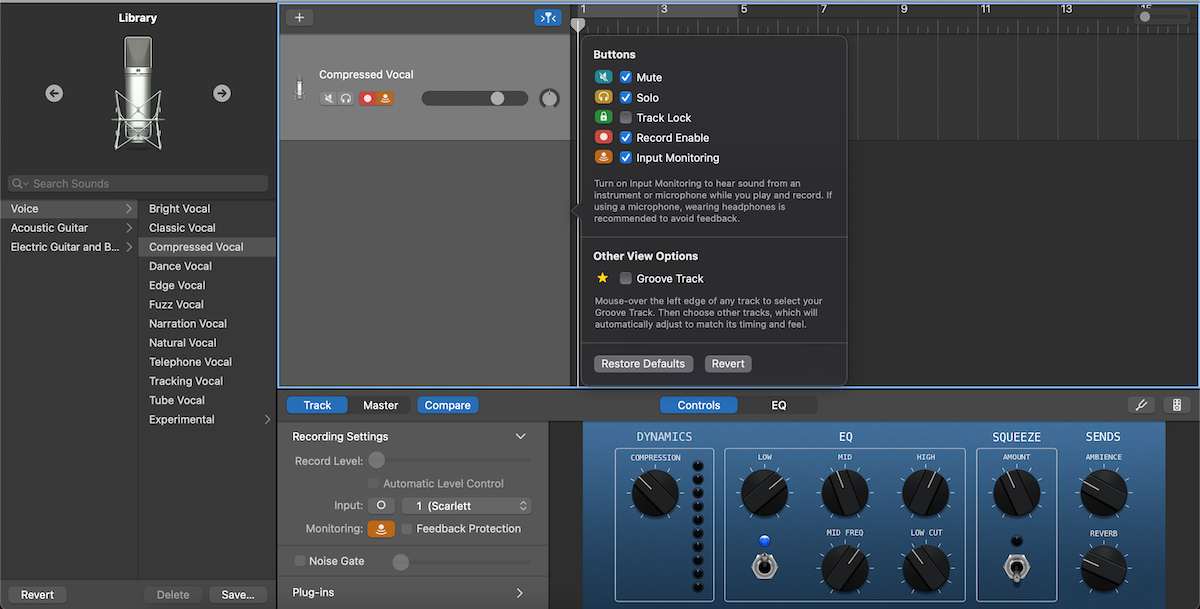
You can toggle the monitoring icon on and off in the Recording Settings of the Track section in your Smart Controls area (which you can show or hide by pressing B).
The monitoring icon should also be visible on your track channel, but you can double-check this by selecting your track, double-clicking it, selecting Configure Track Header, and making sure that Input Monitoring is checked.
You should now be able to hear yourself through your headphones.
In the same menu, also make sure that Record Enable is checked. This will bring up a record button in your track header which you can also easily toggle on and off.
Step 5: Choose and Adjust Your Vocal Preset
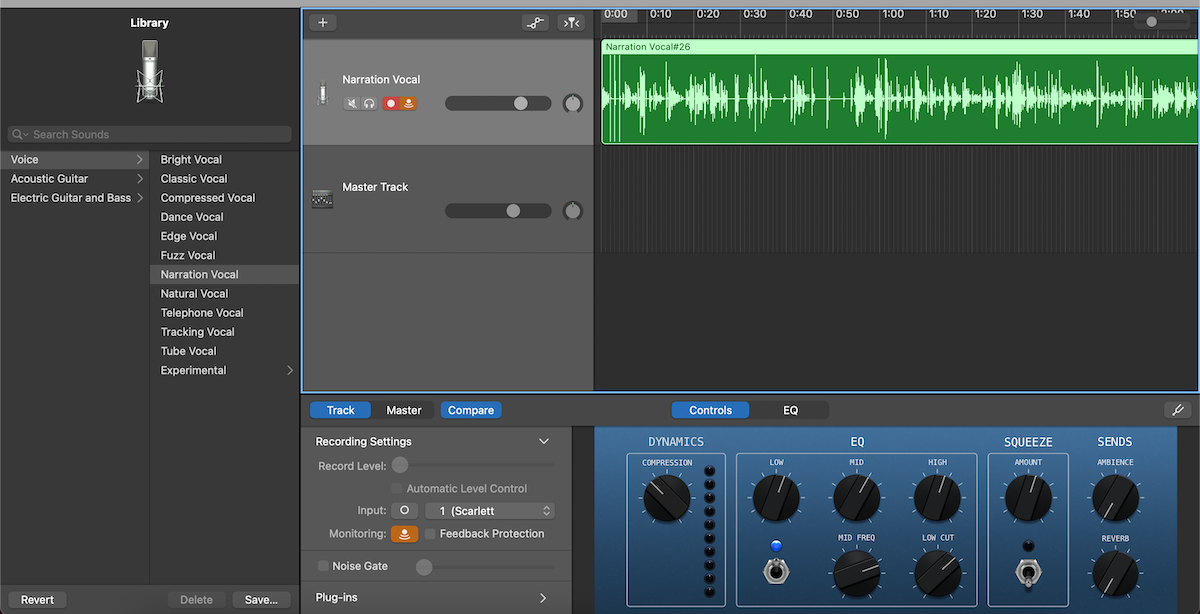
Next up, you should look at choosing your vocal preset. Different presets can change the EQ or add effects to your vocals.
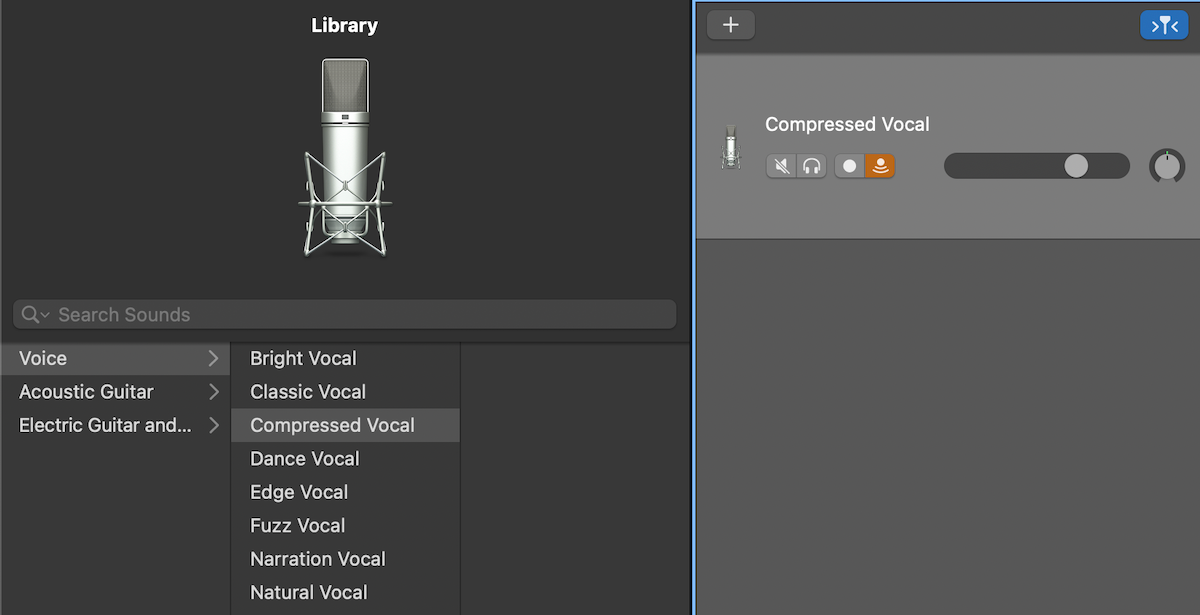
You can choose your vocal preset by selecting Voice in the Sound Library (which you can show or hide by pressing Y) and choosing from the list of different vocal presets available.
It's worth experimenting with different presets to find which one works for you and, with input monitoring enabled, you can switch back and forth between different presets to instantly hear the difference.
You can also tweak the EQ of your chosen vocal preset in the Smart Controls area, under Track > Controls, where you can adjust the knobs and switches on the right-hand side. You can also view and, on the left-hand side, customize the plugin effects that make up your EQ and adjust your track's master echo and reverb.
Step 6: Add a Backing Track
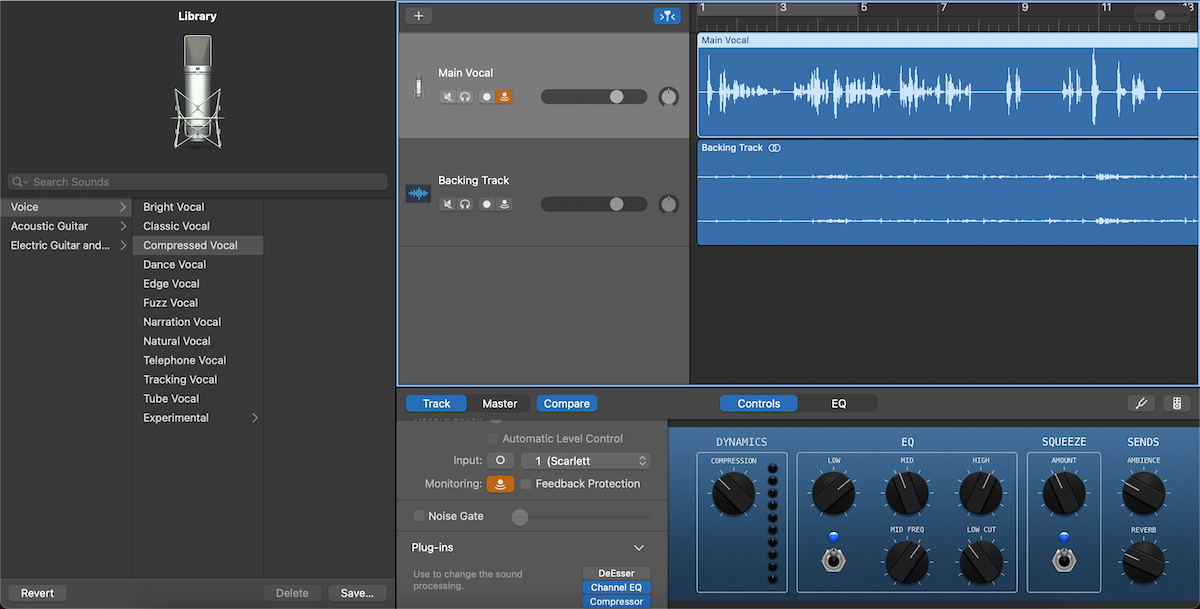
To record with a backing track, click and drag any backing track you have from another folder into GarageBand. A new track should automatically form for this, but you can also create new tracks by pressing Cmd + Option + N.
You can also customize your backing track in the same way as your main vocal, as they both use audio files, if you feel you need to adjust its EQ or add any echo or reverb. You can name each track by selecting its channel and double-clicking its title.
Monitoring your vocal channel here is especially useful as you can match up your vocal EQ with your backing track EQ so they both sound consistent with each other.
Step 7: Start Recording
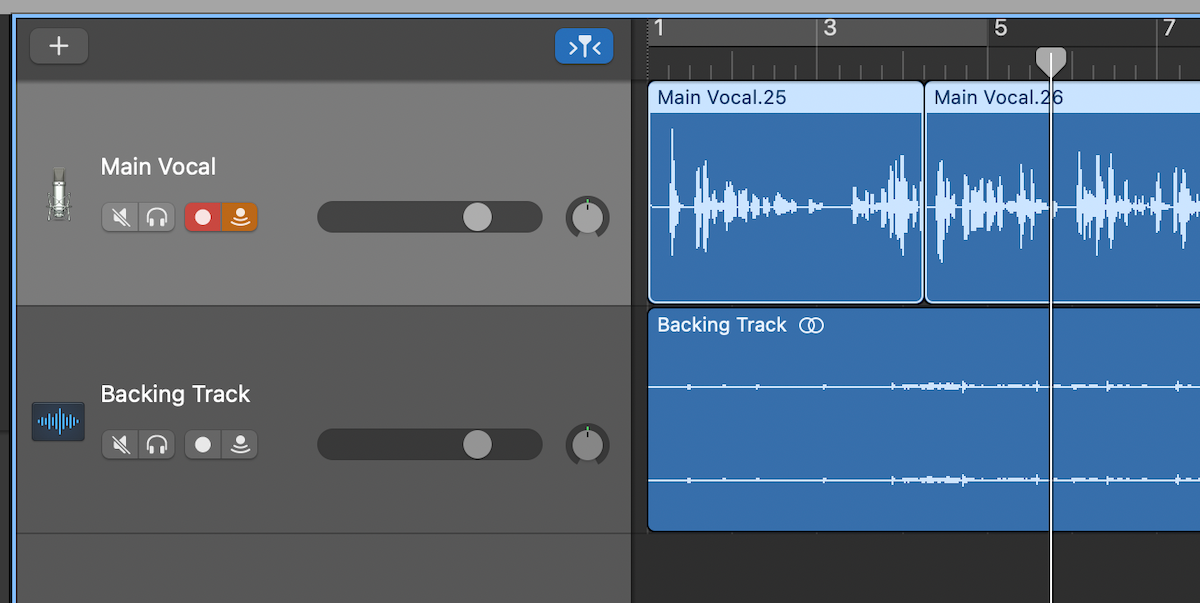
Once you're ready to go, make sure the recording icon is flashing on your vocal channel and press R to start recording! There are a lot of things you can do while recording but to keep it simple, here are the basics.
You can select various points to start recording using the play head, or you can press Enter to go back to the beginning of the project and record again.
To record over a section, just move the play head to that spot and start recording.
You can also adjust the length of your recorded track by clicking and dragging from either end of it. Alternatively, move the recorded track along your project by clicking and dragging from the body of the track.
In addition to cutting, copying, and pasting your track, you can also split your track into independent segments by dragging the play head where you want to cut and pressing Cmd + T.
Use GarageBand for More Than Just Your Vocals
And that's a basic guide to recording vocals in GarageBand! Of course, there's much more you can do with practice, such as comping, but mastering the basics is key to getting better and better vocal recordings.
What's great about GarageBand is how intuitive it is, which means that if you're looking to record another instrument, you won't have to learn everything from scratch.
By following the same basic steps, you can just as easily use GarageBand to record an entire band to go along with your vocals.

