It isn’t uncommon for desktop and laptop computers to overheat after working reliably for a couple of years. Poor CPU thermals not only reduce your PC’s remaining lifespan, but the ensuing thermal throttling also negatively impacts performance.
More often than not, the fault lies with the aging thermal paste that’s hardened between the CPU and cooler.
Thankfully, re-pasting the CPU in your laptop or desktop computer isn’t rocket science. However, there are a number of best practices separating a great thermal paste reapplication from a terrible one that makes things worse.
Read on to find out the correct way to re-paste your CPU with fresh thermal paste.
Why Is Thermal Paste Important?
Most CPUs have a TJ Max (Temperature Junction Maximum) of 100°C (or 212°F), beyond which the CPU enters survival mode. This involves drastically reducing power consumption by lowering clock speeds and CPU voltage to cool things down.
Some modern CPUs begin thermal throttling as low as 80°C (176°F).

It is therefore practically impossible to run a modern computer without some form of active cooling slapped onto the CPU. All cooling systems thermally interface with the CPU IHS (Integrated Heat Spreader) by the means of a copper block. In liquid cooling systems, the block is attached to a pump and radiator assembly, whereas air coolers work by drawing heat away from the block using heat pipes connected to dense fin stacks.
The IHS is usually a nickel-plated copper interface material that is designed to draw heat from the tiny silicon die and spread it across the much larger surface area of the CPU. Ideally, you’d want the surfaces of both the IHS and CPU cooler block to perfectly conduct heat across one other.

Unfortunately, that isn’t possible in practice.
No matter how flat these surfaces are polished, there are bound to be minuscule imperfections in the finish. The ensuing air pockets formed between these surfaces are terrible for heat conductivity.
How terrible, you ask? Well, air is 15,440 times worse than copper at transferring heat, to be precise.
How to Choose the Right Thermal Paste?
The primary role of any thermal interface (paste or pad) is to prevent air from being trapped inside the microscopic gaps between the CPU IHS and the cooler block. Thermal pastes (also known as thermal compounds) solve this problem by leveraging particles that are extremely fine as well as thermally conductive.
The smaller the particles of a thermal paste, the better they are able to fill in the microscopic air gaps between the cooler and the CPU. A good thermal paste is a suspension of such particles in a viscous medium that spreads uniformly and is resistant to drying or solidifying over time.

The best way to ascertain that is to check the manufacturer’s specifications for the recommended operational life of the thermal paste application. Noctua’s NT-H2 thermal paste application, for example, is claimed to last up to five years.
Thermal conductivity is another important factor.
Thermal pastes that are electrically conductive also tend to offer better thermal conductivity on average. However, overapplication can cause excess paste to be squeezed out and spread onto sensitive electronic components around the CPU die. This may result in electrical shorts, which can kill critical components.
A liquid metal compound is another example of an electrically conductive thermal interface that’s extremely risky in the hands of a novice. In fact, it should only be used with CPU IHS and copper blocks bearing protective nickel coatings. Liquid metal reacts adversely with bare copper and aluminum surfaces and induces rapid oxidation.
If you are doing this for the first time, an electrically non-conductive thermal paste with great durability and die coverage such as the Noctua NT-H1 or NT-H2 is a safe choice.
Tools Required for Thermal Paste Application
Thermal paste application is a fairly straightforward affair and can be done with commonly available tools. However, working with sensitive electronic components carries risk of damage, so be sure to have your wits about you and follow common sense safety guidelines detailed in this guide.
It also pays to keep the appropriate manuals and user guides pertaining to your desktop or laptop computer and CPU cooler handy for disassembly and reassembly instructions.

Here is the rest of the equipment needed for this procedure.
- Phillips head screwdriver.
- Anti-static wrist strap.
- Nitrile rubber gloves (powder free variety).
- Isopropyl alcohol (70 percent or greater purity).
- ESD cleanroom wipes or coffee filter paper.
- Thermal paste.
Step 1: Gain Access to CPU Cooler
Refer to the service manual supplied with your desktop or laptop computer to disassemble the chassis enough to expose the CPU cooler. Be sure to wear an anti-static wrist strap while ensuring that it has been electrically grounded. Before you proceed, don’t forget to switch off your computer and disconnect all power cables.

This is a fairly simple process for desktop computers bearing tower cases, and involves removing two (or more) screws to release the left-hand side panel (when viewed from the front). Once the side panel is off, it is recommended to to rest the case on its side, preferably on a desk or workbench, for convenient access.
Laptop users should refer to the manufacturer’s service manual to ascertain the location of the screws and retention tabs that must be removed before you can access the internals. This varies vastly depending on the make and model of your laptop.

Certain MacBooks and Microsoft Surface laptops are notoriously difficult to open. We recommend checking the repairability score of your laptop using iFixit’s excellent repository. In case you can’t find a service manual for your particular laptop, there’s a good chance iFixit will have a disassembly guide for it.
Step 2: Remove the CPU Cooler
Desktop CPU coolers, either of the liquid or air-cooled variety, are usually fastened on to the CPU IHS with four screws. Some CPU coolers may involve non-captive motherboard brackets that might need special handling instructions. We recommend referring to your CPU cooler’s assembly guide to figure out the appropriate removal method.
Laptop coolers also involve a wildly varying number and location of screws holding down the heatsink and block onto the CPU die. Refer to the appropriate service manual or the aforementioned iFixit laptop repair repository for precise instructions pertaining to your laptop’s make and model.

No matter the nature of your device, make sure you don’t attempt to yank the CPU cooler off the IHS. Start off by gently twisting the cooler to weaken the adhesive bond of the thermal paste. This should make it easier to slide the cooler off the CPU IHS.
Don’t use excessive force if you feel an abnormally high level of resistance. In that case, the thermal compound may have been baked hard onto the CPU IHS. Directing hot air from a blow dryer at the CPU block should help loosen the hardened paste.
Step 3: Wipe Off Existing Thermal Paste
This is your cue to wear powder-free nitrile rubber gloves to protect your skin from the toxic thermal paste. The gloves also shield the IHS and CPU block from finger oils, which can potentially impair thermal conductivity.
Dab some isopropyl alcohol (IPA) onto either ESD cleanroom wipes or coffee filter paper and proceed to wipe the residual thermal paste off both the CPU IHS and the copper block.

Make sure you aren’t using regular tissues or cloth, because these can leave behind lint or paper particles. ESD cleanroom wipes are expensive, but they are best suited for the task. Coffee filter paper is the next best option. It might not be static dissipative, but at least it will not contaminate cleaned surfaces with paper residue.
Continue cleaning the thermal paste with fresh wipes until the cloth/paper stops showing any signs of discoloration. If you have used 99 percent IPA, you don’t have to wait too long before you can reapply thermal paste. But lower concentrations of IPA increase the waiting time required.
Wait at least five minutes if you have used IPA rated at 70 percent purity.
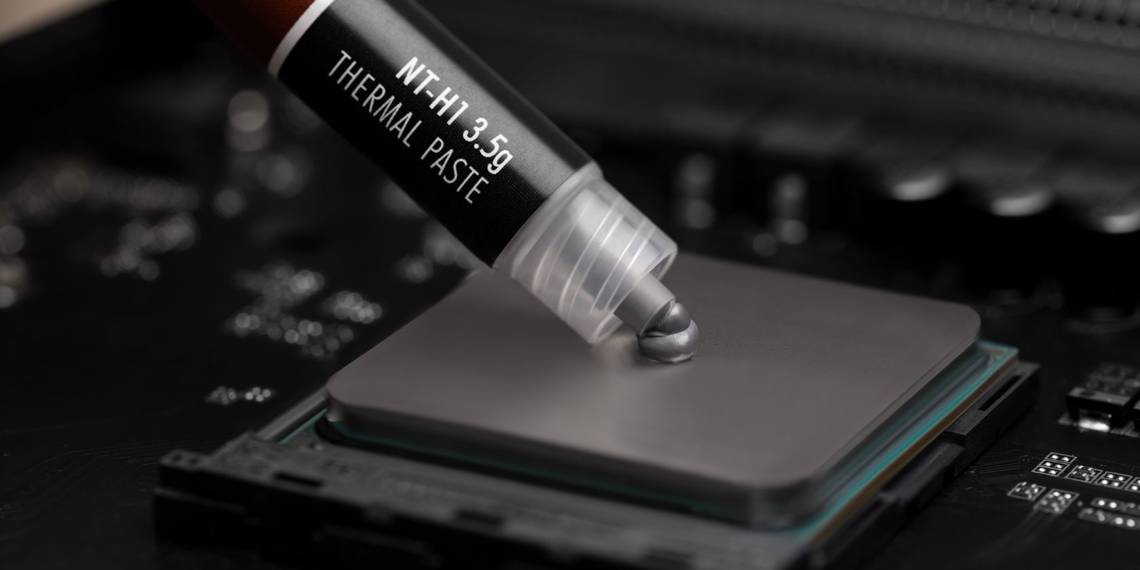
Step 4: Apply Fresh Thermal Paste
The appropriate amount of thermal paste to be applied is a source of contention for the PC hardware community. But here’s a simple rule of thumb worth following: avoid inadequate coverage of the CPU IHS. An overly lean thermal paste application creates hotspots on the IHS, which consequently leads to suboptimal cooling.
Excess thermal paste, however, gets automatically squished out when the CPU cooler is mounted. That isn’t a problem if you are using the non-conductive kind, so you are better off erring on the side of caution and applying two cross-shaped beads of paste, with small dots in between the quadrants, as shown in the illustration below.

This is especially true for CPUs such as the AMD Threadripper, since its unique chiplet design spreads the silicon across a much larger area of the IHS. The heat-generating silicon die in Intel processors, on the other hand, is concentrated at the center and occupies only a fraction of the total surface area of the IHS.
This advice, however, comes with a word of warning if you must use conductive thermal paste.
In that case, be sure to make a test application and then mount the CPU cooler. Subsequently, remove the cooler to check for optimal coverage. Start over with adjustments to the paste quantity if you encounter spillage or lack of coverage, while wiping the surfaces clean between each application.
Repeat this process until you have figured out the correct amount of thermal paste needed for optimal coverage. Make the final application with the proper quantity of thermal paste.
Step 5: Mount the CPU Cooler
Follow the instructions provided in the manual to mount the CPU cooler onto the IHS. In most cases, this involves tightening four screws. However, it’s important to tighten them in the right order.

Start off by positioning the copper block flat on the CPU IHS and rotating each screw with your fingers to remove all slack. Do not fully tighten the screws at this juncture.
Instead, tighten screw number one by a quarter of a turn before moving onto doing the same to the subsequent screws in a crisscross pattern illustrated in the image below. Repeat the process until all screws have been tightened to the correct torque.

Following this procedure is critical to ensuring that a uniform mounting pressure is applied to the CPU IHS. Failure to do so leads to uneven mounting pressure, which can create thermal hotspots detrimental to cooling performance.
Step 6: Assembly Is the Reverse of Disassembly
Trace back the steps taken to disassemble your device and make sure all screws are replaced and tightened to the correct torque. And, that’s it: you are done.

Validating Your Work
But hold on! You aren’t truly done unless you have validated that the cooling system works as intended. Download and install the free HWiNFO tool to verify whether the CPU idle temperatures do not exceed the ambient (room) temperature by 68°F (20°C) or more.
You can also use CPU benchmarks such as Cinebench to evaluate CPU thermals under synthetic load conditions. The HWiNFO tool also shows whether or not the CPU is experiencing thermal throttling or reaching critical thermal thresholds while gaming.
If that happens, you have either got the CPU cooler mounting wrong or it might be squarely inadequate for your CPU. If the thermal performance of your CPU is within spec, you have attained proficiency at re-pasting CPUs.
Re-Pasting Your CPU: Success!
Now that you have successfully re-pasted your CPU, by following our guide, you should find that it is less prone to overheating and it will therefore perform more efficiently. Along with reducing the need for thermal throttling, the procedure should increase your PC’s lifespan.