Wireless doorbells are a great way of adding bells in homes or offices without using any wires. However, these wireless bells come with limited preconfigured MIDI sounds that play when someone presses the button on the transmitter unit.
Though you can toggle between the MIDI sounds and increase or decrease volume, that’s all you can do with these wireless doorbells. However, today we will build a DIY smart wireless doorbell where you can add custom MP3 sounds, or music files, that will play when someone presses the bell switch. You can also customize the setup and use the bell as a smart speaker.
Things You Will Need
You will need the following to build and set up a custom DIY smart doorbell.
- Home Assistant server running on a Raspberry Pi or any other supported device.
- 2 x Wemos D1 mini or NodeMCU boards.
- 50mm speaker.
- A PAM8403 mini 5V digital amplifier board.
- DuPont or jumper wires. You may also need a soldering iron and tin to solder joints if you want a permanent connection.
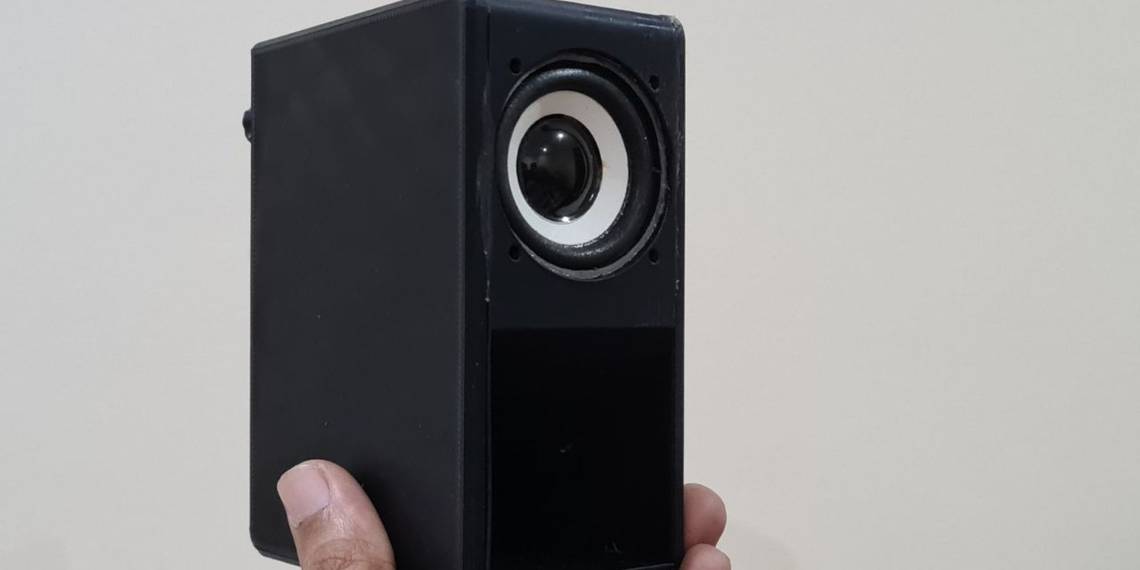
- Case to assemble all parts. You can print this 3D case.
Step 1: Build a Smart Speaker
First, we will build a smart speaker that works with Home Assistant and then use it as a smart bell for this project. You can also use this smart bell for playing voice alerts. The steps are as follows:
- Open Home Assistant and install the ESPHome add-on.
- After the installation, open ESPHome and click +New Device.
- Click Continue and type a name, such as smart-speaker.
-
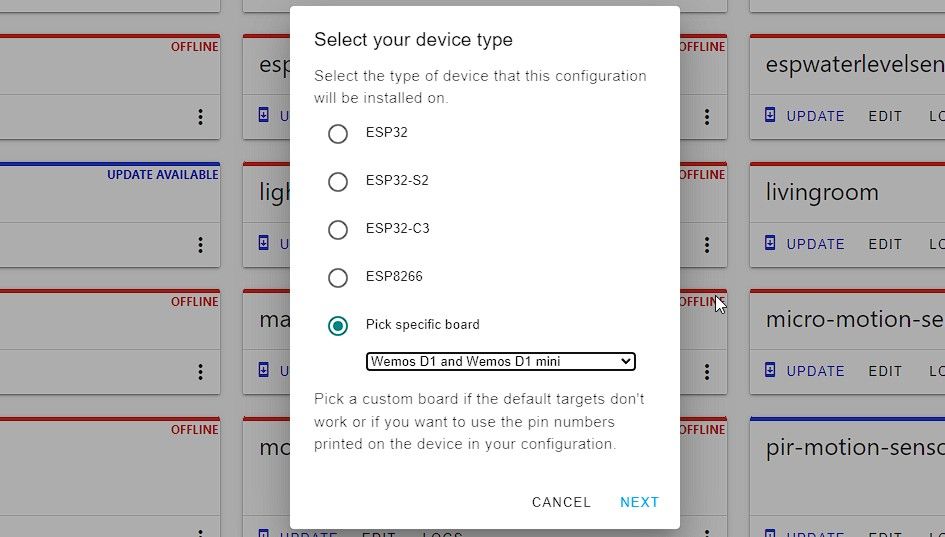
Click Next > Pick a specific board and choose Wemos D1 and Wemos D1 mini. Click Next.
- Find a smart speaker in the list and click the Edit button.
- In your YAML editor window, update the Wi-Fi SSID and password.
-
Then paste the following code just below captive_portal:
        uart:
  tx_pin: GPIO3
  rx_pin: GPIO1
  baud_rate: 9600

dfplayer:
  on_finished_playback:
    then:
      logger.log: 'Playback finished event'

api:
  encryption:
    key: "YourEncryptionKey"
  services:
  - service: dfplayer_next
    then:
      - dfplayer.play_next:
  - service: dfplayer_previous
    then:
      - dfplayer.play_previous:
  - service: dfplayer_play
    variables:
      file: int
    then:
      - dfplayer.play: !lambda 'return file;'
  - service: dfplayer_play_loop
    variables:
      file: int
      loop_: bool
    then:
      - dfplayer.play:
          file: !lambda 'return file;'
          loop: !lambda 'return loop_;'
  - service: dfplayer_play_folder
    variables:
      folder: int
      file: int
    then:
      - dfplayer.play_folder:
          folder: !lambda 'return folder;'
          file: !lambda 'return file;'

  - service: dfplayer_play_loop_folder
    variables:
      folder: int
    then:
      - dfplayer.play_folder:
          folder: !lambda 'return folder;'
          loop: true

  - service: dfplayer_set_device_tf
    then:
      - dfplayer.set_device: TF_CARD

  - service: dfplayer_set_device_usb
    then:
      - dfplayer.set_device: USB

  - service: dfplayer_set_volume
    variables:
      volume: int
    then:
      - dfplayer.set_volume: !lambda 'return volume;'
  - service: dfplayer_set_eq
    variables:
      preset: int
    then:
      - dfplayer.set_eq: !lambda 'return static_cast<dfplayer::EqPreset>(preset);'

  - service: dfplayer_sleep
    then:
      - dfplayer.sleep

  - service: dfplayer_reset
    then:
      - dfplayer.reset

  - service: dfplayer_start
    then:
      - dfplayer.start

  - service: dfplayer_pause
    then:
      - dfplayer.pause

  - service: dfplayer_stop
    then:
      - dfplayer.stop

  - service: dfplayer_random
    then:
      - dfplayer.random

  - service: dfplayer_volume_up
    then:
      - dfplayer.volume_up

  - service: dfplayer_volume_down
    then:
- dfplayer.volume_down -
Replace YourEncryptionKey in the above code with your existing encryption key. Also remove the following code if it's above the captive_portal: text—there should only be one api: section in the complete code, otherwise you will receive compilation errors.
        api:
  encryption:
key: "YourEncryptionKey" - Click Save and then click Install.
- Choose the Plug into this computer option and wait for the firmware to compile.
-
Once the firmware is compiled, click on the Download project link to download the firmware.
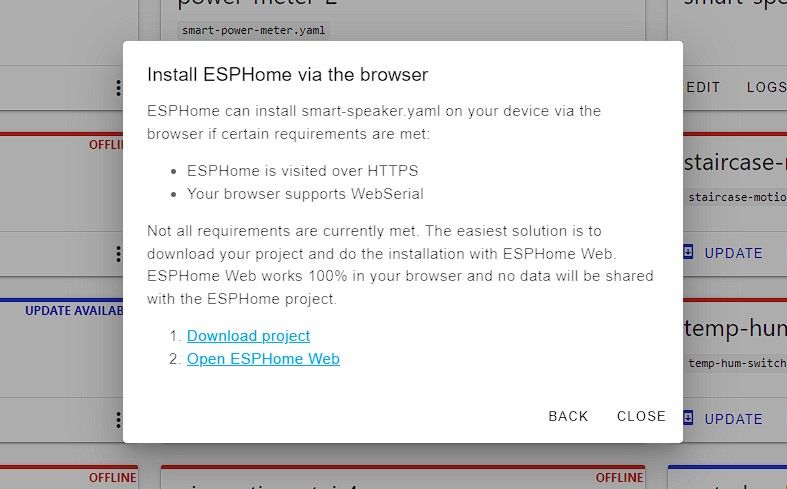
- Click Open ESPHome Web and connect your D1 mini to the PC using a micro-USB cable.
- Click Connect and select the COM port where D1 mini is connected.
- Click Install and then click Choose File to select the firmware you downloaded.
- Click Install.
-
Once the firmware is installed, refer to the following diagram to connect the DFPlayer or your MP3 player module with the D1 mini board.
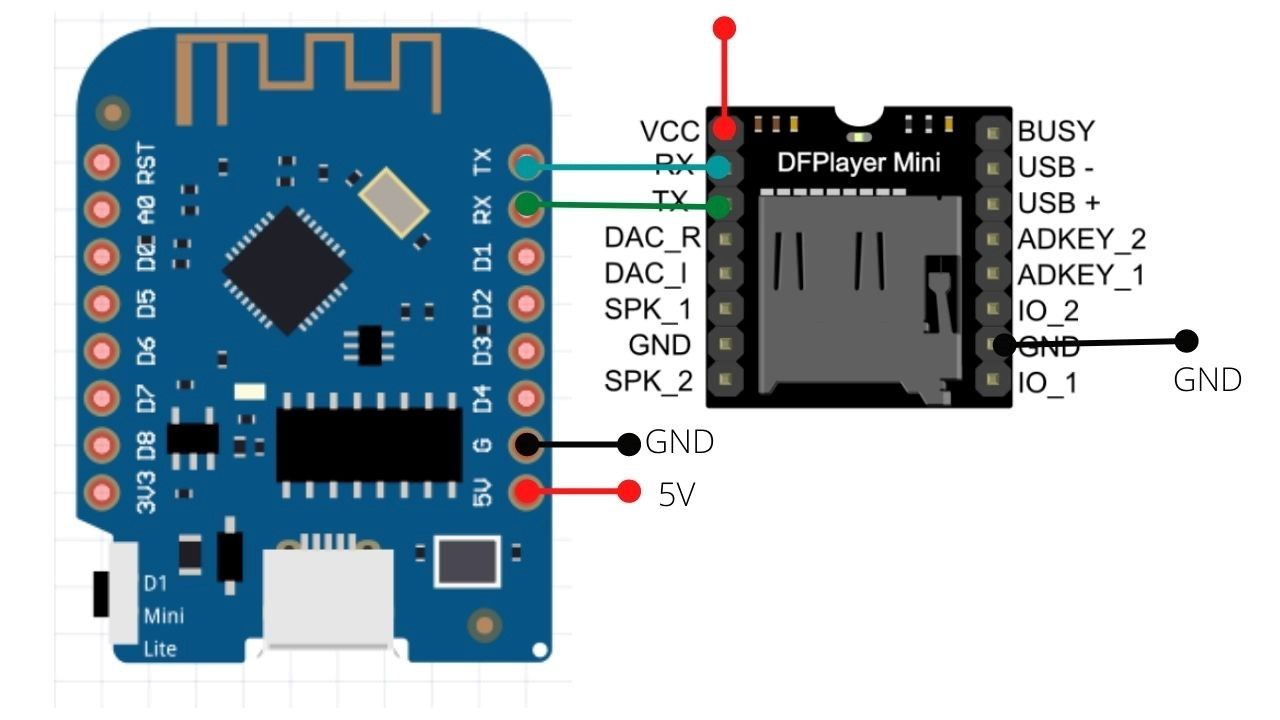


By default, the DFPlayer module can run two 3W speakers that you can connect to the SPK_1 and SPK_2 pins, as shown in the diagram. The other terminal of both speakers will connect to the GND terminal between the two speaker terminals on the DFPlayer module.
Tip: For louder and fuller sound from your 50mm or larger 3W speaker, make sure to install an amplifier module such as a PAM8403 between the speaker and DFPlayer.
Step 2: Build a Smart Switch
Take another D1 mini board and follow these steps to build a smart switch.
- Go to Home Assistant > ESPHome, click New Device, and then create a new project called bell-switch. Make sure to choose Wemos D1 and Wemos D1 mini board.
-
Click on the Edit button under the bell-switch project and paste the following code just below captive_portal:
        switch:
  - platform: gpio
    pin: D2
    id: relay
    name: "Bell"
    icon: "mdi:bell"
    on_turn_on:
    - delay: 200ms
- switch.turn_off: relay - Also, update the Wi-FI SSID and password.
- Click Save and then click Install.
- Click Plug into this computer and then download the firmware.
- Click Open ESPHome Web and use the web installer to flash the firmware on this D1 mini board.
-
Once the firmware is installed, you can solder two wires to this D1 mini board as shown in the diagram below, and then connect those two wires to any mechanical bell switch.
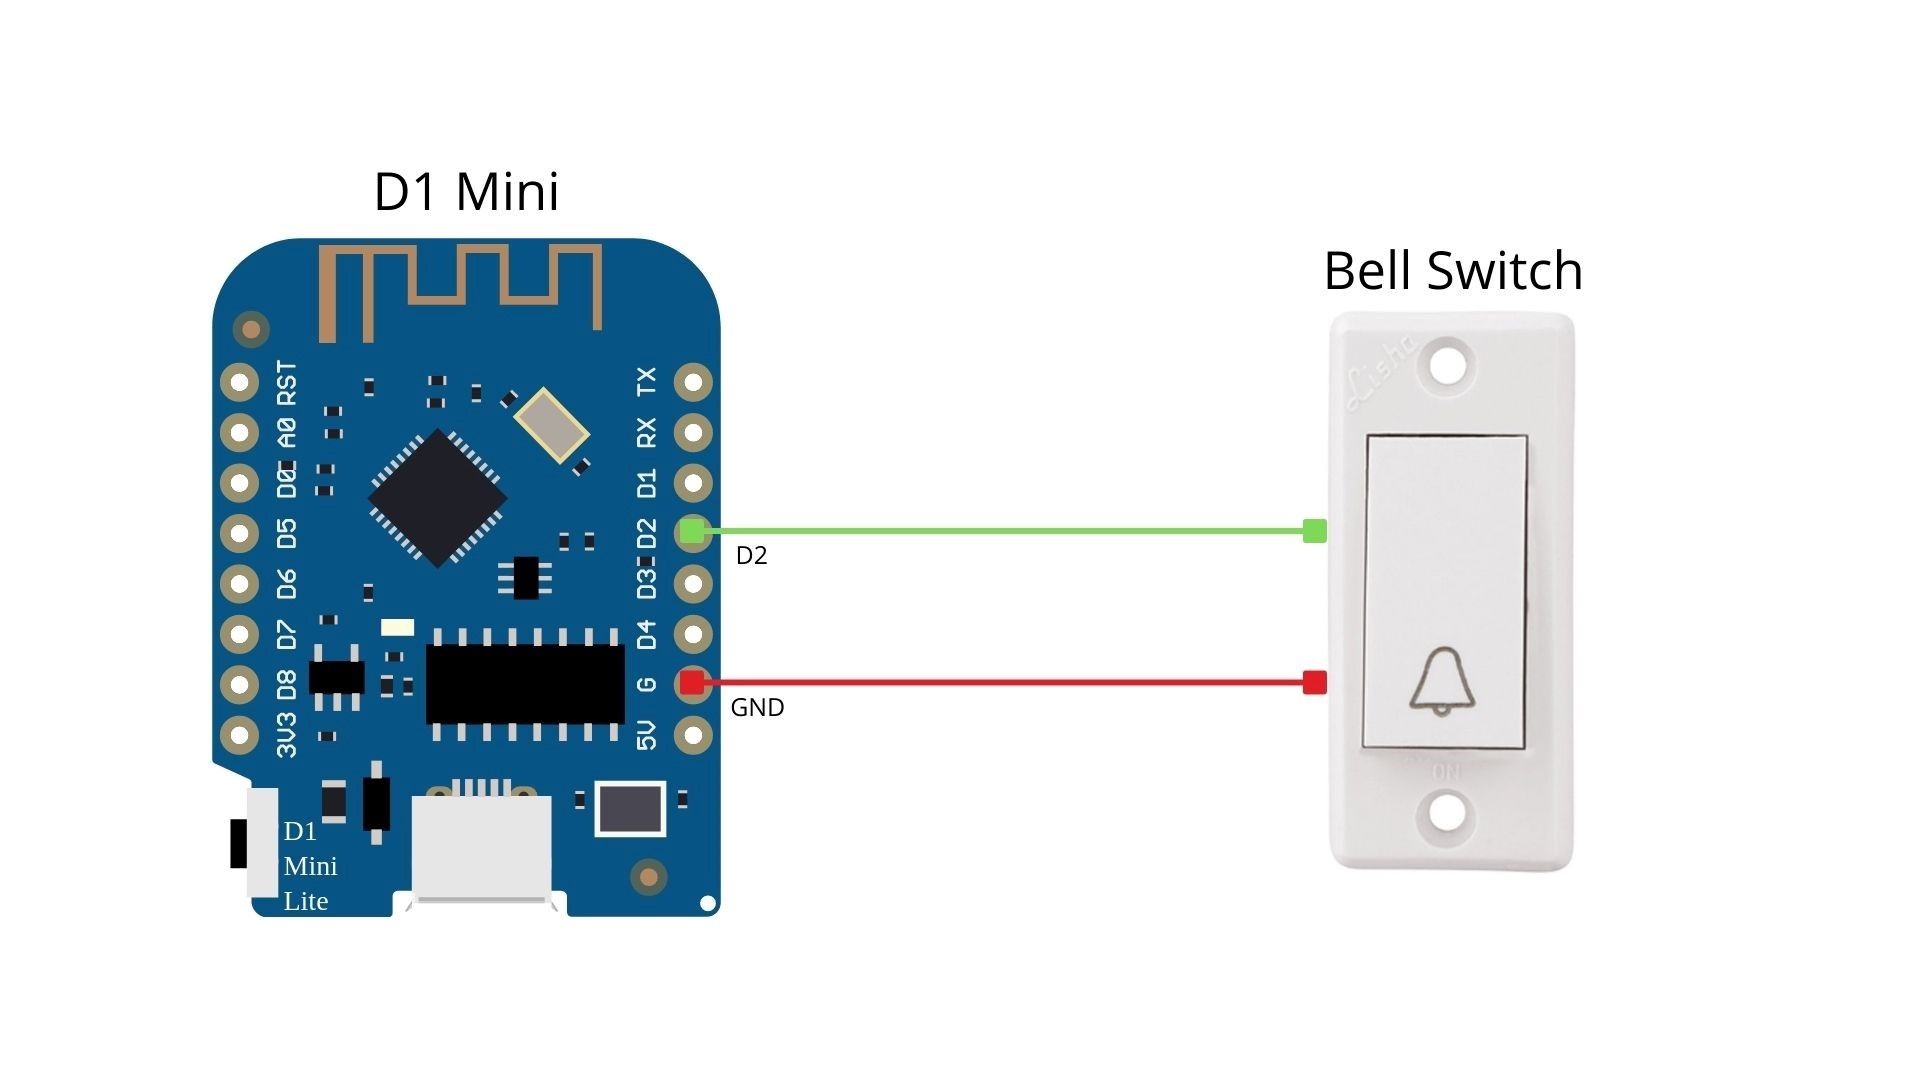
- Connect the power and test the switch. You will see the output in the bell-switch logs.

Step 3: Add MP3 Files
You can connect a microSD card to your PC and copy bell sounds to the card. You can also add any song or dialog from a movie that you want to play when someone presses your doorbell switch.
Make sure they are all MP3 files and renamed with numbers, such as 1, 2, 3, etc. For instance, 1.mp3 or 2.mp3. You can also use any free text-to-speech MP3 converter sites to create your custom sounds for this smart bell. Once the MP3 sounds are copied, connect the microSD card to the DFPlayer.
At this stage, you can power on the smart speaker and the smart bell switch. You can use any 5V adapter and micro-USB cable to power both devices. You can test the module by touching any IO or ADKey pin of the DFPlayer to the GND. You will hear the MP3 files playing.
Step 4: Create Automation
Automation will allow you to trigger or play the desired MP3 file when someone presses the smart bell switch button. Follow these steps:
- In the Home Assistant, go to Settings > Automations & Scenes.
- Click Create Automation and click Start with an empty automation.
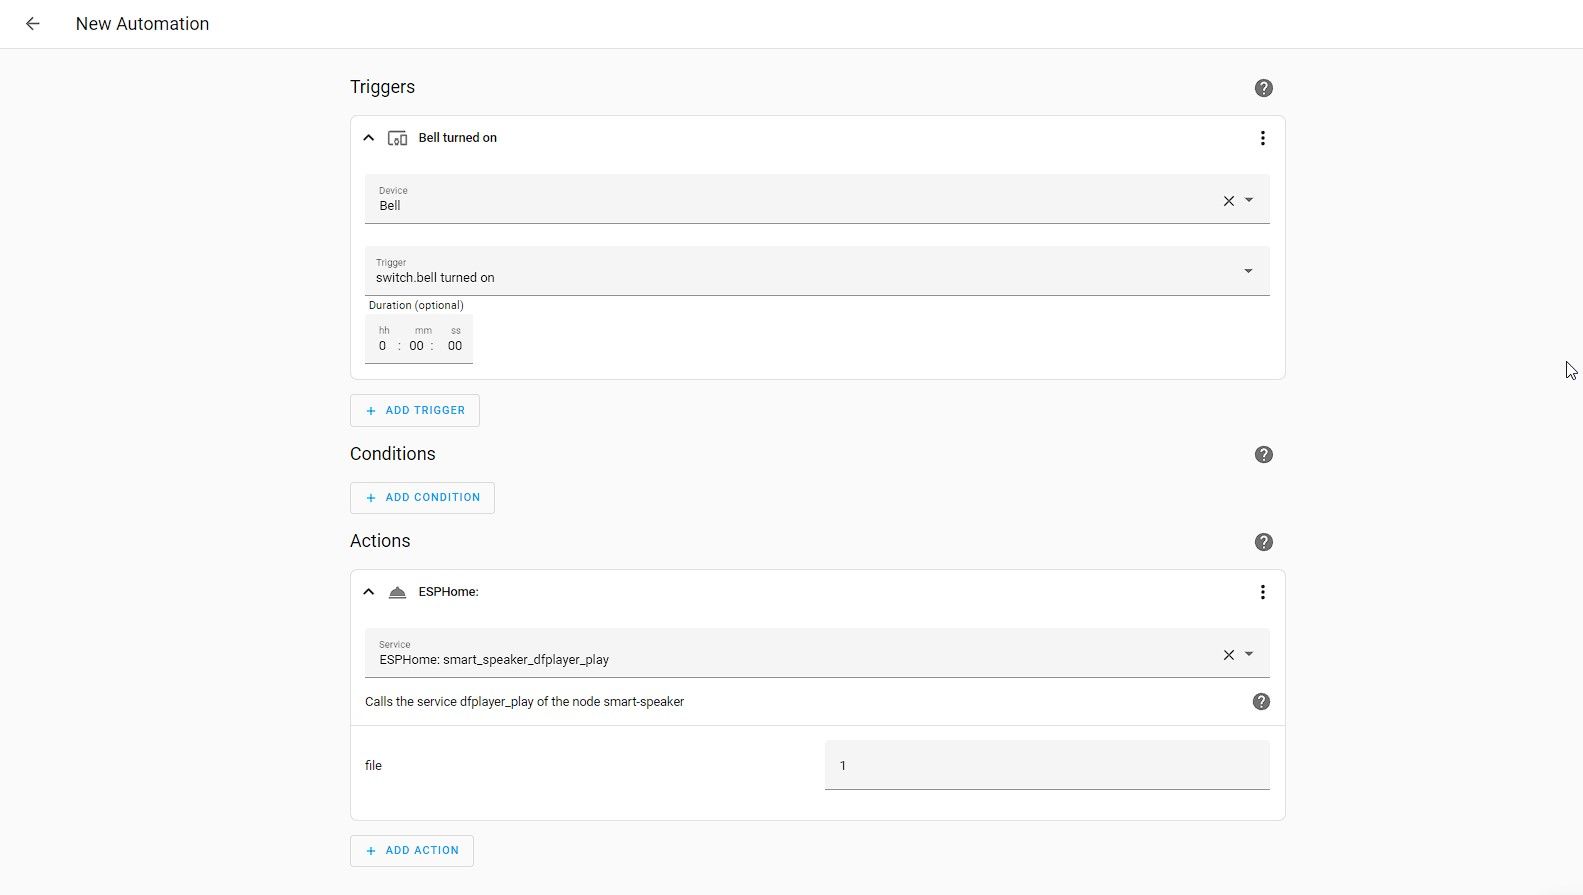
- Click Add Trigger > Device and then search for bell.
- Choose Bell in Device and select the Bell switch on option from the Trigger drop-down.
- Under Actions, click Add Action.
- Choose Call Service.
- Search for ESPHome: smart_speaker_dfplayer_play and select it.
- In the file field, type the MP3 file number you want to play. You can change this number anytime to change the bell sound.
-
Your automation should look like the following:
- Click the Save button and then give this automation any name with a description (optional).
- Click Save.

Now, if you press the smart bell switch, it will trigger the automation and play the sound on the smart bell we made.
Additionally, you can create notification sounds, such as "Tank is full. Switch off the motor" or "High power usage is detected" using TTS to MP3, and create automation to play these sounds whenever such events occur or based on sensor values. You can also follow our detailed guides to build a smart water level sensor and smart power monitoring device for Home Assistant.
Smart Bell for Smart Home
The smart bell we've made can also be used as a smart speaker with your Home Assistant Server to play alerts. You can also add DFPlayer controls on your Home Assistant dashboard to play, pause, increase/decrease volume, etc. Simply add an entity card on the Home Assistant dashboard and search for the DFPlayer control entities to add them.