Photoshop is a widely used program that gives you a lot of creative freedom. Although it is most commonly used for professional photo editing, many use it for personal projects.
Today we're going to show you how to make a filmstrip in Photoshop. If you want to do something creative with your photos, simply follow along.
Step 1: Create Your Canvas
The first thing you need to do is create your canvas. Press Ctrl + N on your keyboard or go to File > New. A small window will pop up; this is where you'll specify the details of your blank canvas. You can give your canvas a name, specify the width, height, resolution, and so on.

For this project, it's best to create a canvas that is 350x260px.
Step 2: Create One Filmstrip
We only need to create one filmstrip to begin with; there are several steps to follow.
Add Separate Layers
Every new canvas will have one background layer by default. The first thing you need to do is create a duplicate of that layer. You can do this by pressing Ctrl + J on your keyboard, or right-click on the layer and choose Duplicate Layer.

Color the Layers
Both of the layers should be white by default, but you need to make the bottom layer black. To do this, simply click on the layer titled Background and press Ctrl + I. You can also color the layer with the Paint Bucket Tool, which you can find in the panel on the left.
Resize the Layers
Select the layer on top and press Ctrl + T to activate the Free Transform Tool. You can also go to Edit > Free Transform.

After the tool is activated, you can freely transform your canvas by clicking and dragging the edges. Click on the top middle part of the canvas, and drag it while holding Shift + Alt on your keyboard. This will make both the top and the bottom edges move.

Move the top edge down until the height is at about 75%. Do the same on the left side until the width is at around 90%.
Now, you should merge the layers; select the layers while holding Shift and pressing Ctrl + E. You can also select the layers, then right-click on one of the layers, and choose Merge Layers.

Step 3: Combine the Filmstrip
Once you've merged the layers, press Ctrl + A (or Select > All) and then press Ctrl + C (or Edit > Copy). Then, create a new canvas that is around 2300x1000px. Once you're on that canvas, press Ctrl + V twice (or Edit > Paste two times).

This will paste the filmstrip you've just created onto the new canvas two times. You'll do everything on this new canvas from here on, so you can close the old one.
You can move each filmstrip by clicking and dragging them with your mouse, or by using the arrow keys on your keyboard. Move the two layers in order to combine them into a longer filmstrip. Then, merge the two layers.

Now, press Ctrl + J twice to duplicate the layer two times, and once again, combining the layers to make an even longer filmstrip. After that, merge the three layers once again. The result should look like the image below.

Step 3: Add the Details
As you might already know, filmstrips have little holes at the top and the bottom of each strip. The easiest way to create these holes in Photoshop is using the Eraser Tool. But first, you need to customize it.
Switch to Square Brushes
Start by clicking on the Eraser Tool. By default, all the brushes are in the shape of a circle. To turn them into square shapes, click on the small arrow on top, then click on the settings icon and select Legacy Brushes.

Then, click on the arrow again and scroll through the brushes until you find the Legacy Brushes folder. Click on the small arrow beside that folder to open it, and scroll until you find the Square Brushes folder. Double-click on that folder to activate the square brushes.

Now we need to adjust the brush settings. Go to Window > Brush Settings or press F5 on your keyboard. Click on Brush Tip Shape, set the size to 14px, and the spacing to around 300%.

Once you've customized the Eraser Tool, it's time to create the holes.
Create the Filmstrip Holes
While holding Shift, click where you want the first hole to be, then drag the mouse to the end of the filmstrip. Repeat on the other edge of the filmstrip.

Step 4: Add Your Pictures
It's time to finally add your photos to the filmstrip.
Remove the Background
Before you can add any pictures to your filmstrip, you need to get rid of the white parts. Start by hiding the background layer so you can properly see what you're doing. To hide a layer, just click on the little eye icon beside that layer. When the background is transparent, it should look like the picture below.
After that, click and hold the Eraser Tool until several options pop up. Select the Magic Eraser Tool and click on the white squares within the filmstrip. This should delete the white background.

Add Your Pictures
To add pictures to the filmstrip, simply drag the pictures onto the canvas from your PC. The filmstrip layer should be on top of all the other layers. You can change the position of any layer by clicking and dragging it.
When importing the image, select the layer where that image is on and press Ctrl + T to activate Free Transform. Now, you can resize the image to fit into the filmstrip.

Once you're done importing, positioning, and resizing the images, merge all the layers, excluding the background layer.

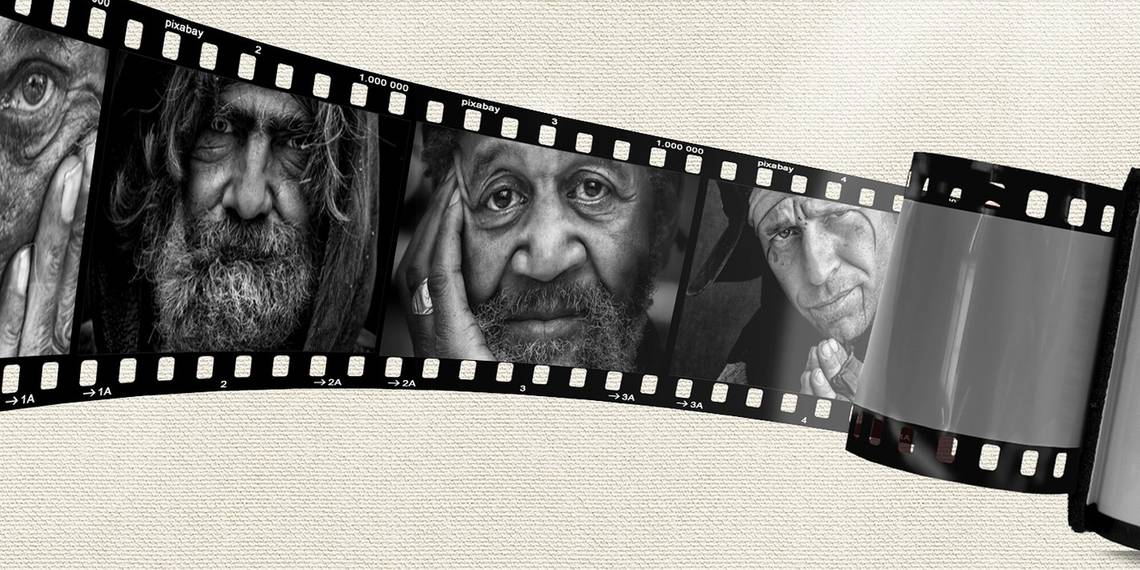
Step 5: Make It Look 3D
If you just want a simple filmstrip, you can skip this step. For those who want to add a 3D effect to their filmstrip, it's quite simple.
Click on the newly merged layer, go to Edit > Transform > Warp. This will allow you to play around with the shape of the filmstrip as much as you want.

You can change the shape of the filmstrip by clicking and dragging the edges.

Photoshop also comes with some customizable default warp shapes.

Make a Cool Filmstrip for Your Photos
If you've got a bunch of pictures on your computer and don't know what to do with them, try making a filmstrip. The above guide is a bit lengthy, but simple to follow along with. You can get creative and use your own settings and effects to make it truly unique.