Learn how to build a phone stand out of sculpting clay for a fun DIY project this weekend. Air-drying clay is cheap and easy to buy making it an affordable project to make.
This tutorial will teach you how to build a simple geometric design, but don't stop there. Once you know how to mold with clay, you can create your own unique designs in the future.
Materials

- Air-dry sculpting clay
- Baking paper
- Sandpaper
- Paintbrush
- Acrylic paint
- Slip (see instructions)
- Sealant (optional)
Inspiration

There are endless phone stand designs out there that you can draw inspiration from, including our large list of DIY phone stands you can make in less than five minutes.
Many designs are simple and can be nicely replicated using clay at home for much less than retail price. In this tutorial, you will learn how to create an easy, minimal, geometric design. If you feel confident in your skills, however, try something harder like creating a clay figurine.
Before Starting: Make the Slip
Slip is a thick paste made from dried clay and water; it's used to help attach two pieces of clay together. It's going to come in handy later, so before beginning (preferably a day in advance), it's best to make a jar of this stuff.
Luckily, it's incredibly easy to do. Simply roll out a palm-sized piece of clay as thin as possible on a piece of baking paper. Leave it to sit until the next day, when it becomes white and bone dry. Now you want to turn the dried clay into a powder by carefully breaking it up with a rolling pin. Once you have a fine powder, add it to a jar or container with a lid, and add just enough water to create a paste. You are looking for a thick cream-like consistency. And that's it: you're ready to move on to making the clay phone stand.
Step 1: Pick a Design
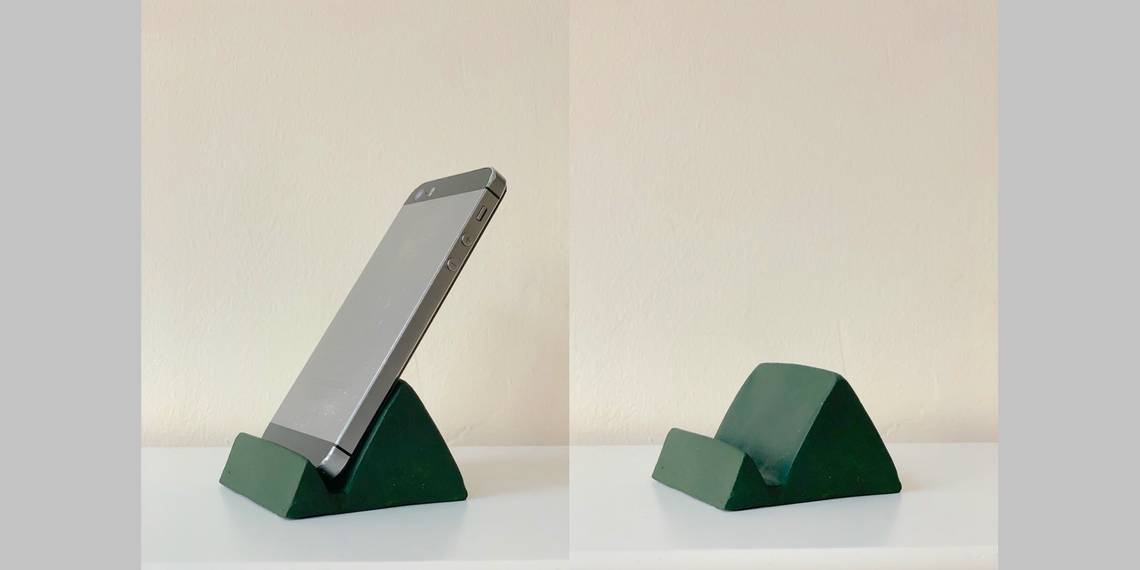
If you don't already have a design in mind, start by browsing the internet for inspiration. Searching for clay phone stands specifically will give you ideas that are guaranteed to be achievable with clay. But of course, there are many other things you can use as inspiration. For example, in this tutorial, we will be making a clay version of a geometric concrete phone stand available on Etsy.
Step 2: Make Some Sketches

Once you have an idea of what to build, begin by making some sketches. Trace around your phone or tablet, then mark a line on the paper to indicate how tall you want the phone stand to be. Next, hold your phone at the angle you want your phone stand to be and mark that on your paper. You can use these markings as a rough guide for shaping the clay later. In this design, make sure the height of the phone stand reaches over about a third of the phone.
Step 3: Roll Out Clay Shapes

To create a geometric phone stand, you will need to create three shapes: a large triangle, a small triangle, and a thin cylinder. Start by rolling a large ball of clay and comparing it to your markings to get the right height. After that, shape it into a triangle.

For the smaller triangle take a ball of clay and roll it into a cylinder before shaping it into a triangle. Lastly, roll a thin cylinder to bridge between the two triangles. Throughout the process, make sure to keep the clay hydrated by periodically adding a few drops of water to the clay to prevent cracks from appearing.
Step 4: Test the Viewing Angle

Getting the viewing angle right is important, so it's a good idea to test your shape out by holding your phone in position against the clay. Make any adjustments if needed.
Step 5: Attach Shapes

The best way to attach the three shapes together is to glue them using a mixture called slip. It's made from water and clay and resembles a thick paste. You can find the instructions for making slip at the beginning of this tutorial. If you need to pause to make the slip, place your clay shapes into an airt-tight plastic bag and add a few drops of water—this will prevent it from drying out.

To attach each piece, simply score the clay with a crosshatch pattern using a sharp knife or X-Acto blade. After that, apply some slip and gently press the shapes together. Using your fingers, smooth out the joint between the two parts to make it seamless.
Step 6: Let It Dry

Dip your fingers in water and smooth out the entire form to remove unwanted marks and fill in small cracks. Once satisfied, transfer the clay work onto a piece of baking paper and leave it to dry. It will take about 24-48 hours for the clay to dry completely. Occasionally check on your work to make sure no cracks have appeared. If you do find cracks, simply apply some slip to the area with a paintbrush. The clay is dry once it turns bright white and feels rock hard.
Step 7: Sand Rough Edges

A great way to polish up your work is to take a bit of sandpaper and smooth any rough edges. You can use sandpaper to straighten the edges as well. Sanding clay will create extremely fine dust that can cause harm, so make sure to wear a face mask for your own protection.
Step 8: Paint

Now you're ready to paint your new phone stand. If using acrylic paint, work in layers to build up the color and wait for each coat to dry in-between. It took us several coats of paint to get a good solid color, but using higher-quality paint can help reduce this time. If building your own phone stand has inspired you, make sure to check out our list of DIY laptop stands you can make this weekend.
Step 9: Apply Sealant (optional)
While extremely hard, dry clay isn't waterproof, so it's a great idea to apply a sealant to add durability to your creation. You can also use it to add a glossy layer to your work, giving it a professional look. If you used acrylic paint to finish your clay phone stand then this will protect the clay from small water droplets to some extent (though not the paint itself), so you can leave it there if you like.
If you want a more durable and waterproof option, however, here are some sealants that you can apply to your creation:
- White Craft Glue: Sometimes called wood glue or craft glue, it's an affordable option that you can apply with a paintbrush.
- Acrylic Sealer/Varnish: You can find this product in hardware stores as it's also used to seal wood. Apply with a paintbrush and let dry.
- Resin: Resin involves two materials that when combined will cure extremely hard. This option is more expensive and will require learning how to use the substance safely.
Easy DIY Clay Phone Stand
A DIY phone stand can make a great personalized gift or a functional office accessory. With very few materials and tools required, it couldn't be easier as well. Have fun making this geometric design, or try creating your own this weekend.