If you’re into mechanical keyboards or just getting started, you might have heard about lubing your keyboard switches to make it sound better. In this guide, we will teach you how to lube your switches in two ways: the traditional, time-consuming method, and the easier method that requires fewer tools and time.
Why Should You Lube Your Mechanical Keyboard Switches?

One of the most significant reasons why people want to do so is to silence their keyboards. Even if you have linear switches that don’t have a click, tapping them can still result in a pretty loud sound. Lubing the switches can help lessen that. In terms of sound quality, it can give a satisfying deep sound. They also feel much smoother compared to scratchy unlubed switches.
However, if you’re into clicky switches, we would advise you to avoid lubing them as it can mute their clickiness. Speaking of switches and sounds, you can check out the difference between red, blue, and brown switches. Those are the three main types of switches, and brands branch them out into different colors.
Things You'll Need to Lube Your Mechanical Keyboard

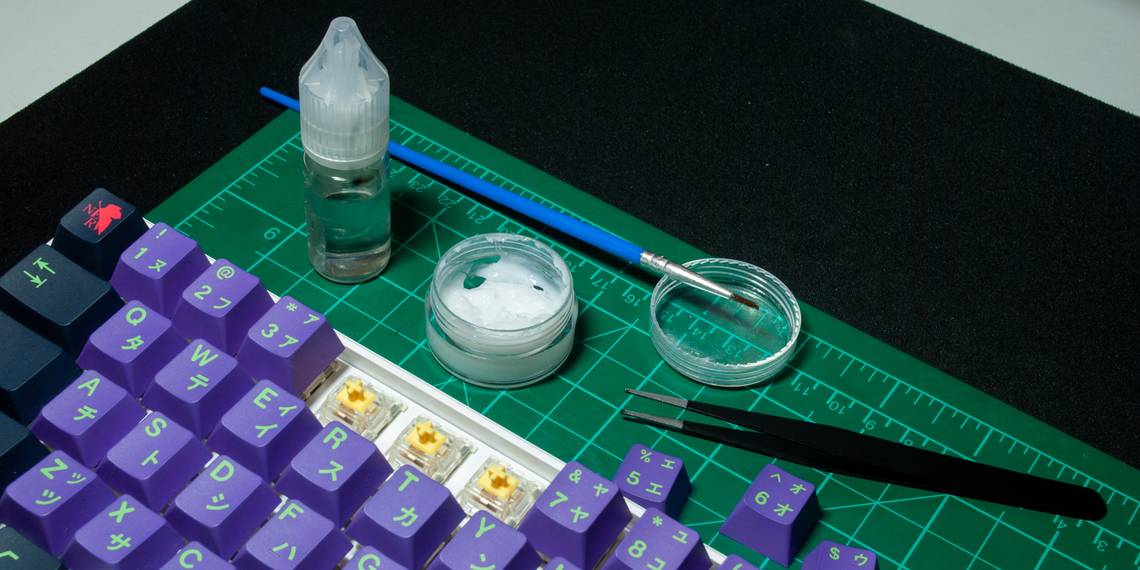
Before you get lubing, you need to make sure you’ve got the equipment to do so. In this part of the guide, we are using a hot-swappable keyboard (the switches are not soldered to the keyboard’s PCB).
Don’t worry, though: if you don’t have the equipment to remove the switches or open them up, go down to the next section where we teach you how to lube your switches without needing to remove them.
Here’s what you’ll need:
- Keycap puller
- Switch puller
- Switch opener
- Krytox 205g0 or Super Lube Synthetic Grease
- Krytox 105g0 (Optional, you can use 205g0 instead)
- Size 0 or 00 paint brush
- Tweezers
- Reusable zip bag
- SL1.5 screwdriver (Optional, an alternative to a switch puller and opener in one)
How to Lube Your Mechanical Keyboard Switches
Lubing your mechanical keyboard switches is the next big step into the hobby. It’s what beginner enthusiasts eventually want to try out doing, especially if they like tinkering with things. Here’s a step-by-step guide on how to lube your switches:
Remove the Switch

Removing the keycaps is easy enough, but removing the switch is a little more difficult if you haven’t done it before. If you have a switch puller, orient it vertically on the switch. Squeeze the latches in and gently rock the switch back and forth with a slight upward force to pull it out.

Alternatively, you can use an SL1.5 screwdriver to push those latches and gently lever them upwards from the bottom side first, then the upper side. Be sure to lift a little bit at a time, alternating sides to avoid bending the pins.
Open the Switch
If you have a switch opener, you simply have to align the locking latches to the protrusions on the switch opener and gently push down until it opens up.

If you don’t have a switch opener, the SL1.5 screwdriver will save the day once again. Simply push it under the plastic latch and then lever it upwards gently, being careful not to snap the latch off. The lever action should lift the piece over the locking ledge on the switch.
Lube Your Switch Springs First
To avoid losing your springs, place them in the zip bag and place about 10 drops of the Krytox 105g0 oil. Blow some air into the bag to puff it up a little bit and shake the springs around. If you don’t have 105g0 oil, you can also just use the Krytox 205g0, but it’ll take a bit longer to spread around. Keep the springs in the bag for now as you won’t be putting them on yet.
Lube the Switch Bottom Housing
You’ll want to lube the bottom housing first so you can place the springs on it afterward. This flow will make things more manageable.

Grab a small dollop of lube with your brush and smear it onto the inner side of the cap of the lube container. The cap will serve as a lube palette where you can recharge your brush with lube. You only need a little bit at a time; less is more.

Start by lubing the sides. Make sure to lube the high points and the inner parts of the rails as that’s where the switch stem comes into contact with the bottom housing the most. Lube the inner and outer parts of where the stem goes as those are also contact points.
Place the Bottom Housing on the Keyboard

If you don’t have a lubing station, you can place your bottom housings on the keyboard like in the image above. Don’t press your bottom housing into the plate as that will only make it more difficult to remove later.
Place Your Springs on the Bottom Housing

Before you lube your stems, place your lubed springs onto the bottom housing so you can place your stems on the spring. This is so you won’t place your newly lubed stem anywhere that might attract dirt on the lubed surface.
Lube Your Switch Stems

To lube your switch stems, grab the cross part with tweezers or a stem holder if you have one. Lube everything below the cross, especially the protruding legs (don’t lube the legs on tactile switches, to avoid lessening the tactility) and the ones that go into the bottom housing rails. Lube the peg that goes into the spring as well.

Place the lubed stem onto the spring that you’ve placed on the bottom housing, making sure the legs of the stem face the metal contacts.
Lube Your Upper Housing (Optional)

You can also lube the inner part of the upper housing if you want. There are many who say you don’t really need to since there’s enough lube on the stem. However, this is up to you and not lubing the upper housing can save you some time. Personally, it helped further lessen the scratchy feeling but didn’t do much to the sound.
Assemble Your Lubed Switch

Use tweezers to grab the housing carefully, not to let any of the balancing parts fall off. Take the upper housing of the switch and orient it correctly over the stem. Squeeze them together until it clicks and you’re done! With one switch at least…
Lubing Your Mechanical Keyboard Switches Without Desoldering or Opening the Switches
If the steps above seemed intimidating, you can try this easier method. This one doesn’t involve opening up the switch or even removing it at all. However, this method doesn’t reach the springs, so you still might get some spring “pinging” which is not very noticeable in most cases.

Simply push down the stem of your switch and push your lubed brush into the gap created. Make sure to get all the sides and repeatedly tap your switch to spread the lube around. You can add some more if it still feels scratchy, but be careful not to overdo it.
Sound Comparison: Which Keyboard Switch Lubing Method Sounds Better?
There aren’t many videos using the easy lubing method as most enthusiasts will not lube their switches that way. However, we have made a video for this very topic comparing dry switches, traditionally lubed switches, and the easy lubing method.
Note that sound tests cannot fully represent the real world. What we want you to listen for in the sound test is not how they sound objectively, but how they sound in relation to each other.
If you’re looking for a customizable mechanical keyboard that’s light on the wallet yet has the potential to sound high-end with the right mods, you should check out this Royal Kludge RK84 review.
Time to Get "Thocking"
The mechanical keyboard hobby is a rabbit hole of tinkering, and lubing switches is just the tip of the iceberg. Some people will put all sorts of foam into their keyboards and even pour silicone in just to get that “thock” sound.
While it can get frustrating to obsess over all of these things, what we really want for you is to enjoy your keyboard more and focus on having fun with it, and we hope learning how to lube your switches has made your keyboard more than just a keyboard.