Whether you read on a Mac, Kindle, or another digital device, the ability to adjust text size is a serious weapon against eye strain. Several text adjustment settings exist in macOS, and each one has a place and purpose.
From altering an app-specific font size to changing your entire display resolution, you have plenty of options to help you see things clearer. Let’s discuss some of the most useful methods to increase the text size on your Mac.
1. Use a Keyboard Shortcut to Increase Text Size
One of the easiest ways to adjust text size in many applications is by using the zoom keyboard shortcut: Cmd + Plus (+). Most popular apps respond to the key combination, and you can reverse any changes by pressing Cmd + Minus (–) to zoom out.
In most instances, however, adjusting the zoom level affects more than text, and you’ll see images and other elements within an app or webpage shrink or magnify. If you want to specifically target text, you’ll need to locate the relevant setting for each app.
2. Change the Text Size in Common Web Browsers
Most popular browsers allow you to adjust the default font attributes, which is handy if you want to keep other on-screen elements at a reasonable size. The process is a little more involved than hitting a simple keyboard combination, but we’ll outline the steps for the more common applications below.
We should also mention that some websites take measures to stop you from changing the default font size, so the setting won’t work everywhere.
How to Change the Text Size in Safari
To change the default text size in Safari, follow these steps:
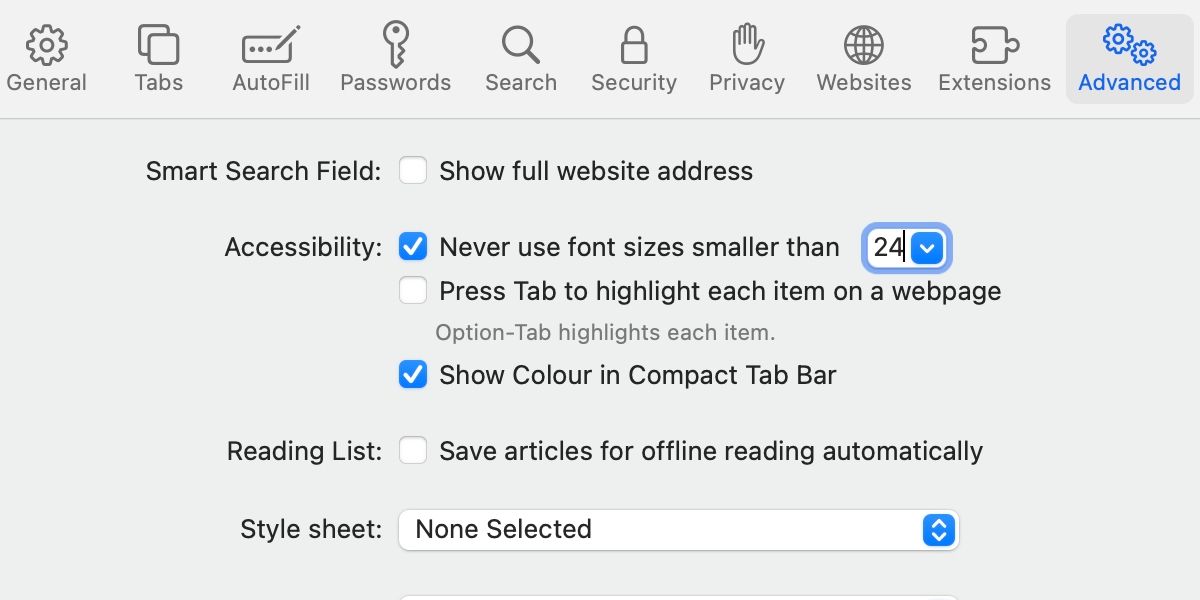
- Navigate to Safari > Preferences > Advanced.
- Tick Never use font sizes smaller than in the Accessibility section.
- Set the desired minimum font size.
How to Change the Text Size in Google Chrome
To change the default text size in Chrome, follow these steps:
- Click the main menu (three dots) and choose Settings.
- Click Appearance in the side menu.
- Choose the desired option in the Font size section.
How to Change the Text Size in Mozilla Firefox
To change the default text size in Firefox, follow these steps:
- Click the main menu (hamburger) and choose Settings.
- Scroll down to Language and Appearance.
- Adjust the Size in the Fonts and Colors section.
3. Change the Text Size in Finder
Is Finder’s font a little too small for your liking? If so, you can use a simple setting to modify the text for just that application. Here’s how to change the default font size in Finder:
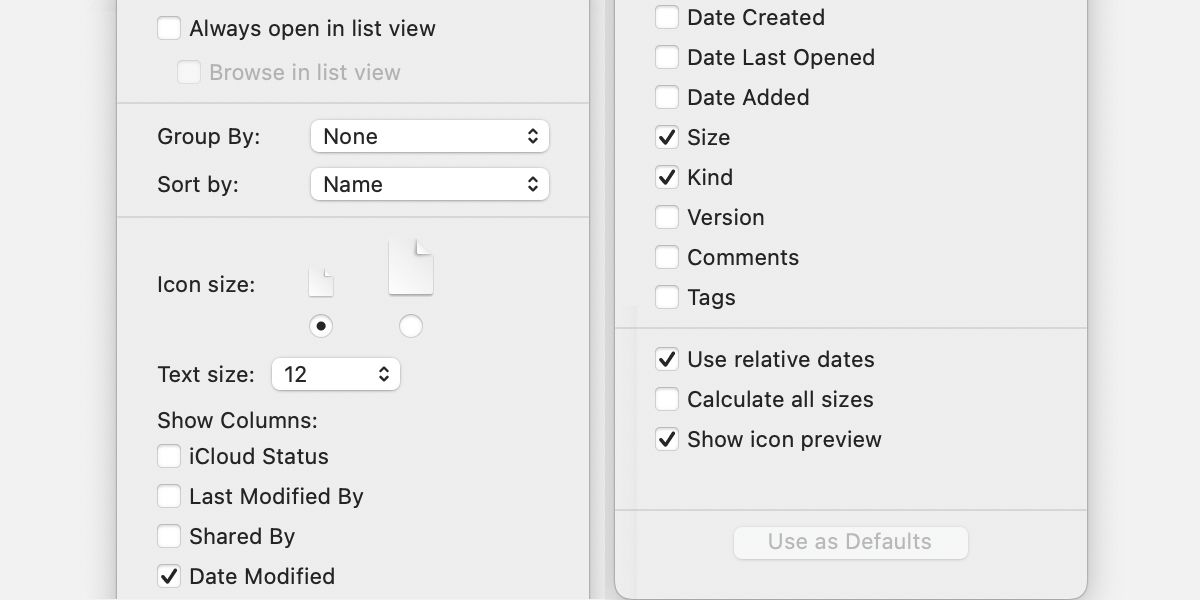
- Launch Finder and navigate to View > Show View Options.
- Select the desired Text size option.
- Click Use as Defaults to apply settings to all folders.
Additionally, from here, you can adjust your icon sizes, which Cmd + Plus (+) and Cmd + Minus (-) will also achieve.
4. Change the Screen Resolution in macOS
If you’d prefer to take a less targeted approach and make everything bigger, you can adjust your screen resolution. A higher resolution means crisper images but smaller on-screen elements. However, you can often individually enlarge anything that seems too small.
To change the display resolution in macOS, follow these steps:
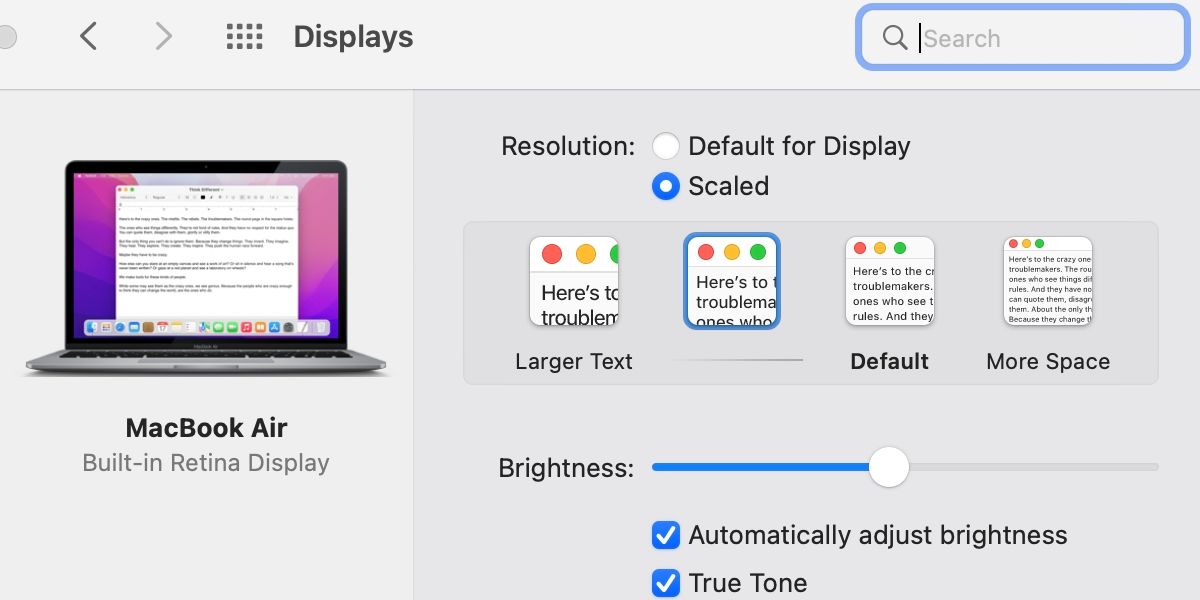
- Navigate to System Preferences > Displays.
- Select Scaled in the Resolution section.
- Choose the desired resolution.
Learn the Most Useful macOS Tricks
In macOS, you have several ways to change the size of text. Quick keyboard shortcuts are often enough to get the job done, but some apps offer a more targeted approach. If you’d prefer to make your whole on-screen world bigger, adjusting the overall screen resolution may be the solution.
We’ve covered many of the most useful methods for increasing text size in macOS, but the operating system has additional accessibility tools that can also assist. Ultimately, learning a few quick zoom shortcuts is more favorable than constant squinting and endless eye strain.


