Logic Pro sessions with a high number of tracks, instruments, or plugins will end up pushing your Mac to its limit. Eventually, the dreaded System Overload popup will appear, interrupting your work, and forcing you to take a break before you can get back to it.
If your Mac is prone to these problems, you may despair at the idea of launching large projects. But don't worry. We'll show you the best methods to improve Logic Pro's performance on your Mac, so that even the biggest project will stand a better chance of running.
1. Freeze Tracks
When you freeze tracks, you save your Mac from processing the effects, edits, and plugins of those tracks in real time. What freezing does is bounce a track in place where the freeze icon—a snowflake—is activated. In other words, all effects, MIDI data, and edits are converted into a single audio file. This makes frozen tracks a much lighter burden on your CPU.
The disadvantage to freezing a track is that you can't change the position, melody, or effects while it is frozen; only the volume fader. You must unfreeze the track to apply any changes.
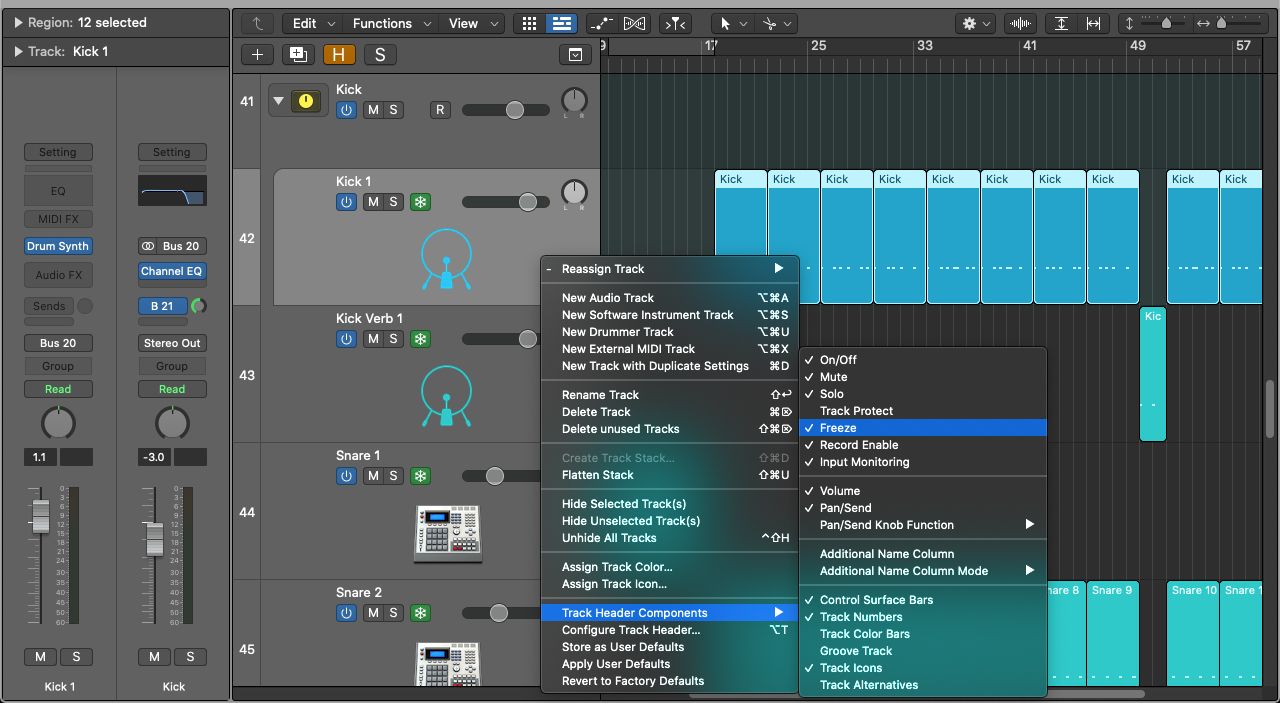
To enable the freeze option, Control-click on any Track Header and select Track Header Components > Freeze. Then click the Snowflake icon to freeze a track.
Bear in mind that when you freeze a track, all of your session is processed as the file is bounced and frozen. Trim your session to the length of your composition to avoid long waits as large sections of silence are frozen.
2. Bounce Regions and Tracks
The benefits of bouncing your regions or tracks are very similar to freezing your tracks: regions with many edits or tracks with many effects are bounced in place and converted into effects-free audio files. The main differences are that a new track is created with the bounced audio file, and you cannot change the effects or melody without returning to the original un-bounced tracks.
Also, you can bounce multiple tracks at once into a single audio file. This means you could mix your percussion section, for example, and then bounce it all into one audio file.
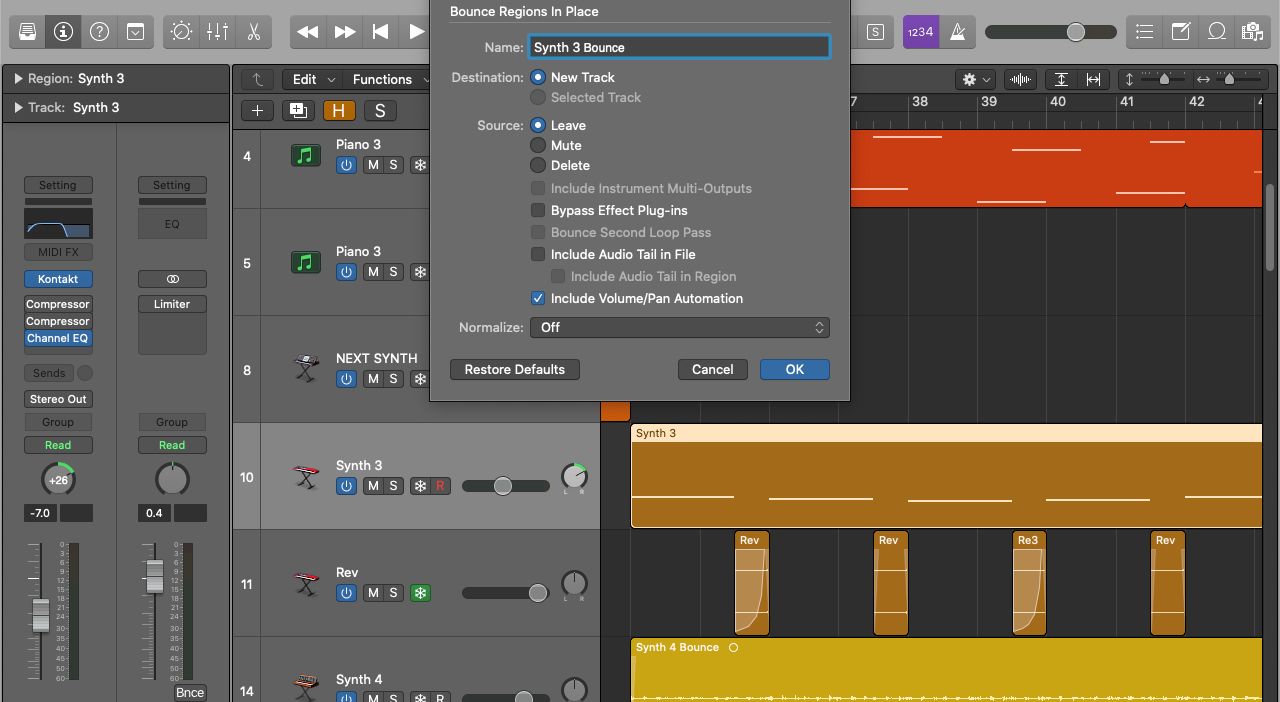
To bounce a region or track, select the region(s) or track(s) you want to bounce and press Ctrl + B. In the popup, make sure to leave Bypass Effect Plug-ins unchecked.
3. Choose the Best I/O Buffer Size
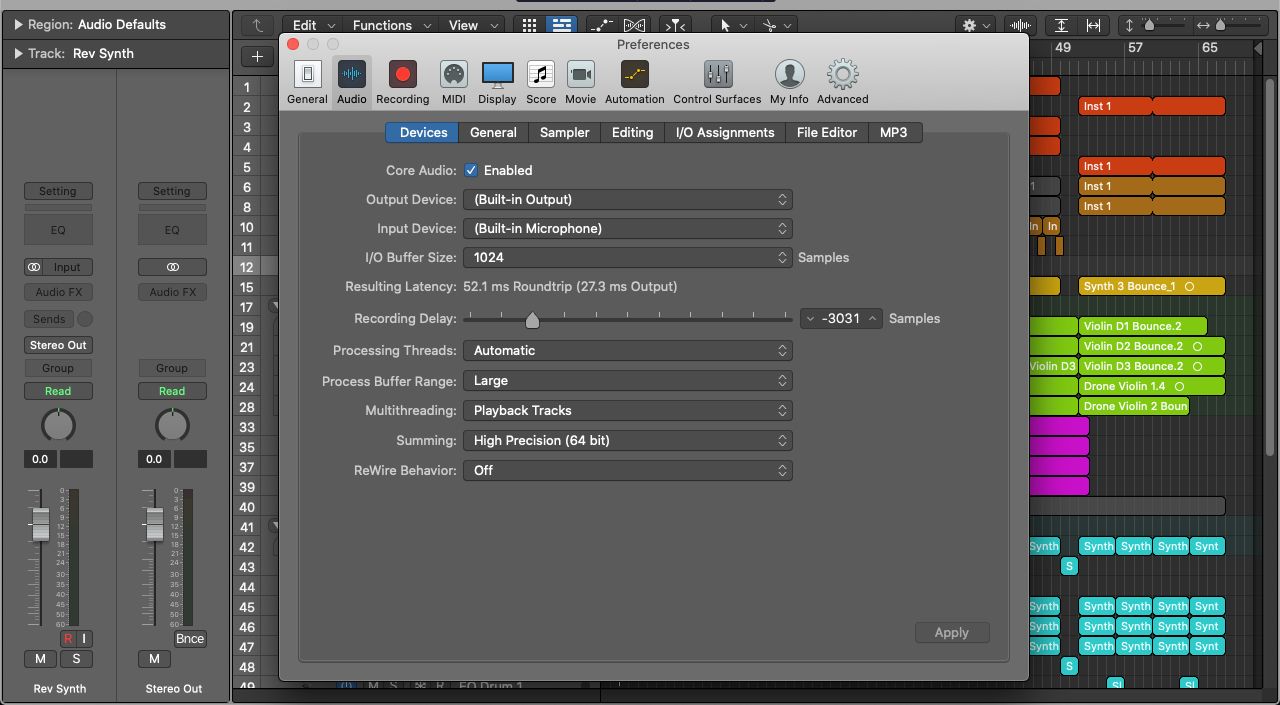
One of the first settings to check when mixing a high number of tracks or effects is the I/O Buffer Size. To find this, select Logic Pro > Settings > Audio from the menu bar. This should bring up the Devices tab.
When you increase the I/O Buffer Size, the CPU load on your Mac is reduced. Setting it to the highest option, 1024, is generally a good idea when you're not recording. However, if you're recording (after setting up the right recording equipment for Logic Pro), you should lower the setting to avoid lag (shown on the Resulting Latency line).
Changes you make to here will apply across all your projects. So make sure you change it back when you shift your focus to mixing.
4. Use Aux Tracks
Let's use an example to show why aux tracks are so handy. In this example, we'll say you want to add an identical reverb effect to 10 backing vocal tracks. Rather than individually adding a reverb plugin to each track—and forcing your Mac to process each one separately—you can add it to a single aux track, and run all the backing vocals through that single plugin instead.
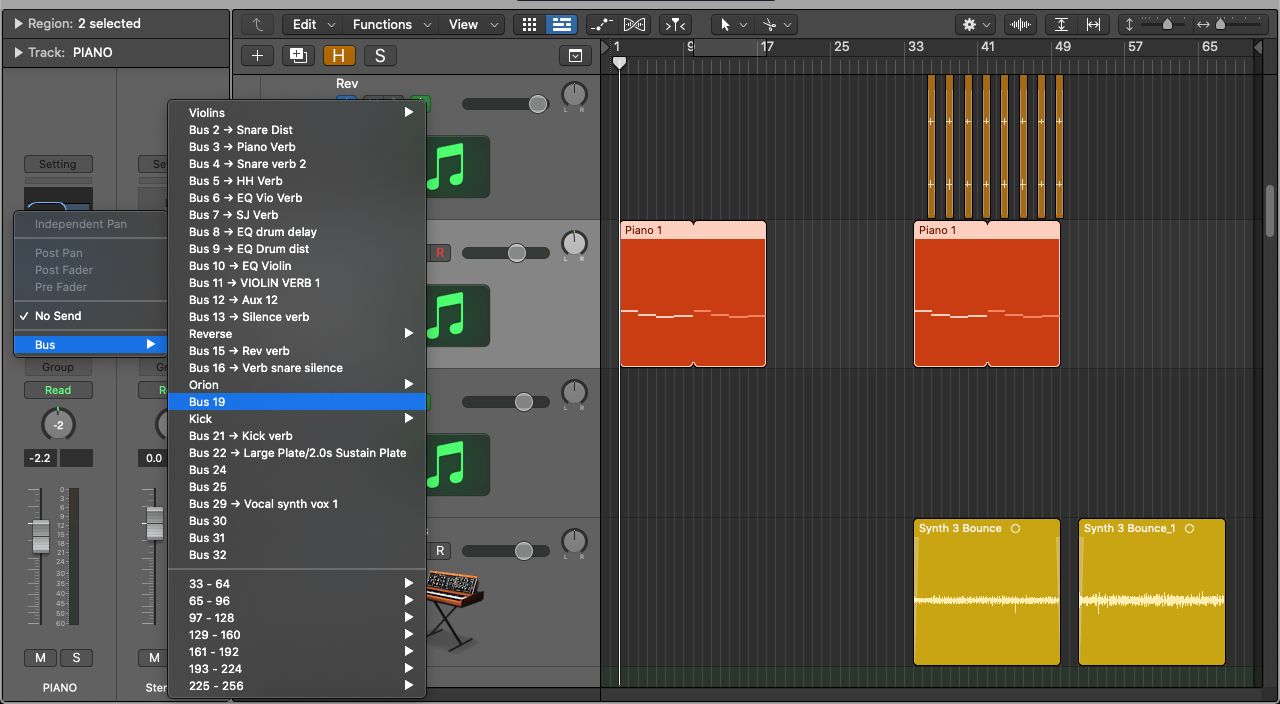
To set up an aux track, click the Sends option on a mix track and choose a Bus to use. When you select a vacant Bus, Logic will automatically create a new aux track, which you can add effects to. Now send all the relevant tracks through the same bus to apply the effect to all of them. Tweak the circular dials that appear on each track to find the effect mix you like.
If you use aux tracks well, you can save yourself time and get much better performance from your Mac. This is one way to apply high levels of organization to your Logic sessions, which can help you cut down on hours of editing and reduce the stress on your Mac.
5. Create Summing Stacks
The most important thing about Summing Stacks is that any Sends, Audio FX, and edits you make to a Summing Stack will affect all the tracks within it. Let's use the same example we looked at for aux tracks to show what this means.
When you create a Summing Stack that contains 10 backing vocals tracks, you can use a single send to bus the Summing Stack to an aux track with a reverb plugin. Now, all the backing vocals tracks will have reverb. You just went from 10 sends to one. This works exactly the same with other plugins as well, like compressors, EQ, or distortion.
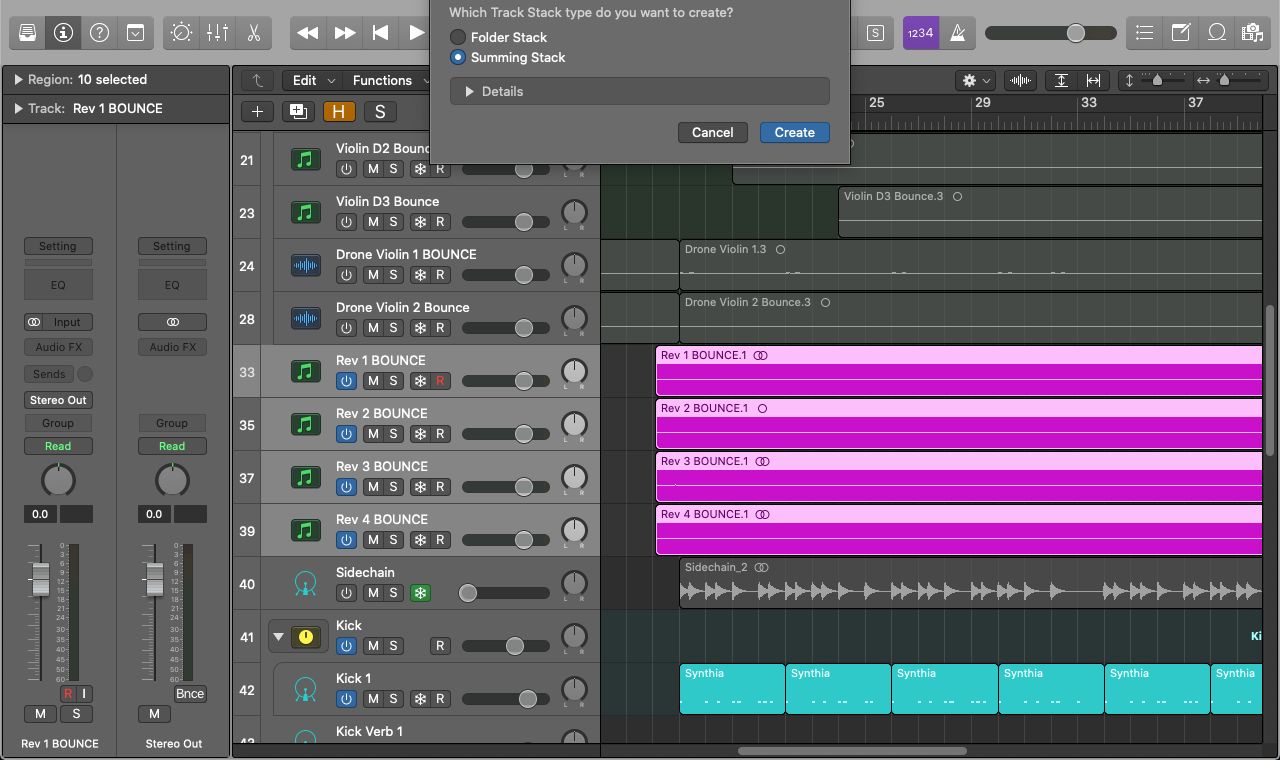
To create a Summing Stack, select the tracks you want in the stack and press Command + Shift + D. Alternatively, go to the menu bar and select Track > Create Track Stack. This will bring up a window where you either choose a Folder Stack or a Summing Stack. After creating a Summing Stack, click the yellow mixer in the Track Header to show or hide all the tracks within it.
If you want to dig further, Logic Pro's track stacks offer additional features that can enhance your creative process.
6. Use an External Drive
External drives are one of the most important pieces of equipment for creative professionals. They let you carry sound libraries and plugins that take up significant amounts of space without creating a burden on your Mac's internal storage.
If you have a particularly fast drive—probably an SSD using a USB-C connection—you can even run your Logic projects from it to save even more space on your Mac. If you're still facing slow loading times, go one step further and run the Logic Pro application from an external drive and store its stock library there as well.
Something to remember is that if you fill up the available storage on your Mac, its performance and overall lifespan will worsen. Given that Logic and its stock libraries combined are over 50GB in size, you may want to transfer them to your external drive to free up more space on your Mac.
7. Get Out of the Zone
Even the latest Mac models aren't safe from overheating. This usually happens after long periods of high demand on your CPU. The performance of your Mac can dramatically worsen as a result, and can lead to crashes and even long-term damage. Don't forget to give your Mac and its charger a chance to cool down, especially during spells of hot weather.
Just like your Mac, your ears and creative gears also benefit from breaks. Both need time to recover. Breaks will make your return to creativity more focused and effective. While you may think that spending hours on end trying to get a sound just right is time well spent, exhausted ears will only slow you down in the long run and wear down your state of mind.
Lighten Logic Pro's Load on Your Mac
We tend to think our hardware isn't up to the job when playback errors appear, yet this isn't always true. With the right tools, even older Macs running Logic will surprise you. When you bounce tracks in place and use aux tracks effectively, the CPU load is significantly lightened. Add in the option of housing all third-party and even stock Logic plugins on an external drive, and your Mac will breathe a sigh of relief.
Another way to improve Logic's performance on your Mac is to install all the latest updates. Though you do need to be careful that doing so won't break your plugins.

