
Quake is one of the greatest multiplayer gaming experiences you will find. The follow-up to Doom is essentially a first-person shooter but also features a stunning multiplayer (co-op and versus) mode.
Like an FPS Fortnite, Quake delivers a memorable gaming experience. And you don’t need to pay for an expensive server (or lug a PC around as in the old days) to play it.
You can host Quake multiplayer sessions on a humble Raspberry Pi.
How Does Quake Run on a Raspberry Pi?
As you may know, Quake was first released in the late 1990s, and its sequels in the early 2000s. It was available on standard Windows PCs with Intel processors.
So, how does it run on a Raspberry Pi, with its Linux-based OS and ARM processor? Well, it's thanks to the open source philosophy.
Code for Quake, Quake 2, and Quake 3 Arena was released by developers id Software back in 2012. You can find the source code for these games on id Software’s GitHub. Because the code is open source, anyone can view it and make changes to enable new features.
In the meantime, the code has been rebuilt to run on other operating systems, including Linux. It has also been officially released on Nintendo Switch, Sony PlayStation, Microsoft Xbox, and other platforms.
Which Pi Model Is Best for Quake?
Quake can run on any Raspberry Pi, from the original SBC all the way up to the Raspberry Pi 4.

For the most impressive results from multiplayer Quake, you need a Raspberry Pi 4. As the most advanced Raspberry Pi to date, this model can handle solo and multiplayer sessions.
Failing this, the Raspberry Pi 3 is also suitable for running a Quake multiplayer server.
In addition, there is also a version of Quake on LAN that is optimized for the Raspberry Pi Zero.
What Do You Need to Host a Quake LAN Party on Raspberry Pi?
Before proceeding, ensure you have the following items and cables:
- A Raspberry Pi: any B or A board will work, although A and A+ don’t have Ethernet ports, so you’ll need to configure Wi-Fi or use a USB Ethernet adapter.
- SD Card: use at least an 8GB card
- A suitable version of Quake (see below)
- Ethernet cable: this should be cat 5/5e/6
- Suitable power adapter
- HDMI display
- HDMI Cable
- Keyboard and mouse
With these items hooked up and ready to use, you can install a multiplayer Quake server on your Raspberry Pi.
Unlike most other projects, you'll spend far less time setting this up if you use the keyboard, mouse, and display option. Enabling SSH doesn't result in a good experience.
Which Quake Server Software Should You Use?
Several Quake server options are available for Raspberry Pi.
- Quake on LAN: a multiplayer-optimized server for QuakeWorld, Quake II, and Quake III Arena, available as a disk image. Quake on LAN is available for all Raspberry Pi models and there is a Pi Zero-optimized build.
- quake3: a Quake 3 port for models up to Raspberry Pi 3, available in the Pi repositories.
- ioq3: a Quake 3 port for Raspberry Pi 4 and other SBCs, also available in the Pi repositories.
You can play Quake 3 with the second two options in single player and multiplayer modes. However, quake3 and io3 are not suitable for the massive multiplayer arena environment that Quake has latterly become associated with.
To play that, you’ll need Quake on LAN.
Which Version of Quake Works With Quake on LAN?
After setting up your Raspberry Pi Quake on LAN server, you’ll need to install a version of Quake to play. As the Raspberry Pi is purely hosting the game server, you’ll need another device for this.
In testing this set up I’ve tried PC and mobile versions of Quake 2 and Quake 3. It seems that OpenArena on Android does not work with this server, however, both the original Quake 2, Quake 3, Quake 3 Arena, and open source variants (such as nQuake and ezQuake) will work.
Note that you should have an original version of the Quake you want to play for some original files. Documentation for each of the open source versions will explain how to find these, which simplifies things. If you don’t own a copy, you can grab Quake 2 and 3 for just a few dollars on Steam and GOG.
Install a Quake Server on Your Raspberry Pi
Start by downloading Quake on LAN via the link above. This is a 2.5 GB file that will take a while to download. While that is happening, check you have version of Quake II or III running on your computer (or other device) that is fully up-to-date. Both that device and the Raspberry Pi should be hosted on the same network (at least at first).
Once the Quake on LAN 7z file has downloaded, write this to a blank microSD card.
Use our guide to installing an operating system on the Raspberry Pi to get this up and running. This uses cross-platform tools, so it doesn’t matter whether you use Windows, macOS, or Linux.
After completion, safely remove the microSD card from your PC and insert it into your Raspberry Pi. Connecting the Pi to your router via Ethernet cable is recommended for the first run and configuration.
Configure the Quake Server
When the Quake on LAN server boots, and you’re connected to a display, you’ll see the DietPi-CPU_set and DietPi-Services statements. Rather than Raspberry Pi OS, this server runs on DietPi, an operating system that is even lighter than Raspberry Pi OS Lite.
Upon first boot, you’re required to log in. You’ll need the default credentials for DietPi:
- Username: dietpi
- Password: dietpi
After login, the nQuake installation commences. Ensure the Raspberry Pi is connected to the router via Ethernet.

For the first run, you’re fine to go with the default options (in square brackets) but later you might install Clan Arena, Team Fortress, and High Res textures add-ons.
Once installed, you'll be able to manage the server from a console. This can be opened by pressing ¬ or ~ or simply Esc, depending on your system. Options include:
/reboot to reboot the Raspberry Pi)/shutdown to power off the Raspberry Pi/quake/map/list to list available maps for QuakeWorld
Further console commands can be found on the Quake on LAN website. If you're already familiar with Quake console commands, these are pretty standard.
Other options are available. For example, you can check system resources with sudo htop, or even check the CPU temperature with sudo cpu.

While system temperature information is displayed when the server starts, the CPU info provides more depth.
Connect to a Raspberry Pi Quake LAN Party
When you boot and login to a Quake server running on Raspberry Pi, the IP address is displayed. All you need to do is input this IP address in the game client’s console:
connect [ipaddress]
If prompted, the password is
quakeonlan
With the connection established, the world of Quake multiplayer is open to you and others on your network. The Quake on LAN developers recommend keeping it local, as the software isn’t designed for access from beyond your network.
Can’t Connect to the Quake on LAN Server?
By default, the server requires you to connect to it as a wireless hotspot. So, if you are happy to switch your PC’s wireless network to the QuakeOnLAN hotspot, it shouldn’t be long before you’re up and running.
In testing the setup, however, I found this doesn’t work well. Worse, for some reason, while I could disable the hotspot mode, I couldn’t enable standard Wi-Fi on the Pi 4. Fortunately, using Ethernet mode affords greater flexibility and reliability.
To do this, log in to the server using the dietpi credentials above. Then:
-
Enter sudo dietpi-config
- Go to 7: Network Options: Adapters
-
Select Ethernet
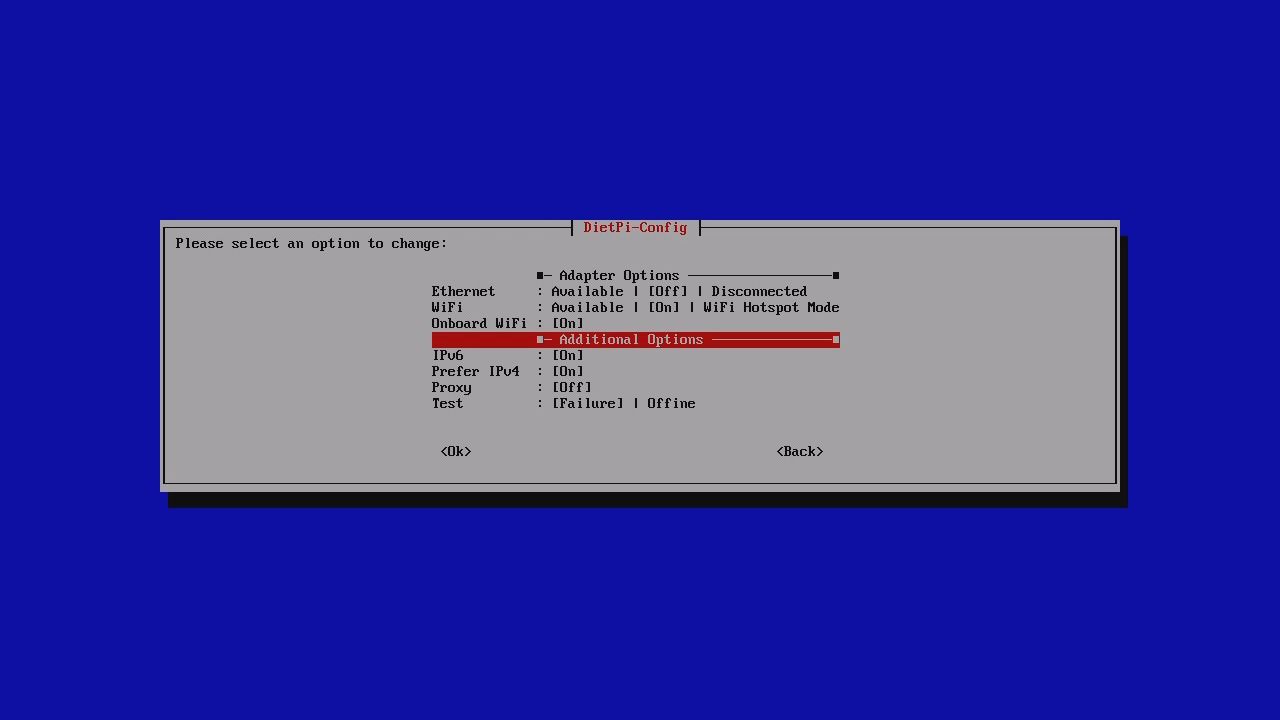
- Choose Enable
- Select OK
- Select Back until the config exits


Finally, input sudo reboot to restart the computer. When you sign in with the DietPi credentials, the router-assigned Ethernet IP address should be displayed. You can use this from your Quake client to access the server.
Hosting Multiplayer Games on Quake Server Is Another Way to Use Raspberry Pi
The Raspberry Pi isn’t an obvious gaming machine, yet this project demonstrates that it can host Quake multiplayer sessions. In fact, it’s a process that will work on any Raspberry Pi model.
While straightforward to set up, you may run into trouble with the local hotspot mode. Nevertheless, switching to Ethernet is a smart solution, and will give everyone on your network direct access to the Quake 3 environment.