Studio executives won't read your screenplay if it's in the wrong format. Most writers spend hundreds of dollars on screenwriting software to ensure their screenplay is correctly formatted, but if you follow this guide you can get the same results for free.
By changing the font, line spacing, margins, and style rules, you can create a perfectly formatted screenplay in Microsoft Word, Apple Pages, or Google Docs.
Here's how to format a screenplay...
Screenplay Formatting Guidelines
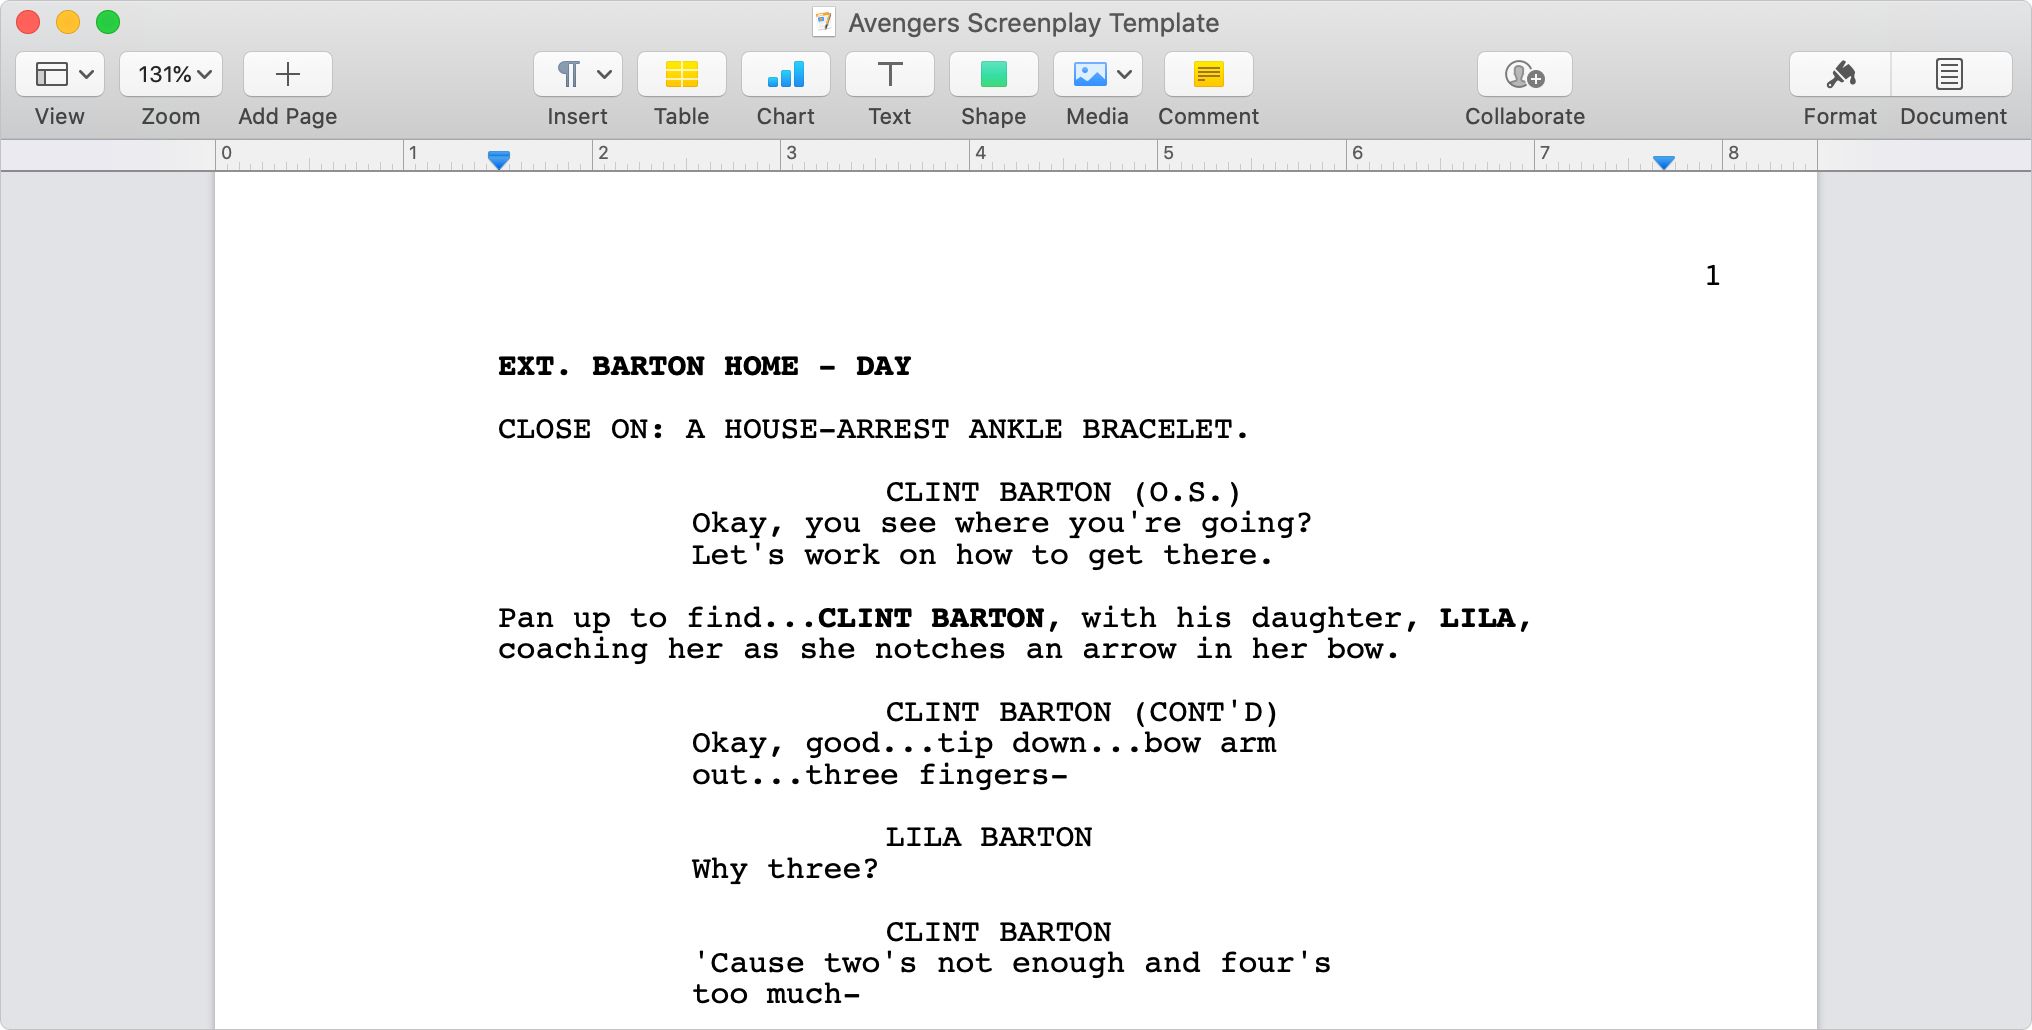
You're likely to find small variations across different screenplays when it comes to the exact line spacing, indentation, and font styles. We based our guidelines on the screenplay format for Avengers: Endgame.
If you want to use different settings, we suggest you find a screenplay from a company you want to work with and copy the format you find there. We'll highlight the areas you're likely to change as we work through the format below.
Follow the steps below to create a screenplay format in three of the most popular writing apps: Microsoft Word, Apple Pages, and Google Docs.
Step 1. Create a New Document
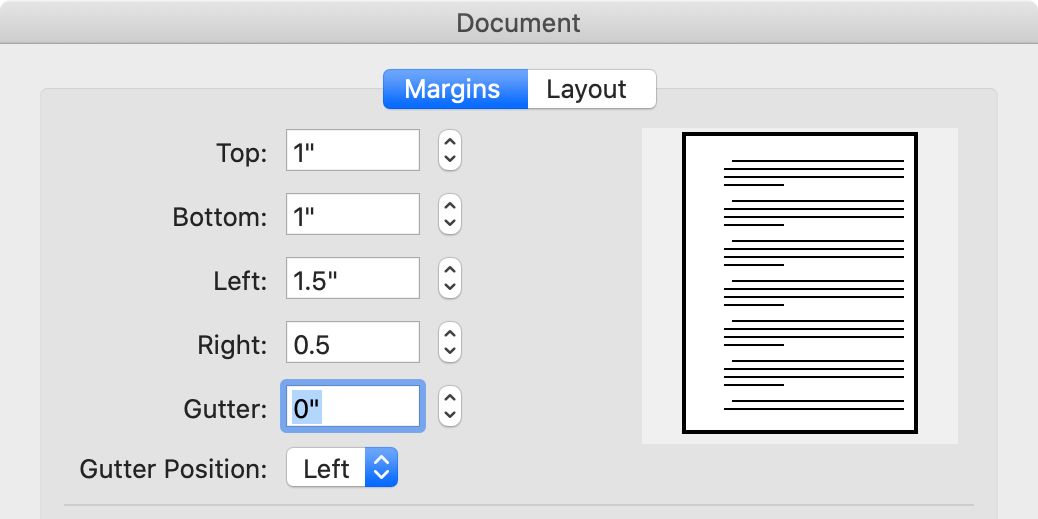
Create a new document in your word processor and use the settings below to change the paper size to US Letter with the following margins:
- Top: 1 inch
- Bottom: 1 inch
- Left: 1.5 inches
- Right: 0.5 inches
For A4 Paper, set the margins to:
- Top: 1.35 inches
- Bottom: 1.35 inches
- Left: 1.5 inches
- Right: 0.3 inches
Microsoft Word: Find these options by going to Layout > Size to choose the paper size. Then go to Margins > Custom Margins.
Apple Pages: Open the Document sidebar, then choose the paper size from the second dropdown menu. Change the Document Margins below that.
Google Docs: Go to File > Page Setup and edit the Paper Size and Margins.
Step 2. Choose the Font
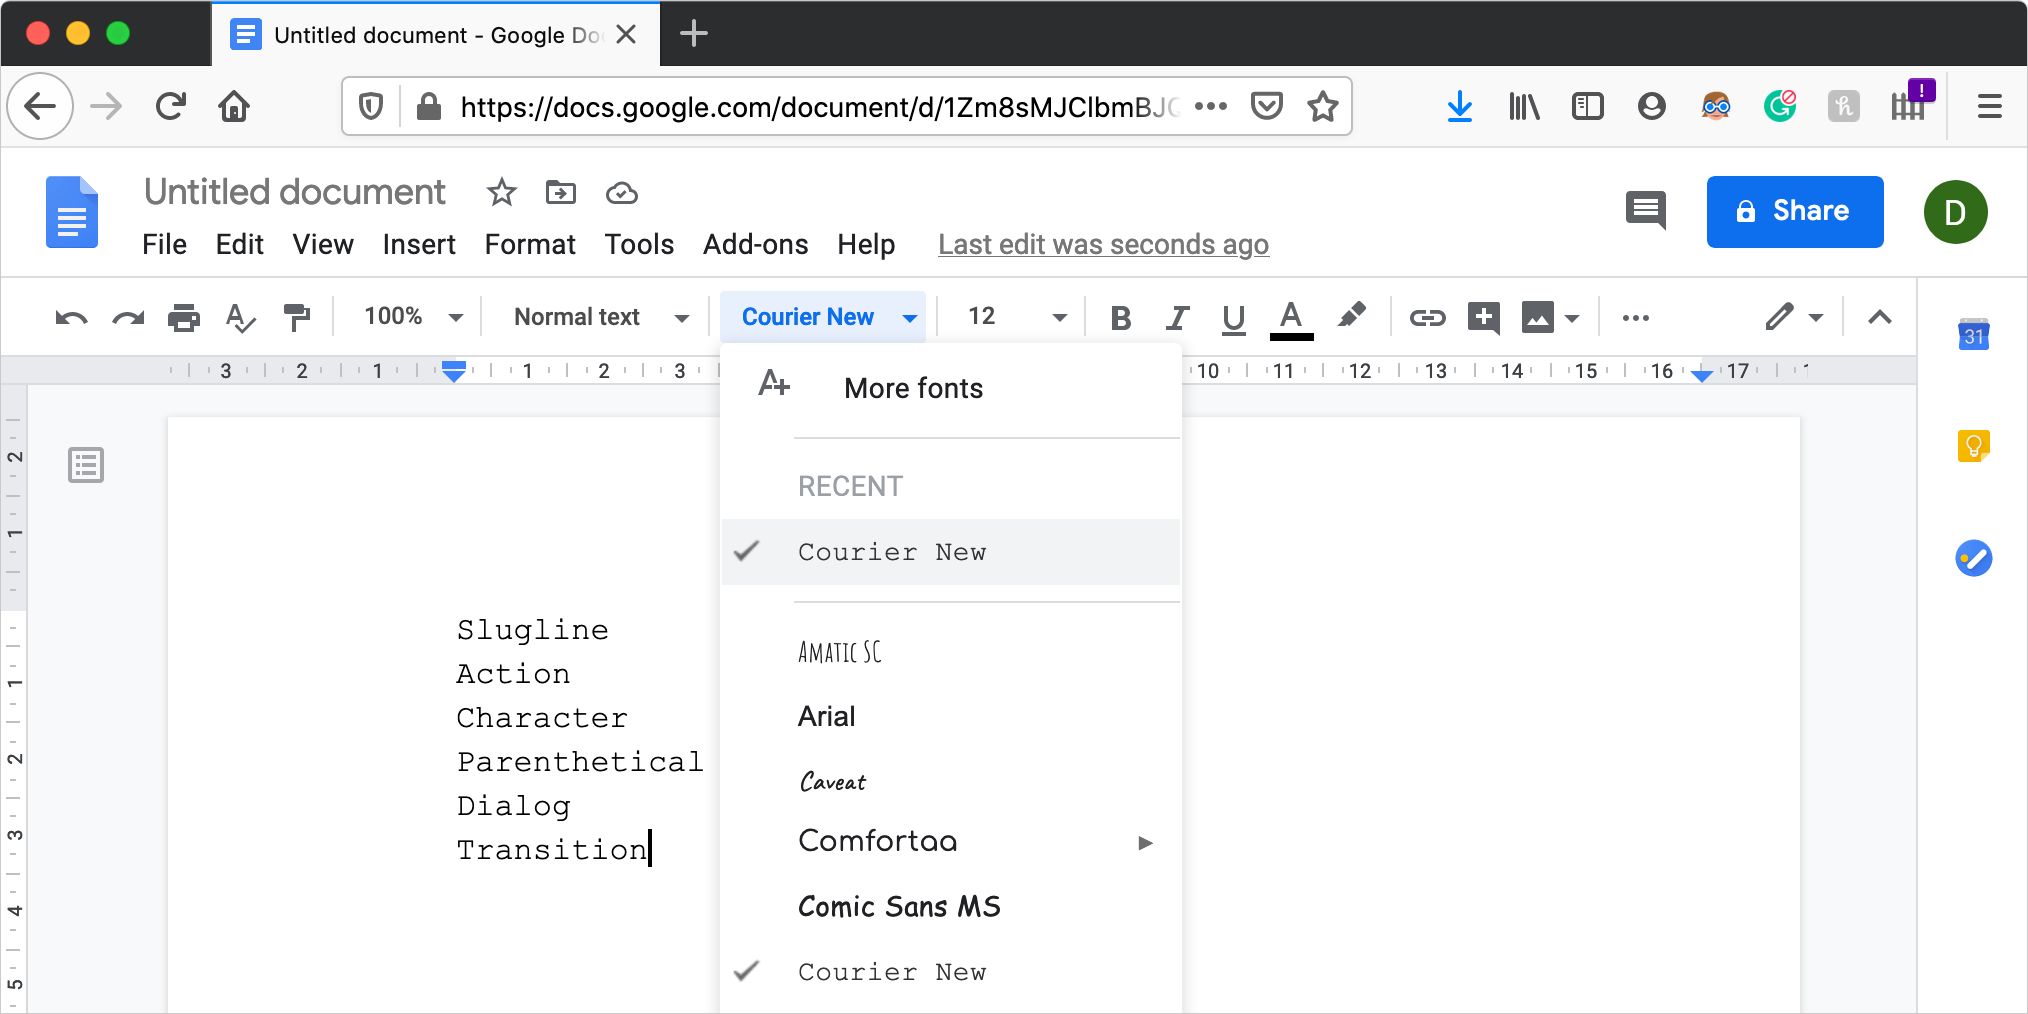
Before typing anything, set the font to Courier at 12 point size. You could also use variants of Courier, such as Courier New or Courier Prime.
Then type these six words, each on its own line:
- Slugline
- Action
- Character
- Parenthetical
- Dialog
- Transition
Each word refers to a different font style within a screenplay. You'll format each of them differently below, then save them to keyboard shortcuts for easy access.
For reference, here is what each style refers to:
- Slugline: Also known as a scene header, details the time and place of each scene.
- Action: Describes the setting, characters, or actions in a scene.
- Character: Appears before dialog lines to show which character is talking.
- Parenthetical: Appears in brackets before dialog, explaining how to deliver that line.
- Dialog: The words spoken by characters in your screenplay.
- Transitions: Used to emphasize the change to a new scene, such as Cut To.
Bold and Underlined Sluglines
Sluglines, or scene headers, appear in a range of styles across different screenplays. You may see them bold, underlined, or just capitalized.
We made our slugline bold, to match the Avengers: Endgame script. To do so, double-click the word "Slugline" and press Ctrl + B (or Cmd + B on a Mac).
You can choose a different style if you wish. But whichever slugline style you choose, keep it consistent across every page of your screenplay.
Capitalization
Certain lines in a screenplay only ever appear in all capital letters. Double-click to select the following lines, one at a time, then use the settings below to make them capitalized:
- Slugline
- Character
- Transition
Microsoft Word: Right-click the selected line and open the Font menu. Enable the box for All Caps.
Apple Pages: Open the Format sidebar, go to the Style tab, and open the Advanced Options menu beneath the font size. Change the Capitalization to All Caps.
Google Docs: You can't create a capitalized style in Google Docs, so you need to remember to capitalize these lines yourself as you write.
Step 3. Adjust the White Space
The recognizable look of a screenplay mostly comes from its use of white space. This is determined by the line spacing, indentation, and alignment settings for each of the different font styles.
Line Spacing
The line spacing determines how much white space appears before or after a line. Press Ctrl + A (or Cmd + A on a Mac) to select everything, then make the line spacing Exactly 12 points (or Exactly 1 in Google Docs).
Microsoft Word: Go to the Home tab and open the Line Spacing Options from the Line Spacing dropdown menu.
Apple Pages: Find the Spacing section in the Style tab of the Format sidebar. Use the dropdown menu to select Exactly.
Google Docs: Go to Format > Line spacing > Custom spacing.
Now double-click to select a single line and set these Before and After line spacings:
|
Style |
Before (Pts) |
After (Pts) |
|---|---|---|
|
Slugline |
24 |
12 |
|
Action |
12 |
12 |
|
Character |
12 |
0 |
|
Parenthetical |
0 |
0 |
|
Dialog |
0 |
0 |
|
Transition |
0 |
12 |
Indentation
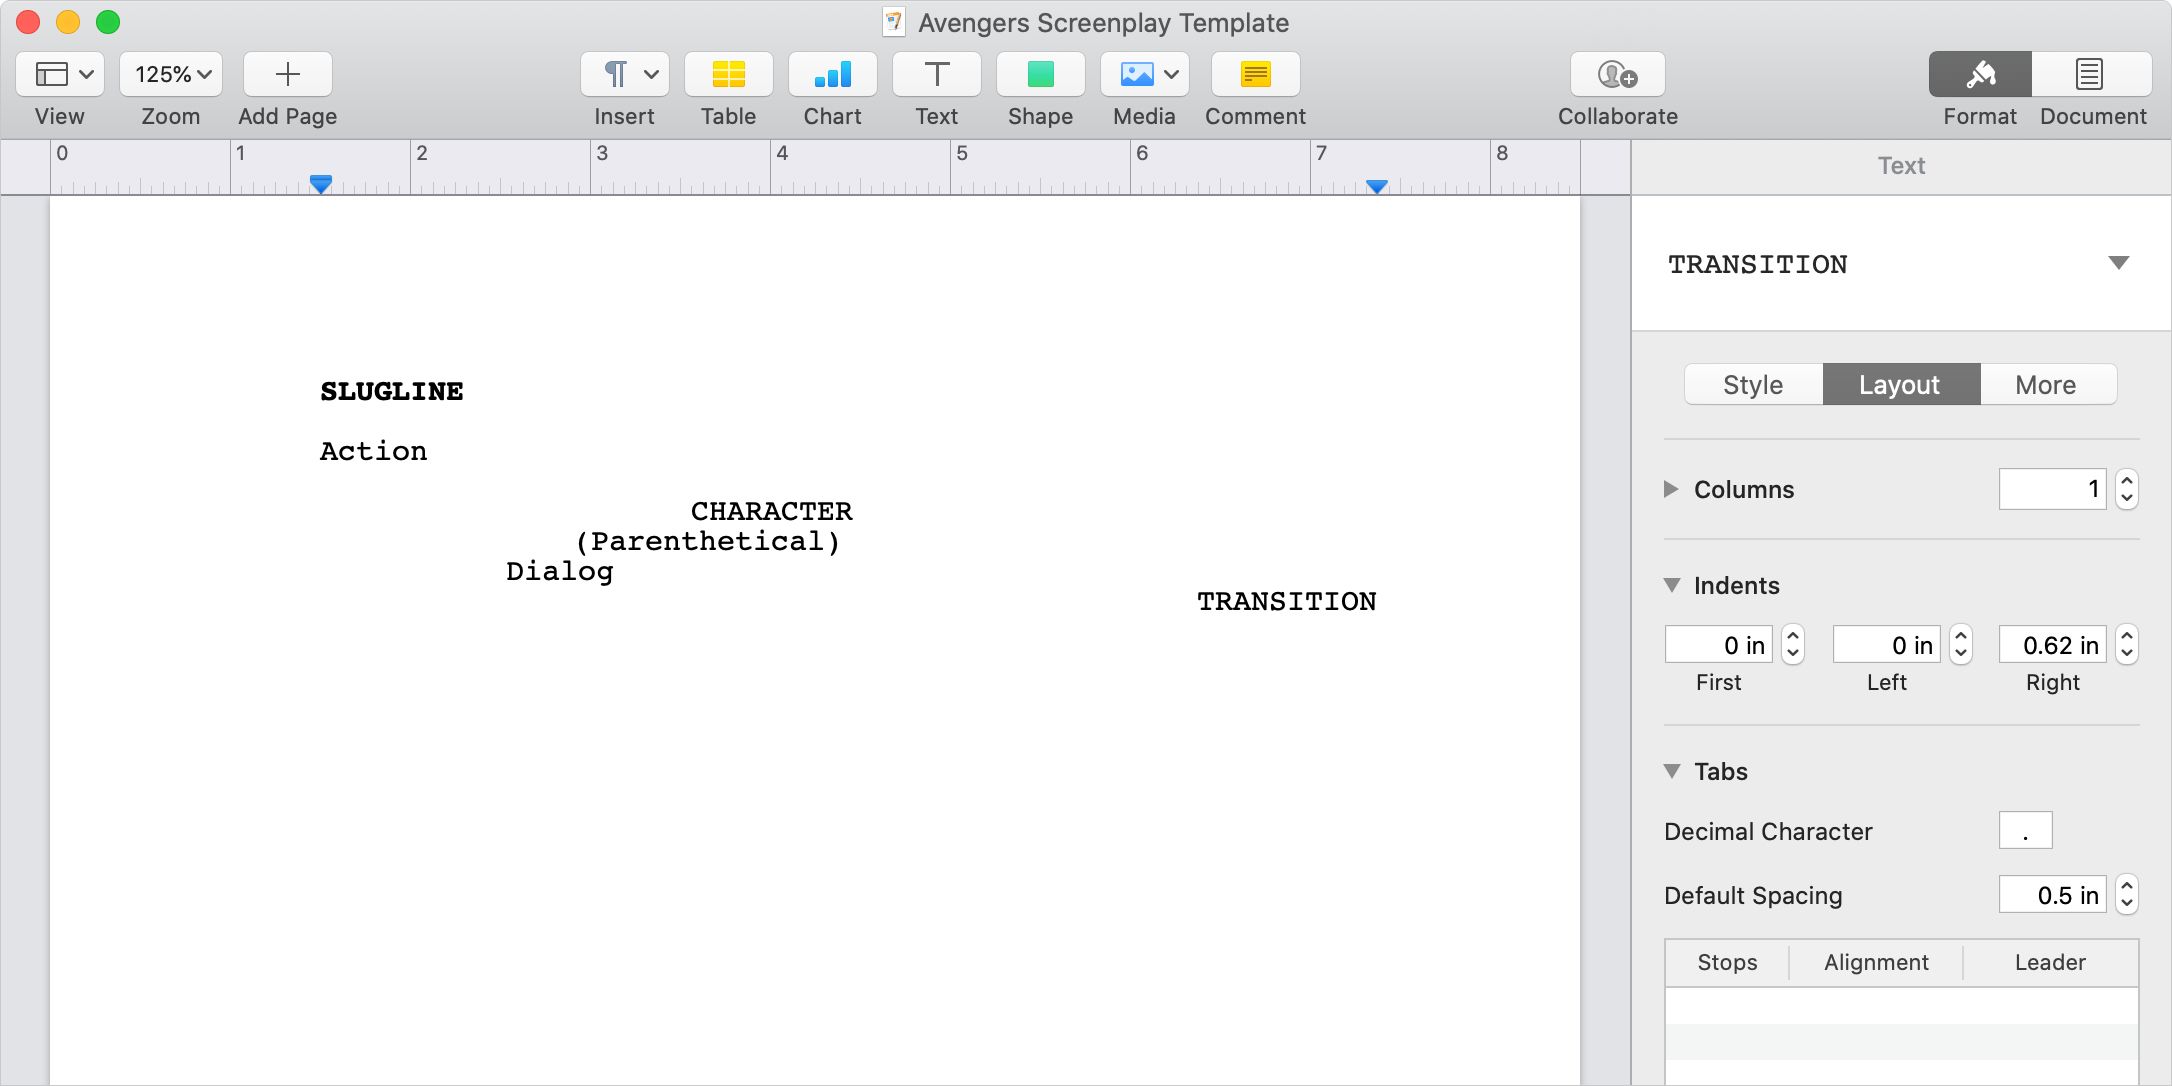
The indentation determines the gap to the left or right of each line in your screenplay. These settings are the most likely to vary from script to script, so feel free to make adjustments based on the format of your target screenplay.
Double-click to select a line, then set these indentations with the settings below:
|
Style |
Left (Inch) |
Right (Inch) |
|---|---|---|
|
Slugline |
0 |
0 |
|
Action |
0 |
0.31 |
|
Character |
2.06 |
0.5 |
|
Parenthetical |
1.41 |
2.13 |
|
Dialog |
1.03 |
1.88 |
|
Transition |
0 |
0.62 |
Microsoft Word: Open the Layout tab in the toolbar.
Apple Pages: Open the Format sidebar and go to the Layout tab. Set the First indent to the same as the Left one.
Google Docs: Go to Format > Align and Indent > Indentation options.
Alignment
Almost all text in a screenplay is aligned to the left, which is the default for most word processors. The only exception to this is transition lines, which are aligned to the right.
Double-click to select the Transition line, then align it to the right.
Page Breaks
It's important to keep certain lines together in a screenplay, even if that means leaving white space at the bottom of a page. This way, sluglines or character names always appear with the action or dialog lines that follow them.
Use the settings below to enable the Keep with next option for:
- Slugline
- Character
- Parenthetical
Then use the same settings to turn on Keep lines together (or Keep lines on same page in Google Docs) for:
- Parenthetical
- Dialog
Microsoft Word: Go to the Line and Page Breaks tab to choose your settings.
Apple Pages: Open the Format sidebar, then go the More tab.
Google Docs: Go to Format > Line Spacing and select the relevant options at the bottom.
Step 4. Create the Styles
You need to save each line as a style in your word processor so you can automatically format text as you write your screenplay. Double-click to select a single line, then follow the steps below to turn it into a style.
Repeat these steps for each line.
Microsoft Word: Go to the Home tab and open the Styles Pane. Click New Style and name it after the selected line.
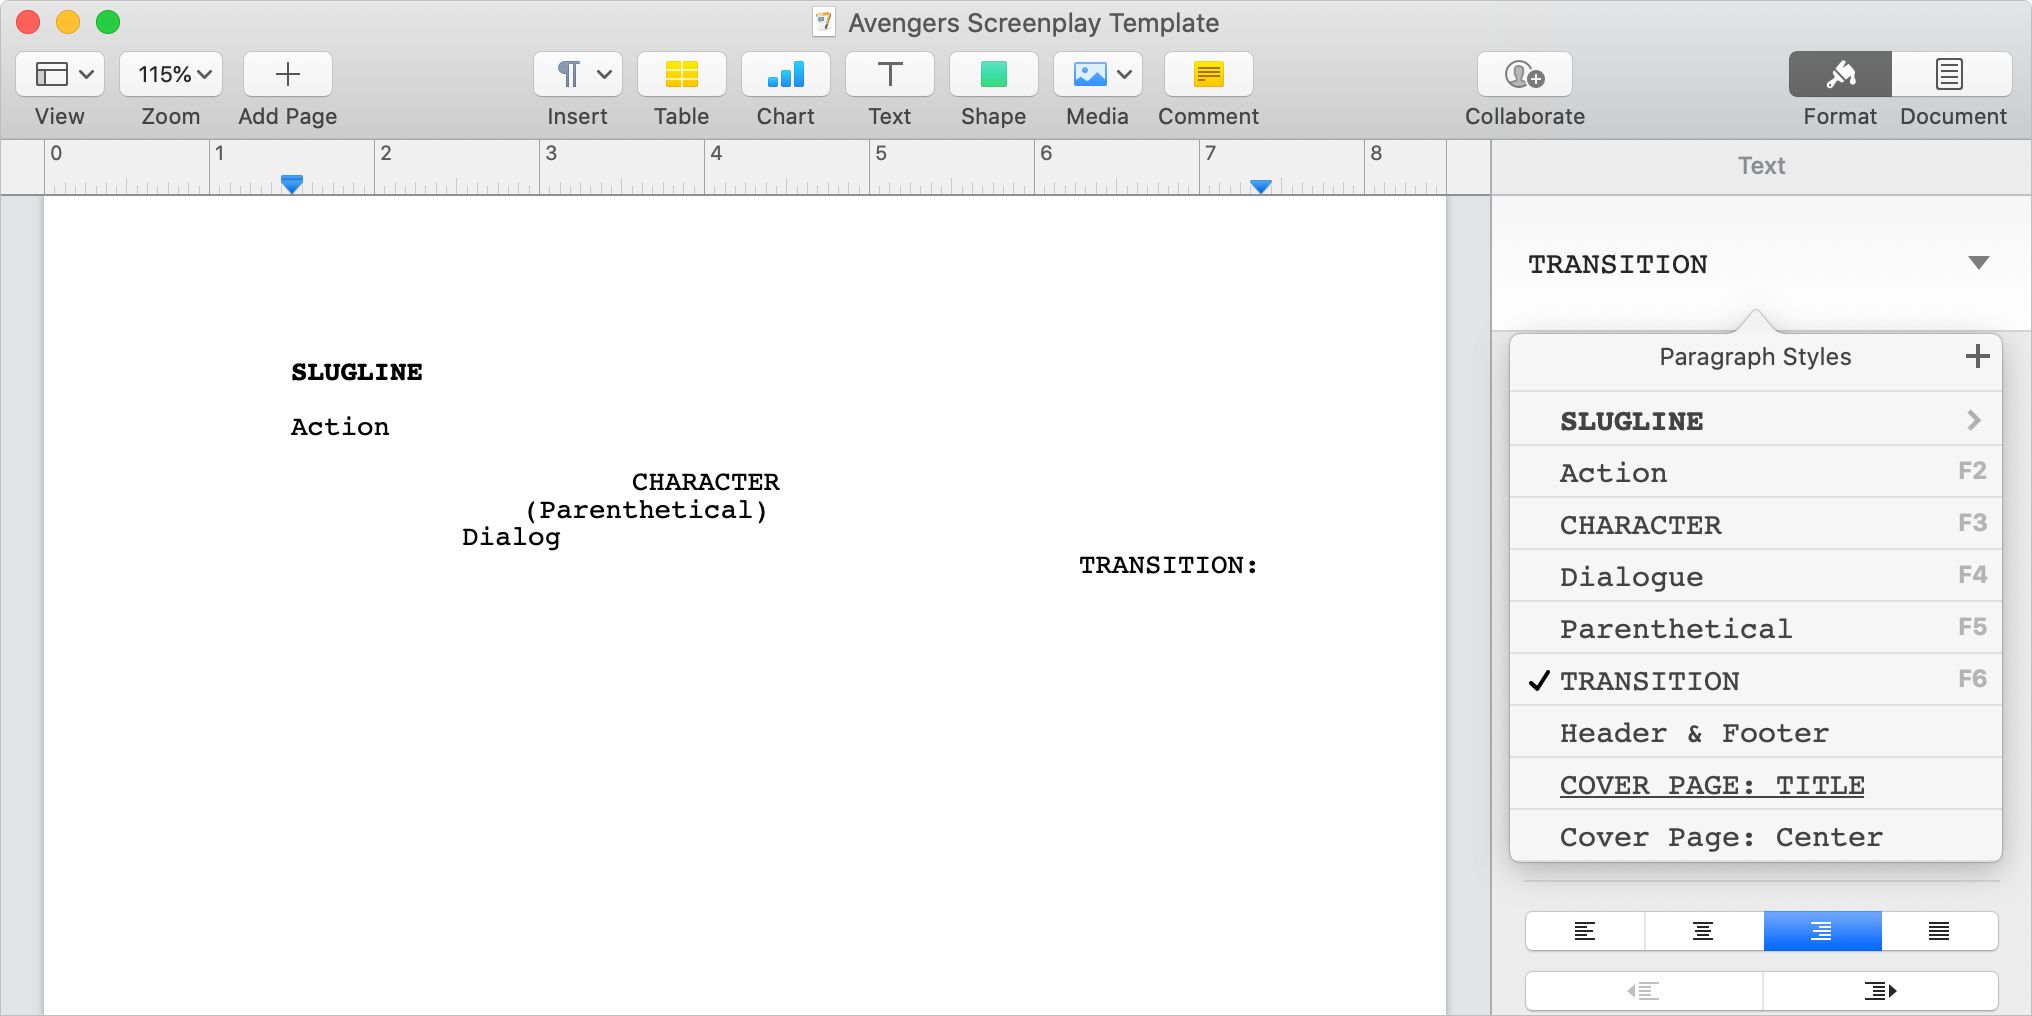
Apple Pages: Open the styles dropdown menu at the top of the Format sidebar. Click the Add (+) button where it says Paragraph Styles to create a new style, then name it after the selected line.
Google Docs: You can't create new styles in Google Docs. Instead, update the existing styles to match different lines. To do this, select a line and go to Format > Paragraph styles > [Heading 1–6] > Update [Heading 1–6] to match. You need to match the Heading styles so you can use them with shortcuts.
Choose the Following Style
Certain styles are almost always grouped together in a screenplay, such as character and dialog. Use the settings below to make your word processor automatically select an appropriate style whenever you create a new line.
Choose these following styles for each line in your screenplay:
- Slugline: Followed by Action
- Action: Followed by Action (or Same)
- Character: Followed by Dialog
- Parenthetical: Followed by Dialog
- Dialog: Followed by Character
- Transition: Followed by Slugline
Microsoft Word: Open the Styles Pane and hover over the first style, then open the dropdown menu and select Modify Style. In the window that appears, choose an appropriate Style for following paragraph.
Apple Pages: Select the first line, open the Format sidebar, and go to the More tab. Use the Following Paragraph Style dropdown to choose the following style.
Google Docs: You can't choose a following style in Google Docs.
Save Your Style to a Keyboard Shortcut
Keyboard shortcuts make it easier to select styles and format text as you write your screenplay. However, the available shortcuts depend on your word processor.
Microsoft Word: Open the Styles Pane, hover over one of your new styles, open the dropdown menu, and choose to Modify Style. From the menu in the bottom-left corner, select Shortcut Key, then press any keyboard shortcut you want to use and click Assign.
Apple Pages: Open the Format sidebar, then click the arrow at the top to reveal the styles dropdown menu. Hover over one of your new styles and click the Arrow that appears. Choose a Shortcut from the available options. You need to hold Fn to use the function keys as shortcuts on a Mac.
Google Docs: Shortcuts already exist for the Heading styles. Hold Ctrl + Option (or Cmd + Option on a Mac) with the numbers 1–6 to select Heading styles.
Step 5. Finishing Touches
At this point, the body of your screenplay should be perfectly formatted. Spend some time with these motivational and planning writing apps to get your head down and write your story.
But before you send it out to anyone, you still need to add a couple of finishing touches.
Add a Title Page
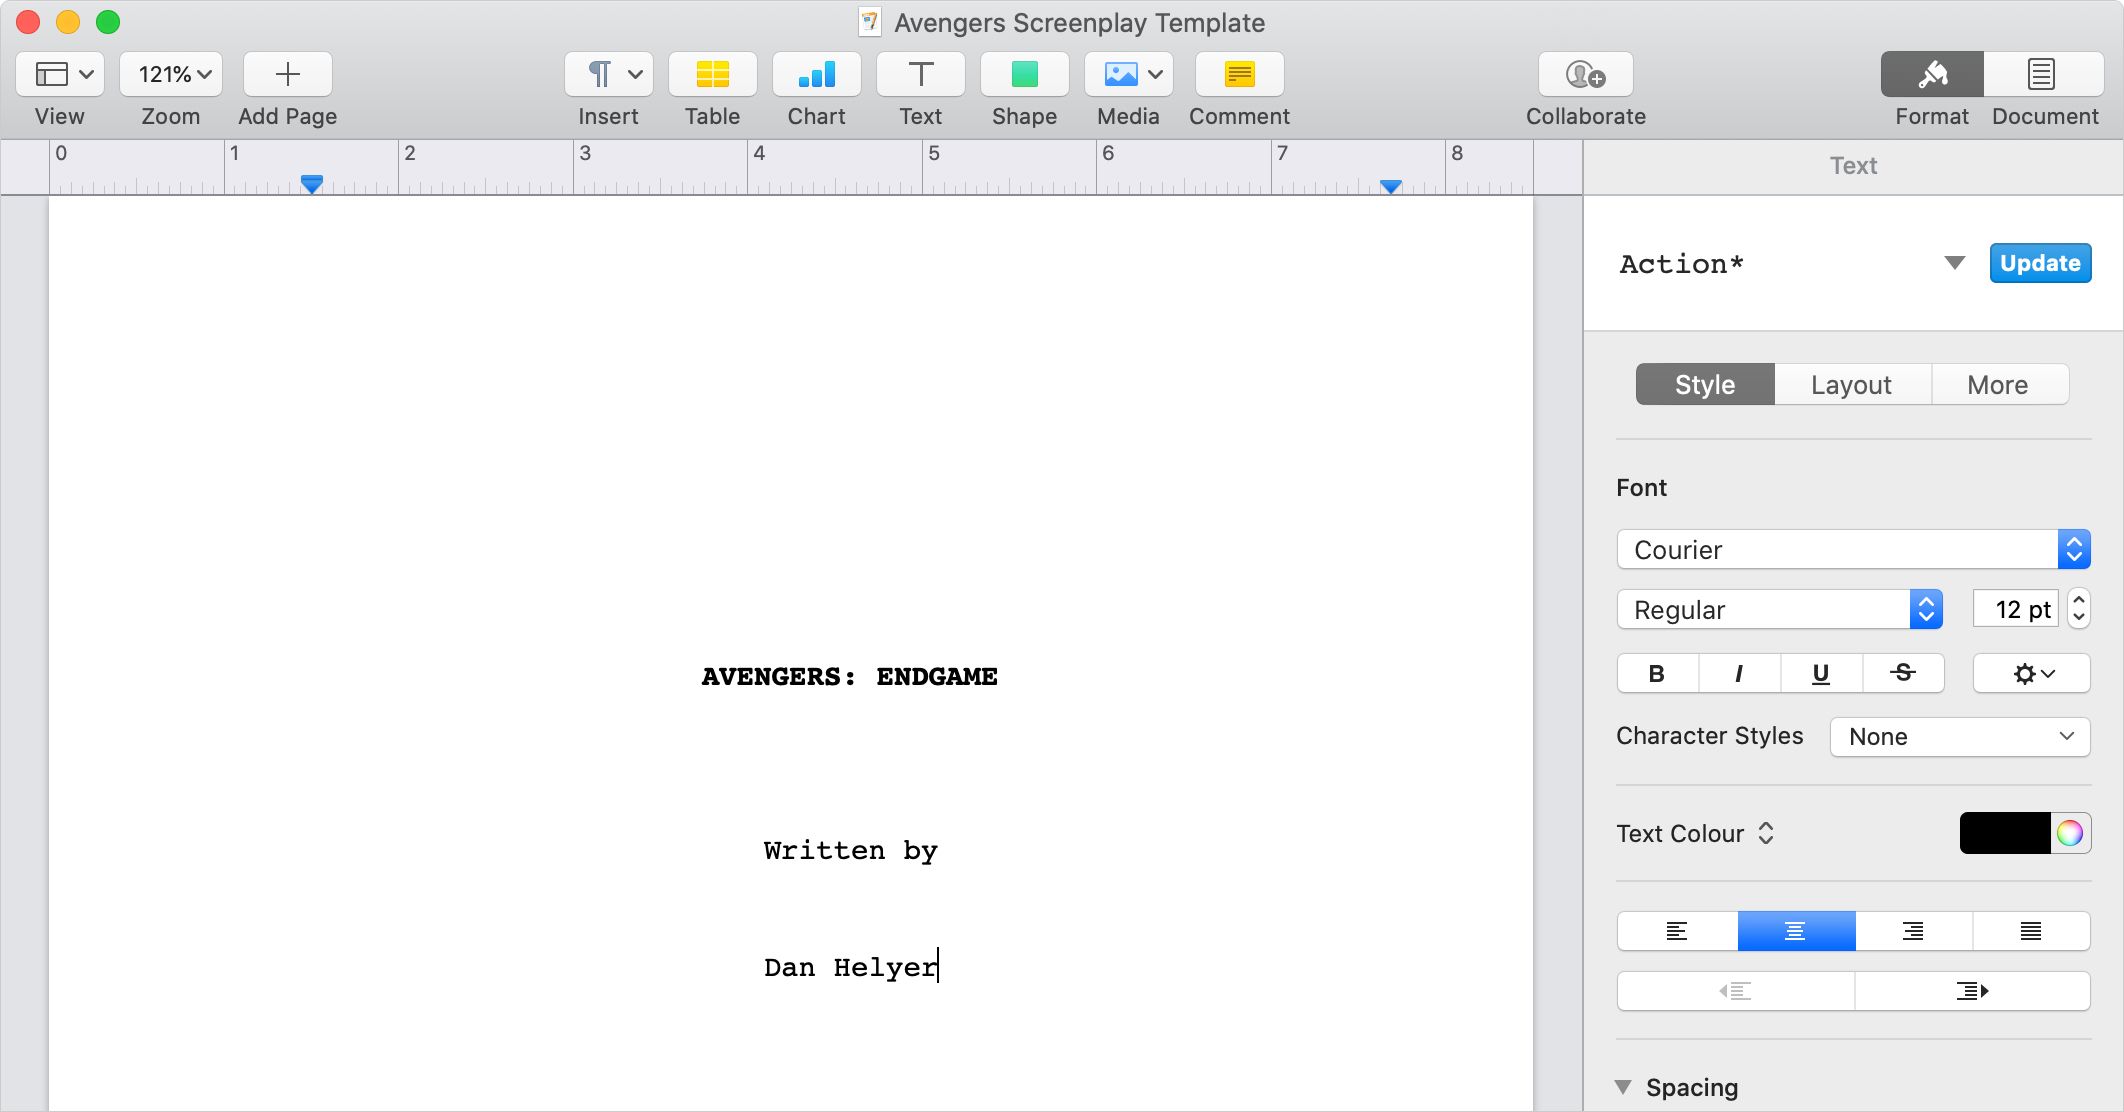
Start with a blank page and use the action style to create five blank lines. Now type your screenplay title in all capitals and make it bold.
Create another two blank lines, type "Written by", then type another blank line and type your name.
Select everything on the page and align it to the center.
It's also a good idea to add some contact details to the bottom of this page for people to find you if they like the screenplay.
Add Page Numbers
You need page numbers in case someone prints your screenplay out to read it. Use the settings below to add them and make sure your page numbers appear in 12 point Courier.
Microsoft Word: Open the Insert tab and click the Page Number button. Change the Position to Top of page and turn off the Show number on first page option. After clicking OK, double-click your page number to change the font and size.
Apple Pages: Click in the top-right corner of the page to edit the header, then choose to Insert Page Number > 1. Double-click your page number to change the font and size. Then open the Document sidebar, go to the Section tab, and enable the Hide on first page of section option.
Google Docs: Go to Insert > Page Numbers and choose the second option to show numbers in the top-right corner after the first page.
Save Your Screenplay Format Template
Now that you've finished creating your free screenplay format, you should save it as a template in Microsoft Word or Apple Pages. To do so, go to File > Save as Template.
Unfortunately, you can't save your own templates in Google Docs. Instead, create a copy of this document for each screenplay you want to start working.
Learn More About Filmmaking
When you're setting out to write a screenplay, you should aim to learn everything you can about filmmaking in general. Fortunately, the internet has endless free resources you can use to learn from.
Why not check out some movie analysis channels on YouTube for the best crash course in film studies. Then use the lessons you learn to improve your next screenplay.


