
Windows 11 has finally rolled out, and Windows users are rushing to experience Microsoft’s newest operating system for themselves. While many users have successfully upgraded to Windows 11, others have reported an 0x8007007f error when upgrading via the Windows 11 Installation Assistant.
Bugs are relatively familiar with a major Windows upgrade release, so you shouldn’t worry too much about the Windows 11 upgrade error. Read on as we explain what this error means and how you can fix it and upgrade to Windows 11.
What Is the Windows 11 Installation Assistant Error 0x8007007f?
Windows 10 users report that the 0x8007007f error appears when they attempt to upgrade to Windows 11 through the Windows 11 Installation Assistant utility program. And while Windows 11 has notably high system requirements, even people with compatible PCs have encountered this error.
Microsoft has not yet shared the exact cause of the issue. Still, the Installation Assistant error 0x8007007f is suspected to arise due to insufficient administrator permission, outdated drivers, or maybe a corrupt system file.
There is no exact solution to this error yet, so you might have to experiment and see what works for you. Windows users who had reported the Windows 11 Installation Assistant error have had success with the fixes discussed below.
How to Fix the Windows 11 Installation Assistant Error 0x8007007f
There are a few ways to fix this issue, and each method focuses on a different aspect of Windows 10. As such, be prepared to dart around your whole system to get a fix working!
Run the Assistant as an Administrator
A third-party background app could be interfering with the Windows 11 Installation Assistant utility, causing it to fail. As such, the most popular solution to the 0x8007007f error is to run the Windows 11 Installation Assistant as administrator.
Here’s how you can run the Windows 11 Installation Assistant as administrator:
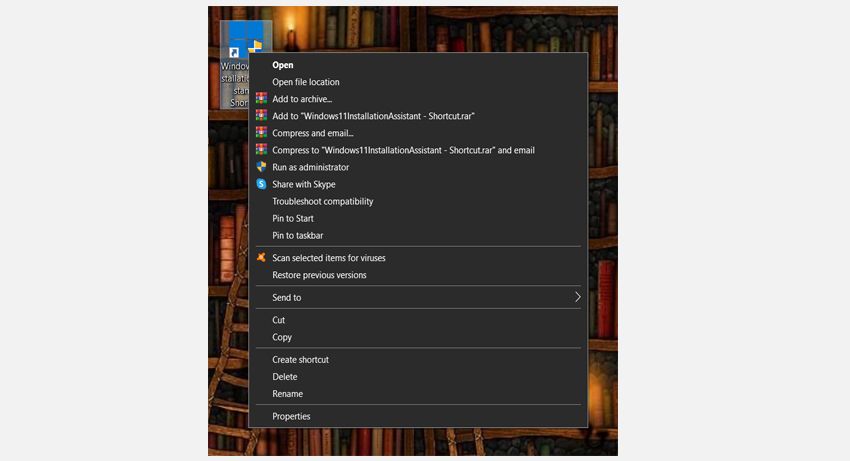
- Locate the Windows 11 Installation Assistant program file, and it will most probably be in the Downloads folder of your PC.
- Right-click on the program icon, and click on Run as administrator from the drop-down menu.
-
A dialog box will pop up to ask your permission; click Yes to allow Windows 11 Installation Assistant to run with administrator privilege.
- Follow the on-screen steps to install Windows 11 on your device.

There is a high chance that this simple fix will solve the Windows 11 Installation Assistant error 0x8007007f. However, if you still receive the same error message, you might want to try another possible solution.
Disable Your Antivirus
You can also try disabling your antivirus program for a few minutes and then launch the Windows 11 Installation Assistant as administrator.
Depending on your antivirus program, the steps to temporarily disable it will be different. A general method for temporarily disabling the antivirus is to locate the antivirus program icon on the system tray, right-click, and you should see a disable option. Disable the antivirus for a short time (15 minutes or 30 minutes), and allow Administrator access when asked.
Once done, try the steps we listed above a second time and see if they work for you.
Update Your Graphics Driver
Sometimes our PCs are running an outdated graphics driver that can cause unexpected issues with your PC. A possible fix to the Installation Assistant 0x8007007f error is to update your display adapter drivers.
Here’s how you can update the graphics driver on Windows 10:
- Launch the Start menu, search for Device Manager and click on the Best match.
- In the Device Manager window, expand the Display adapters list.
-
Right-click on your display adapter driver and click on Update driver. Windows 10 will then automatically search for the latest available graphics driver.
.png)
- Alternatively, you can also choose Uninstall device and download the latest graphics driver from the manufacturer’s website.
- Once the driver has been installed/updated, restart your PC and launch Windows 11 Installation Assistant once again.
.png?q=50&fit=crop&w=1500&dpr=1.5)
System File Check Scan
Corrupt system files can often cause issues with your PC. If the above solutions have not fixed the Windows 11 Installation Assistant error, then you should try performing a System File Check scan through the Command Prompt.
- Launch the Start menu and search for Command Prompt, right-click the Best match, click Run as administrator, and click Yes when prompted.
-
In the command prompt window, type the following command and press Enter:
.png)
SFC /scannow - The System File Checker utility will now scan your PC for any damaged files and repair them automatically.
- After the scan is complete, restart your PC.
.png?q=50&fit=crop&w=1500&dpr=1.5)
If corrupt system files were causing the Windows 11 Installation Assistant error, you should now be able to upgrade to Windows 11 using the Installation Assistant easily.
Upgrade Using the Windows 11 Disk Image
If you’re still facing issues upgrading to Windows 11 using the Installation Assistant, you can still upgrade using two different methods.
The first method requires users to create an installation media using the Windows Media Creation tool and then use it to install Windows 11. This is similar to using the Windows Media Creation tool for creating a Windows 10 bootable drive.
The second method is intended for users who want to install Windows 11 on a virtual machine or create a bootable Windows 11 installation media. You can easily download the Windows 11 disk image (ISO) and then install Windows 11 without using a bootable drive as follows:
- Download the Windows 11 ISO from Microsoft.
- Locate the downloaded file, right-click and select Properties.
- Under the General tab, click on Change to mount the ISO file without using a USB/DVD drive.
- Select Windows Explorer and click on Apply.
- You now want to right-click the ISO file once again and then click on Mount to create a virtual bootable disc.
- Double-click the ISO file to view the setup files, then finally double-click setup.exe to launch the Windows 11 installation setup.
We recommend you back up your files on external storage before installing Windows 11.
Windows 11 Is Finally Here
Microsoft has finally released Windows 11, and while many users have successfully upgraded, some have reported issues. Hopefully, the solutions discussed above will have fixed the Windows 11 Installation Assistant 0x8007007f error.
Windows 11 is redesigned for the better, and it is now much easier to use and accessible. The new Start menu and Settings app are the most significant improvements that will positively impact your day-to-day use.