
If you have recently upgraded to Windows 11 or reinstalled the OS, you experience a Windows activation failure that shows the error code 0xc004c003. This issue usually occurs when your system tries to activate the operating system with an OEM Activation Digital Product Key.
Here’s we show a few troubleshooting tips to help you fix this error and activate your copy of Windows 11.
What Causes the Error Code 0xc004c003 in Windows 11 Pro?
The licensing code component in Windows is responsible for accessing the registry hive and verifying the product key. When the access is denied due to incorrect access, it triggers the 0xc004c003 error.
An unsuccessful key validation can cause this error, but the reasons as to why it was unsuccessful can vary. Here we explore a few tips that you can execute to fix this error in Windows 11.
1. Check Your Windows Version

Windows 11, like its successor, is available in multiple editions—Home, Pro, and Enterprise. Most consumer-grade computers come with the Home edition installed out of the box.
Depending on how you installed Windows 11 on your PC, the installed OS edition can change. If you performed an in-place upgrade, Windows would automatically detect your existing edition and install the correct edition (Home, Pro, or Enterprise).
However, if you performed a clean install for Windows 11, you may have installed the Pro edition instead of Home. Unfortunately, you will not be able to activate the Pro edition with a Home edition license key.
To check the installed Windows 11 edition:
- Press the Win + I to open Settings.
- In the System tab, scroll down and click on About.
- In the right pane, scroll down to the Windows specification section. Here locate the Edition section to view the Windows 11 edition installed on your PC.
- If your Windows 11 edition matches your earlier edition, skip to Fix three below.
If you have purchased a Windows 11 Home license key, and have installed the Pro edition, try performing a downgrade.
2. Downgrade From Windows 11 Pro to Windows 11 Home
If you have upgraded to the Pro edition of Windows 11 with the Home edition license key, you will experience the activation error 0xc004c003.
There are two ways to deal with this issue: First, upgrade to the Pro version by making a new purchase, or downgrade to the Home edition.
If you don’t want to splurge on a new upgrade, the process to downgrade from Windows 11 Pro to Home involves two steps. You first need to tweak your registry editor to prepare for the downgrade and then run the ISO setup file to complete the downgrade process.
2.1 Tweaking the Registry to Install Windows 10 Home

- Press Win + R to open Run.
- Type regedit and click OK to open the Registry Editor. Click Yes when prompted by the UAC.
-
In the Registry Editor, navigate to the following location. You can copy and paste the path in the Registry Editor for easier navigation:
Computer\HKEY_LOCAL_MACHINE\SOFTWARE\Microsoft\Windows NT\CurrentVersion - In the right pane, locate and double-click on the ProductName value.
- In the pop-up window, type Windows 11 Home Single Language.
-
Click OK to save the changes.
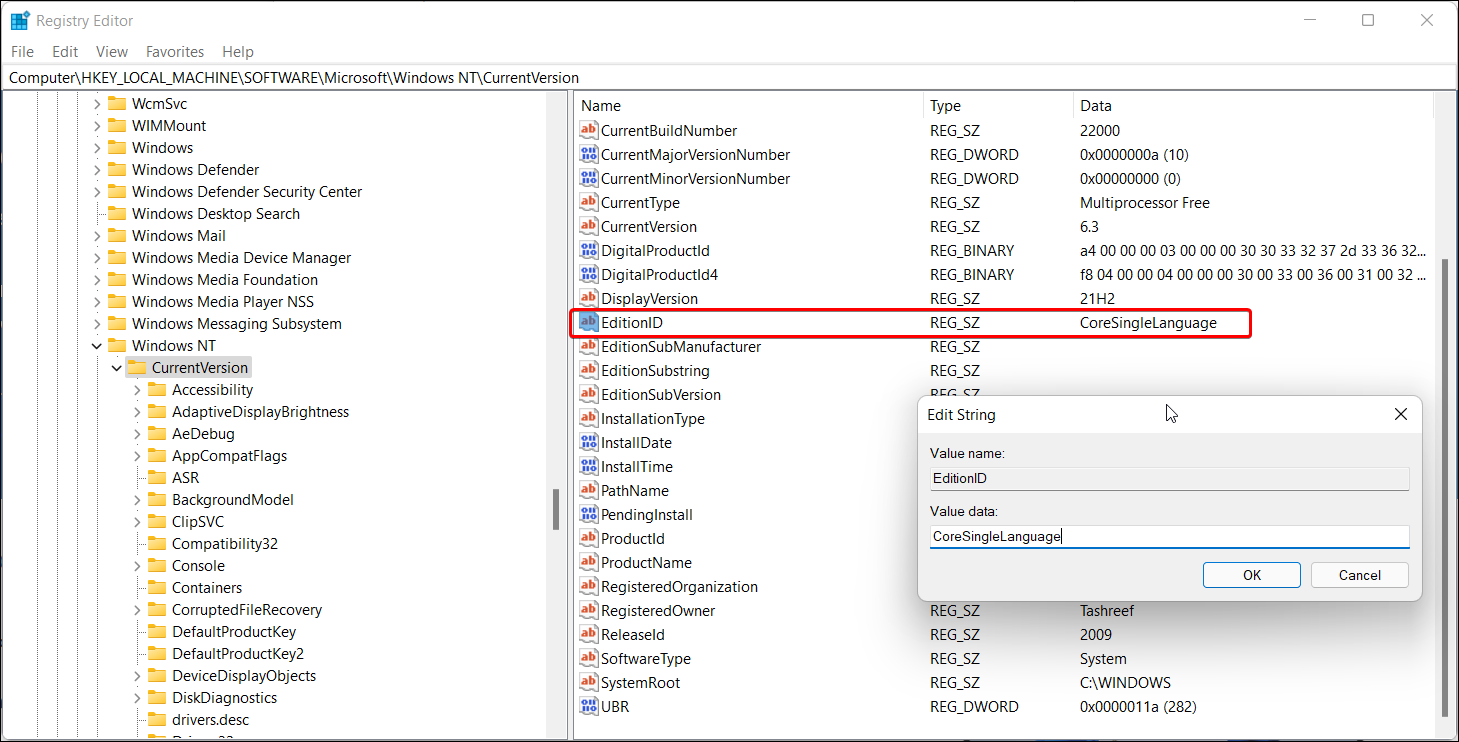
- Next, locate and double-click on the EditionID value.
- In the pop-up window, type CoreSingleLanguage.
- Click OK to save the changes.
-
Next, navigate to the following location in the Registry Editor:
Computer\HKEY_LOCAL_MACHINE\SOFTWARE\WOW6432Node\Microsoft\Windows NT\CurrentVersion - In the right pane, look for the ProductName value and change it to Windows 10 Home.
- Click OK to save the changes.
- Next, locate and double-click on the EditionID and change it to CoreSingleLanguage.
- Click OK to save the changes.
- Close the Registry Editor.

2.2 Downgrade to Windows 11 Home

To complete the downgrade process, we will download the ISO file and perform an in-place upgrade. An in-place upgrade allows you to reinstall Windows OS without removing your files or apps. Here’s how to do it.
- Go to Microsoft’s official Windows 11 download page.
- Scroll down to the Download Windows 11 Disk Image (ISO) section.
- Click the drop-down and select Windows 11.
- Click on the Download button.
- Next, select your language from the drop-down.
- Click Confirm.
- Click on the 64-bit Download button. It will start your download for Windows 11 ISO.
- Once the ISO is downloaded, open the download folder.
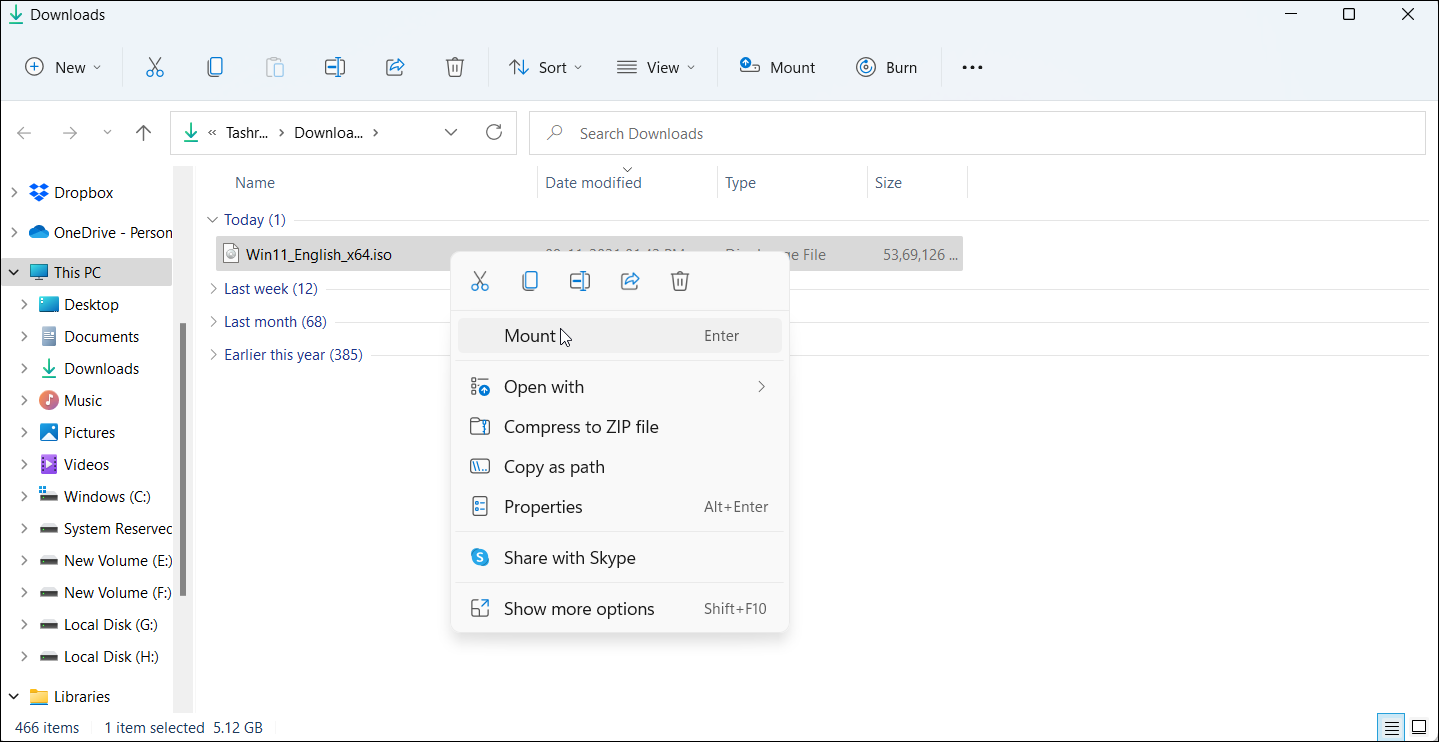
-
Right-click on the ISO image and select Mount.
- Windows will mount the ISO and open the drive folder automatically. If not, click on the DVD Drive icon under This PC.
- Inside the ISO folder, double-click on the Setup.exe file. Click Yes if prompted by UAC.
- In the Install Windows 11 window, click on Change how Setup downloads updates.
- Next, click Not right now.
- Click Next to proceed.
- Then, accept the notices and license terms.
- In the Ready to install window, ensure the Install Windows 11 Home and Keep personal files and apps option is displayed.
- Click Install and wait for the process to complete. An in-place upgrade can take a few hours to complete depending on your system hardware. You may also notice a few reboots during the process, but it is normal behavior.

After the restart, verify if the downgrade is successful. To do this, navigate to Settings > About > Windows Specifications and check the Edition.
To activate Windows 11, go to Settings > System > Activation. Next, follow on-screen instructions to activate your edition of Windows 11.
3. Activate Windows 11 Using Command Prompt

At times, the Microsoft server may fail to verify and activate your license because of server issues. If the activation still fails, you can use the Command Prompt to get your license activated. Here’s how to do it.
- Press the Windows key, and type cmd.
- From the search results, right-click on Command Prompt and select Run as administrator. Click Yes if prompted by UAC.
-
In the Command Prompt window, type the following command and hit enter:
slmgr.vbs –rearm - Once the success prompt is displayed, click OK and then restart your PC. After the restart, open the activation page and check if the 0xc004c003 error is resolved.
4. Contact Microsoft to Reactivate Windows After a Hardware Change
When you register your Windows 11 license for the first time, it associates itself with your computer’s hardware. This helps Microsoft ensure the license is used per the terms of use, and also, the user doesn’t have to manually activate Windows each time after clean install.
However, if you have made major hardware changes, such as replacing your motherboard, Windows will not be able to verify the validity. To resolve this, you can use the Digital Product Key or run the troubleshooter to verify and activate Windows. Check out Microsoft’s resources on reactivating Windows 11 after a hardware change for more troubleshooting steps.
Fixing Windows 11 Activation Error 0xc004c003
Microsoft restricts some personalization and other functionalities on systems with inactivated Windows licenses. To troubleshoot the error, verify your Windows 11 version and product key, or manually activate the key using the Command Prompt. You may also want to verify the validity of your license and perform a downgrade to the correct edition of Windows 11 if required.
If nothing works, consider downgrading to Windows 10 from Windows 11 till Microsoft irons out early bugs and glitches.