We often have files containing sensitive information such as financial records, passwords, bank details, personal documents, etc. Protecting these files from unauthorized access or malicious programs is crucial.
While there are third-party applications that make it possible to secure a Windows 10 folder, they're nearly not as secure as Windows' built-in disk encryption software—BitLocker. Read on as we detail how you can secure your precious files in Windows 10.
What Is BitLocker? Why Use It on Windows 10?
BitLocker is a highly secure drive encryption feature that comes pre-installed on Windows. It is integrated with the operating system directly and keeps your data secure in case of physical theft or unauthorized access.
Windows 10 is not the most secure operating system, and it's not even the most secure version of Windows (Windows 11 is miles ahead, thanks to TPM 2.0). So, if you have sensitive files and folders, you can use a BitLocker encrypted drive to password protect them. Doing so will safeguard essential files in case your device gets into the wrong hands. BitLocker's virtual hard disk feature lets us encrypt any folder on your system as a separate virtual drive.
Unlike other third-party folder-secure options, BitLocker is more reliable since it's an official Microsoft encryption mechanism), costs nothing, and has no hidden charges or bloatware.
How to Add a Password to a Windows 10 Folder Using BitLocker
To secure a Windows 10 folder with a password, we will configure it to use a virtual drive encrypted with BitLocker.
Create a Virtual Drive in Disk Management

- To create a virtual drive, search for Disk Management in the Start menu and select the best match.
- Select Action from the toolbar at the top and click on Create VHD.
- Choose the location of your protected folder by clicking on Browse and its name.
- Allocate the required memory for your folder by entering the size in the Virtual hard disk size field.
- We suggest selecting the VHDX format as they provide modern features supported by newer operating systems.
- If you want the folder size to increase dynamically and not worry about allocating memory, select the Dynamically expanding (Recommended) option.
- Once you've verified the chosen configuration, select OK to create your virtual drive.
Initialize the Virtual Disk
Before you can begin using your virtual drive, you need to initialize it. This involves assigning volumes and selecting the required partition type:

- Find your virtual drive within Disk Management, right-click and choose Initialize Disk from the context menu.
- Ensure your drive is checked, select the GPT (GUID Partition Table) partition style, and click OK.
- Right-click on the disk once again and select New Single Volume.
-
Navigate the New Simple Volume Wizard by clicking Next, and choose the default memory allocation size.
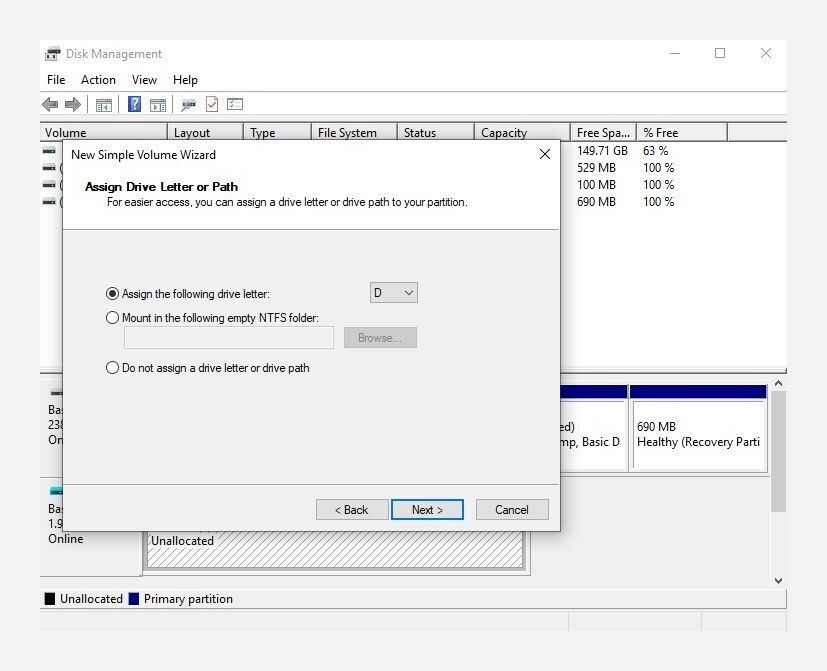
- We recommend using the NTFS file system and a generic name in the Volume label. Ensure Perform a quick format is selected, click on Next and Finish.

Configure BitLocker for Your Virtual Drive
Now that we've set up the virtual drive, we need to encrypt it using BitLocker. You can confirm if BitLocker is already configured on your system—the process for doing so is relatively straightforward:

- Launch the Control Panel and navigate to System and Security > BitLocker Drive Encryption.
-
Find your newly created virtual drive in the Fixed data drives section and click on Turn on BitLocker.
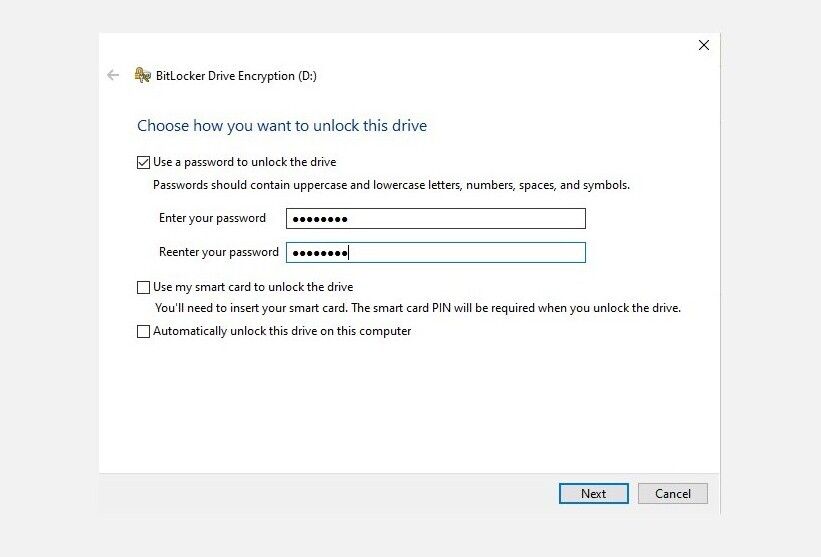
- Choose the Use a password to unlock the drive, enter a strong password, and click on Next.
- It is crucial to safeguard your recovery key, or you'll be locked out for good. We recommend saving it to a file and printing it to keep it safe.
- In the next screen, select Encrypt used disk space only and Compatible mode from the next screen.
- Once you've completed the above steps, click on Start encrypting and wait for the process to complete (your PC may restart during the process).

How to Use the BitLocker Encrypted Folder on Windows 10
Your secure folder is now ready to be used, and you can begin securing files:
- Navigate to the saved location of the virtual drive and double-click the VHD/VHDX file to mount it.
-
Go to This PC, find your virtual drive in the Devices and drives group, and double-click on it.
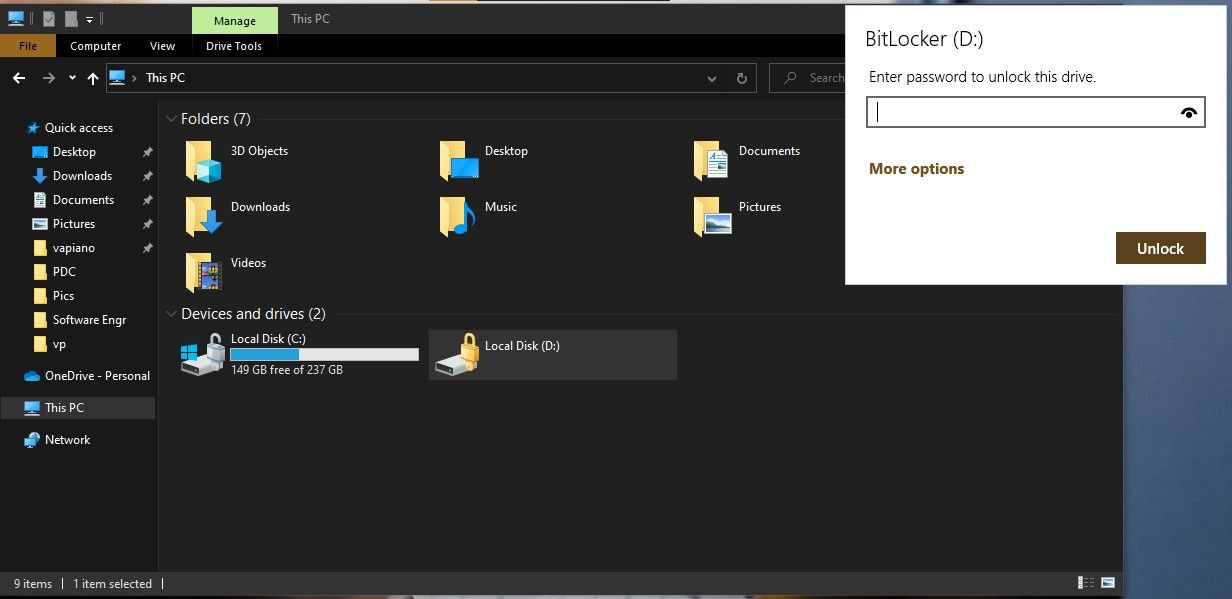
- When prompted, enter your configured password and finally click on Unlock to access your protected folder.
- You can easily create new files directly in this folder or move files here from an existing saved location.
- To lock the folder again, navigate to This PC, right-click on your virtual drive, and select Eject to lock your secure folder. Always remember to repeat this step to secure your protected folder after use.

How to Remove the Password From Your Encrypted Folder on Windows 10
If you've changed your mind and don't want to password protect your virtual drive anymore, you can quickly remove BitLocker's encryption from the drive. You can disable the encryption through the Control Panel as follows:
- Launch the Control Panel through the Start menu.
- Navigate to System and Security and then select BitLocker Drive Encryption.
- Find your virtual drive, and click on Turn Off BitLocker. When prompted, select Turn off BitLocker/ Decrypt the drive to complete the process.
- The decryption process can take some time, but your folder/virtual drive will no longer require a password once it's done.
How to Delete a BitLocker Encrypted Folder on Windows 10
Deleting an encrypted folder or virtual drive is complicated but possible. The best way to do it would be first to decrypt the drive (turn off BitLocker) as mentioned in the previous section, and then delete the volume/virtual disk through Disk Management. Alternatively, you can permanently delete the virtual drive from its saved location.
If you've forgotten the password to your protected folder or virtual drive and need to delete it, you can utilize the Recovery Key you saved while encrypting the virtual disk with BitLocker. You can even disable BitLocker for good.
Protect Your Sensitive Files and Folders
BitLocker allows Windows users to add an extra layer of security to their sensitive files, and it's super easy to set up. Many people have already been victims of stolen files, which cost them money and privacy. But by using BitLocker, you can ensure that no one can access your most important files without your permission.