All YouTubers can now enable auto captions on their live streams. This feature was previously only available to YouTube channels with up to 1000 subscribers, but now, anyone can use it.
Captions on YouTube make your content more accessible to viewers. In this article, we're going to give you the rundown of live stream auto captions on YouTube and show you how to enable them.
What Are Auto Captions for YouTube Live Streams?
When you create a video, you can manually caption it so that your viewers can follow along. YouTube encourages this since it's a great way to engage viewers, especially the hearing impaired.
The auto caption feature on YouTube automatically generates captions for long-form videos and Shorts, and, as recently announced by YouTube, is now available for live streams too. Using speech recognition technology, YouTube's machine-learning algorithm can automatically create captions for your live videos.
However, due to machine-learning limitations, mispronunciations, dialects, accents, overlapping speeches, and background noises, captioning errors are commonplace. And the biggest shortcoming of auto captions for YouTube live streams is that it's only available in English.
Auto captions must be enabled for each new live stream, and the captions won't remain on the video once the live stream ends. New auto captions will be generated on demand and may differ from the captions seen during the live stream.
Requirements for Enabling Auto Captions on YouTube Live Streams
In order to use the auto captions feature on your YouTube live streams, you'll need to meet the following requirements:
- First, you'll need to verify your YouTube account to be able to live stream. This is different from getting a YouTube verification badge and only takes a few minutes to complete.
- You should be free from any live streaming restrictions within the last 90 days.
- Your account must be activated for live streaming. This is only necessary if you've never live streamed before, and YouTube will do this automatically when you attempt to go live for the first time. You'll just need to wait 24 hours.
- Your channel content must be in English.
- Your live stream must be set to "normal latency" which is a 15 to 60-second delay.
- The video must have a good sound quality, and not have overlapping speech, so YouTube can recognize the speech.
How to Enable Auto Captions for Live Streams on YouTube
Here's how to enable auto captions for live streams on YouTube.
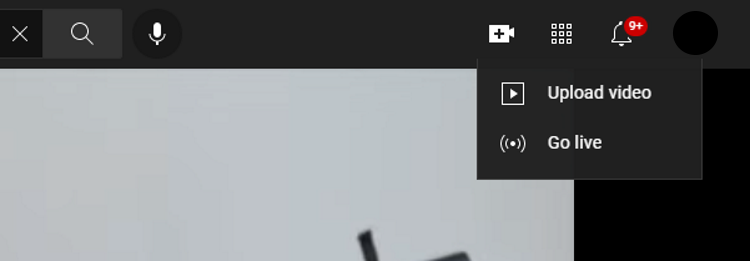
- Go to YouTube on your desktop, sign in to your account if you haven't already, and click on the + (Create) icon in the top-right corner.
-
Select Go live.
- Select Stream from the left-hand menu.
-
Under the STREAM SETTINGS tab, locate the Additional settings section. Scroll down and turn on the Closed captions toggle button.
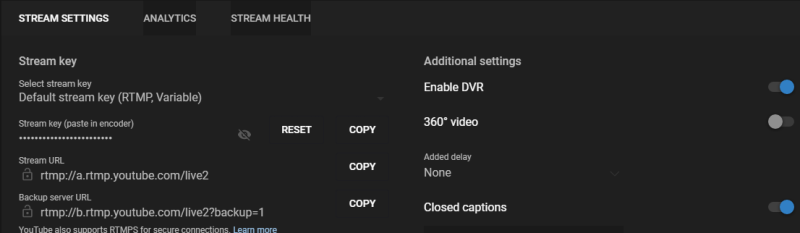
- When asked for your captions source, choose Automatic captions.
- Select a language.


Your next live stream will now have auto captions.
If the auto captions don't properly relay your content, you can turn it off to avoid confusing viewers. Simply head back to Stream > STREAM SETTINGS > Additional settings > Closed captions and turn it off.
Enable Auto Captions for Your YouTube Live Streams
If you're planning a YouTube live stream and want viewers to be able to read what you're saying in real-time, you can now turn on auto captions. This will enable a lot of viewers to better follow along and increase the engagement from your audience.
Go ahead and follow this guide to enable auto captions on your YouTube live streams.