You can always rely on the Windows context menu when you want to perform certain actions on a specific app. It's the little window that pops up when you right-click within an app; the contents change depending on which app you're using.
Now, you might sometimes want to enable or disable the context menu for various reasons—especially if you share your device with others. For example, you might want to disable this menu so that other users won’t tweak your PC’s settings. Or, perhaps you want to enable the context menus because your device doesn’t show them anymore.
In this article, we’ll show you how to enable and disable various Windows context menus.
1. How to Enable or Disable the Taskbar Context Menu
The taskbar context menu helps you configure a couple of settings without a hassle. Also, this menu can help you easily open other programs such as the Task Manager.
To access this menu, you need to right-click on a blank space on the taskbar.
Now, let’s check out how you can enable or disable the taskbar context menu.
Use the Local Group Policy Editor
The Local Group Policy Editor (LGPE) can help you enable or disable the taskbar context menu with ease.
The only problem is that you won’t have access to this tool if you’re using the Windows Home edition. But, fortunately, there are some tricks you can apply to access the LGPE on Windows Home.
Now, let’s see how you can enable or disable the taskbar context menu with the Local Group Policy Editor:
- Press Win + R to open the Run command dialog box.
- Type gpedit.msc and press Enter to open the Local Group Policy Editor.
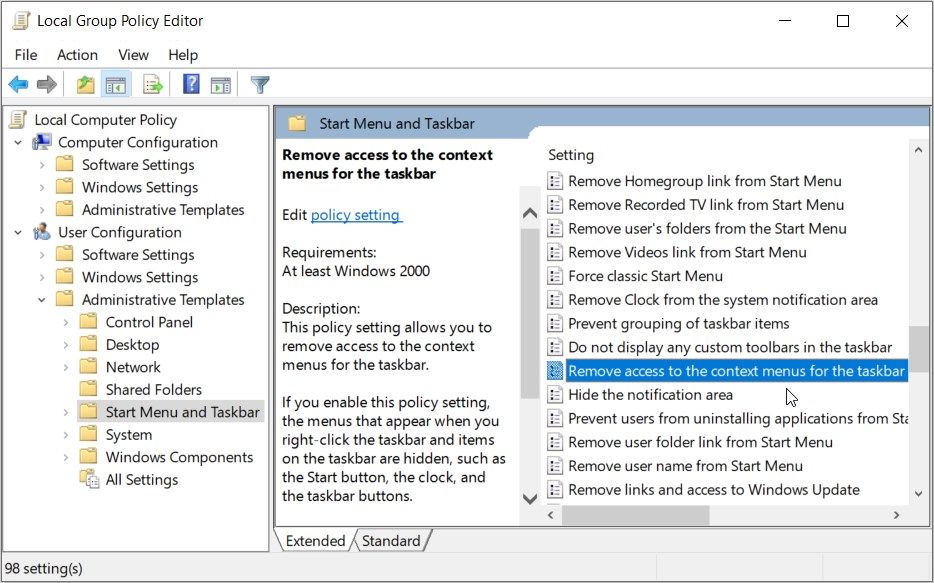
- Navigate to User Configuration > Administrative Templates > Start Menu and Taskbar.
- Double-click on the Remove access to the context menus for the taskbar option.
If you want to enable the taskbar context menu, select the Not configured or Disabled option in the pop-up window. To disable the taskbar context menu, select the Enabled option.
Click Apply, click OK, and then restart your device to save these changes.
Use the Registry Editor
The Registry Editor is an incredible Windows tool that you can use to configure various system settings. In this case, we’ll show you how you can use it to enable or disable the taskbar context menu.
Before you get started, it’s always best to back up the Registry. This will ensure that you’re on the safe side in case things don’t go according to plan.
Now, here’s how you can enable or disable the taskbar context menu using the Registry Editor:
- Press Win + R to open the Run command dialog box.
- Type Regedit and press Enter to open the Registry Editor.
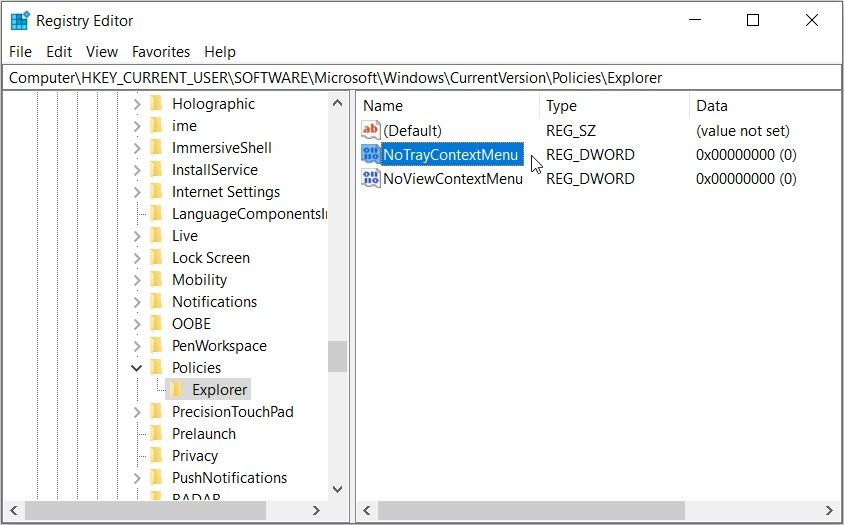
- Navigate to HKEY_CURRENT_USER > SOFTWARE > Microsoft > Windows > CurrentVersion > Policies > Explorer.
- Right-click on the right-hand side pane and select New > DWORD (32-bit) Value. Next, rename this value as NoTrayContextMenu.
To enable the taskbar context menu, double-click the NoTrayContextMenu value and set its Value data as 0 (zero). Press OK when you finish.
If you want to disable the taskbar context menu, double-click the NoTrayContextMenu value and set its Value data as 1. Press OK to save these changes.
2. Enable or Disable the File Explorer Context Menu
Let’s now take a look at how you can enable or disable the File Explorer context menu using the Registry Editor or the LGPE.
Use the Local Group Policy Editor
Here’s how you can enable or disable the File Explorer context menu using the Local Group Policy Editor:
- Press Win + R to open the Run command dialog box.
- Type gpedit.msc and press Enter to open the Local Group Policy Editor.
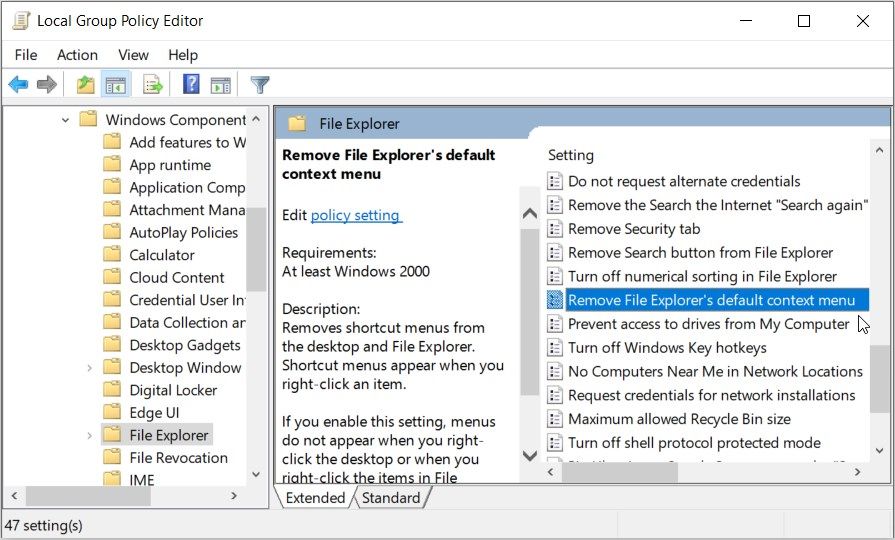
- Navigate to User Configuration > Administrative Templates > Windows Components > File Explorer.
- Double-click on the Remove File Explorer’s default context menu option.
If you want to enable the File Explorer context menu, select the Not configured or Disabled option in the pop-up window. To disable the File Explorer context menu, select the Enabled option.
Next, click Apply and then click OK. Finally, restart your device to save these changes.
Use the Registry Editor
Now, let’s check out how you can enable or disable the File Explorer context menu using the Registry Editor:
- Press Win + R to open the Run command dialog box.
- Type Regedit and press Enter to open the Registry Editor.
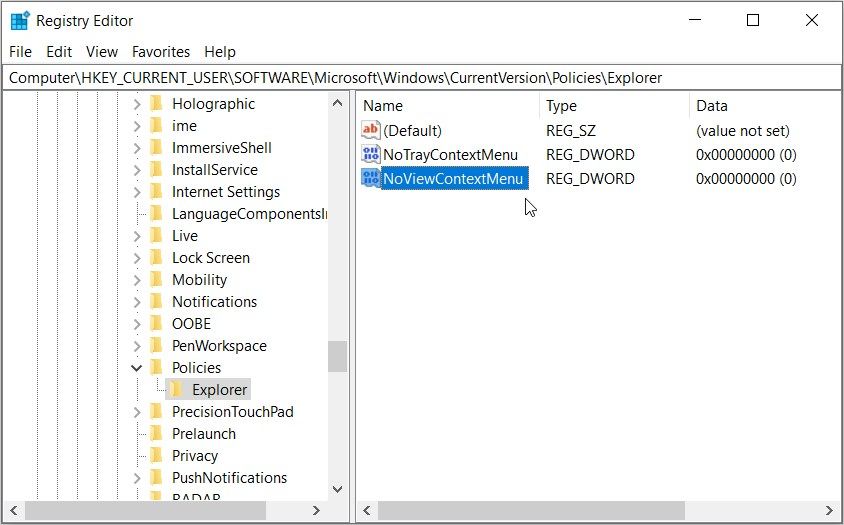
- Navigate to HKEY_CURRENT_USER > SOFTWARE > Microsoft > Windows > CurrentVersion > Policies > Explorer.
- Right-click on the right-hand side pane and select New > DWORD (32-bit) Value. Next, rename this value as NoViewContextMenu.
If you want to enable the File Explorer context menu, double-click the NoViewContextMenu value and set its Value data as 0 (zero). Press OK to save these changes.
To disable the File Explorer context menu, double-click the NoViewContextMenu value and set its Value data as 1. Press OK and restart your device to finalize these changes.
3. Enable or Disable the Context Menus in the Start Menu
Now, how do you enable or disable the context menus in the Windows Start Menu? It’s simple—you can either use the Local Group Policy Editor or the Registry Editor.
Use the Local Group Policy Editor
Here’s how you can enable or disable the context menus in the Windows Start Menu using the Local Group Policy Editor:
- Press Win + R to open the Run command dialog box.
- Type gpedit.msc and press Enter to open the Local Group Policy Editor.
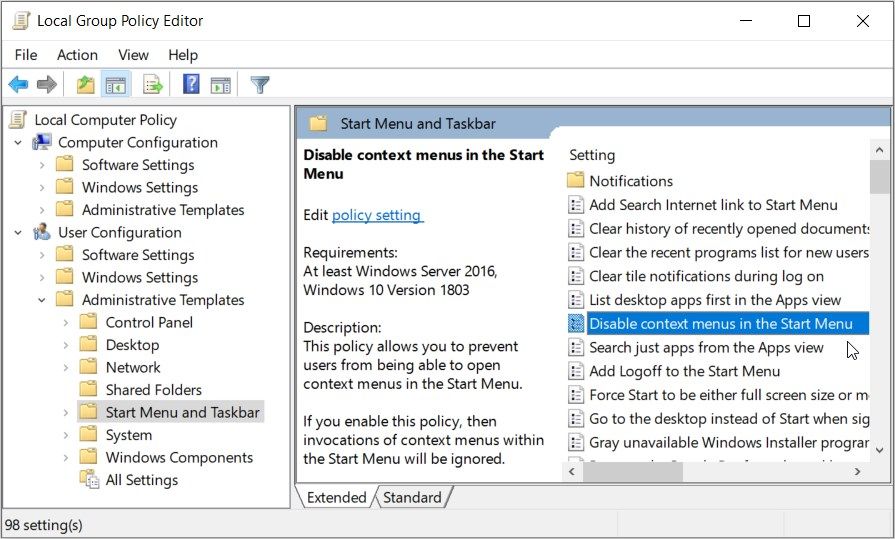
- Navigate to User Configuration > Administrative Templates > Start Menu and Taskbar.
- Double-click on the Disable context menus in the Start Menu option.
If you want to enable the context menus in the Start Menu, select the Not configured or Disabled option in the pop-up window. To disable the context menus in the Start Menu, select the Enabled option.
From there, click Apply, click OK, and then restart your device to save these changes.
Use the Registry Editor
Now, here’s how you can enable or disable context menus in the Start Menu using the Registry Editor:
- Press Win + R to open the Run command dialog box.
- Type Regedit and press Enter to open the Registry Editor.
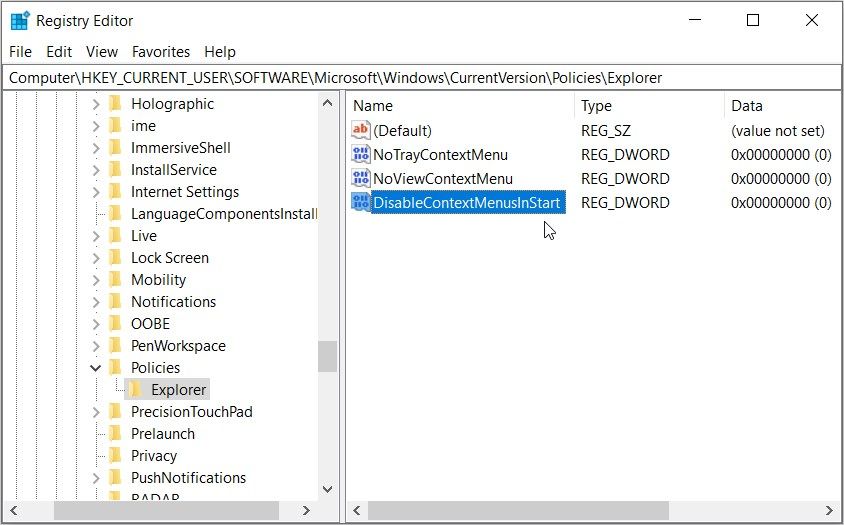
- Navigate to HKEY_CURRENT_USER > SOFTWARE > Microsoft > Windows > CurrentVersion > Policies > Explorer.
- Right-click on the right-hand side pane and select New > DWORD (32-bit) Value. Next, rename this value as DisableContextMenusInStart.
If you want to enable the context menus in the Start Menu, double-click the DisableContextMenusInStart value and set its Value data as 0 (zero). Press OK to save these changes.
To disable the context menus in the Start Menu, double-click the DisableContextMenusInStart value and set its Value data as 1. Press OK and restart your device to save these changes.
Enable and Disable Windows’ Context Menus With Ease
There’s no denying that Windows context menus come in handy in various situations. Whether you want to configure some settings or delete items, the context menus have you covered.
If you want to enable or disable different context menus on Windows, simply apply any of the methods in this article.


