Whether you prefer AMD’s graphics cards or you’re warming up to the breakout Intel Arc GPUs, it’s undeniable that NVIDIA offers some of the most enjoyable gaming experiences. It produces some of the most powerful graphics cards you can buy and provide excellent drivers and apps to augment these GPUs.
The two primary apps for tweaking NVIDIA GPUs are the NVIDIA Control Panel and GeForce Experience. They perform several functions, chief among them customizing graphics settings. Luckily, these apps are free and take little effort to install on your PC.
So, let's check out the graphics settings you can change on how to do so.
The Most Commonly-Adjusted NVIDIA Graphics Settings, and What They Mean
You can customize several graphics settings on the NVIDIA Control Panel and GeForce Experience. These settings affect how the models, textures, lighting, and reflections are rendered in games and other graphics-intensive applications.
Generally, tweaking them to obtain a higher graphical fidelity often comes at a performance cost. That's why it's best to know what precisely each setting does and how it can affect your FPS.
Some of the more common graphics settings you can customize in this software include:
1. Anti-Aliasing
Most games allow you to adjust the screen resolution at which they are rendered. However, not all of them swap out textures to match the current resolution. As a result, high-quality images are rendered at low resolution, resulting in jagged edges, called jaggies, on textures that should be smooth.
This phenomenon, known as aliasing, occurs when the display device cannot render smooth lines correctly. To mitigate this problem, anti-aliasing introduces blurriness and slight discolorations to lines and object edges, causing them to appear smooth.
There are several techniques used for anti-aliasing, including supersample (SSAA), multisample (MSAA), fast approximate (FXAA), and temporal (TAA). Each has advantages and disadvantages, but temporal anti-aliasing is fast becoming the norm. It powers NVIDIA's DLSS and AMD's FidelityFX.
2. VSync
Vertical Synchronization, or VSync (V-Sync), is a feature that forces your game to run at the same frame rate as your monitor's refresh rate. For example, if your monitor displays at 144Hz, VSync forces your game to run at that maximum frame rate.
VSync is necessary to prevent screen tearing, a phenomenon where the GPU pushes frames for rendering faster than your monitor can display them. Screen tearing is characterized by rendered portions of multiple frames and ugly horizontal lines across the screen.
Asides from limiting the game's frame rate, VSync also alleviates this problem by stopping the GPU from writing to the display memory until the monitor has finished the current refresh cycle.
Despite its apparent benefits, enabling VSync can induce input lag as the game can't process the results of player inputs fast enough. Moreover, it can affect your performance in highly competitive games where high frame rates can determine the outcome of a match.
3. Anisotropic Filtering
Although this setting has mostly gone unnoticed, it greatly improves graphics quality and gaming immersion without significantly affecting your gaming FPS.
Anisotropic filtering enhances textures' image quality on surfaces at oblique angles to the viewing plane. Unlike other texture quality settings that swap out low-resolution textures for higher-quality ones, this setting modifies the appearance of the texture itself to match the viewing angle. This reduces artifacts and blurriness from distant in-game objects, allowing you to improve the image quality of an entire scene.
Most game settings allow you to set the anisotropic filtering value to x2, x4, x8, or x16. Each value represents the samples collected per texture element or texel. In addition, higher values result in better texture quality at steep angles but with a slight performance and FPS cost.
4. Ambient Occlusion
Ambient occlusion makes 3D objects in games look more realistic by simulating soft shadows that would typically occur when lit by indirect lighting. It calculates the exposure of each geometry surface in the scene to ambient lighting and darkens the shaded areas.
This feature helps detect subtle lighting variations and expose minute surface details. For example, enabling ambient occlusion can enhance bumps and ridges on rough surface textures like wood and concrete. It also helps to soften light sources that are uncomfortably bright.
Ambient occlusion works similarly to ray tracing, as it casts rays to sample the surfaces of nearby geometries. In fact, with the release of graphics cards with ray-tracing support, ray-traced ambient occlusion (RTAO) is now available in games, game engines, and other graphics applications.
5. Screen Resolution
Choosing the best display resolution for your game largely depends on your monitor. Most games detect the native resolution for your display device and can render frames at that resolution or below. For instance, 4K monitors can render at Full HD and Standard HD.
A higher screen resolution results in sharper images and higher frame rates. However, it can impact performance and loading times since the game uses high-quality textures. Running your games at lower resolutions may improve performance, but you may get blurred textures and miss finer details from the game you're playing.
3 Ways to Customize the Graphics Settings With the NVIDIA Control Panel and GeForce Experience
Customizing graphics settings on the NVIDIA Control Panel and GeForce Experience is easy, thanks to accessible controls like sliders, buttons, and drop-downs. Now that you know what each setting does to improve your gaming experience, here are three ways to customize them.
1. Performance/Quality Balance
Most gamers' primary concern when tweaking graphics settings is how they affect performance. This fear is not unfounded, as higher graphics quality often comes at a performance cost and reduced FPS.
To that end, the NVIDIA Control Panel and GeForce Experience both provide a slider that can automatically adjust the settings for better performance or quality.
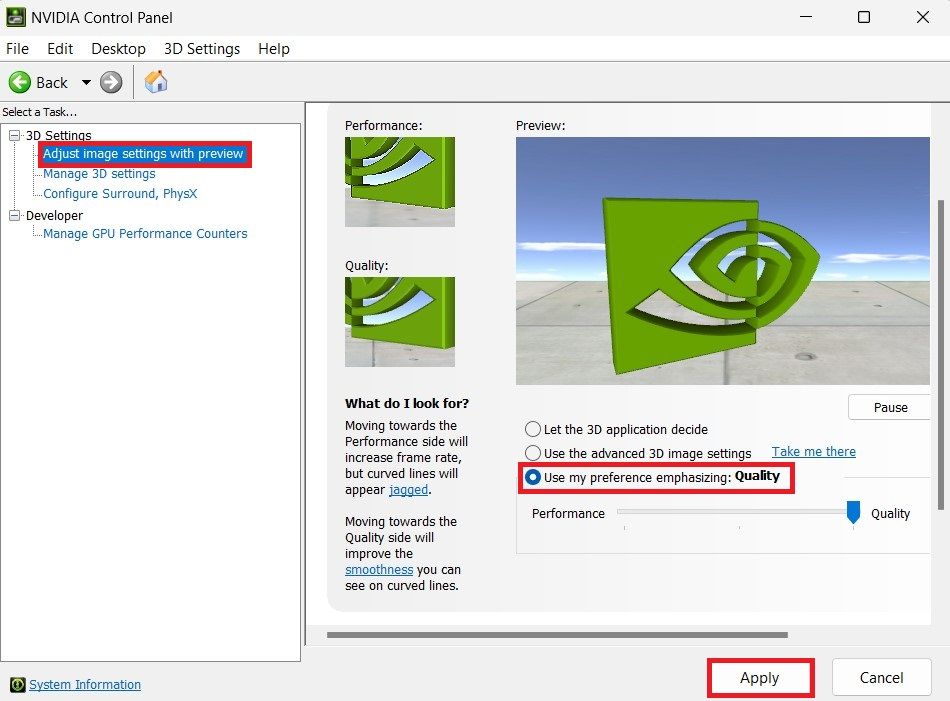
On the NVIDIA Control Panel, head over to Adjust image settings with preview and select Use my preference emphasizing to enable the slider. After this, you can move the slider between performance and quality.
The 3D preview image provides real-time feedback on the effects of your setting. Click Apply to save your changes. It's worth noting that this slider is a global setting that affects all games and graphics applications.
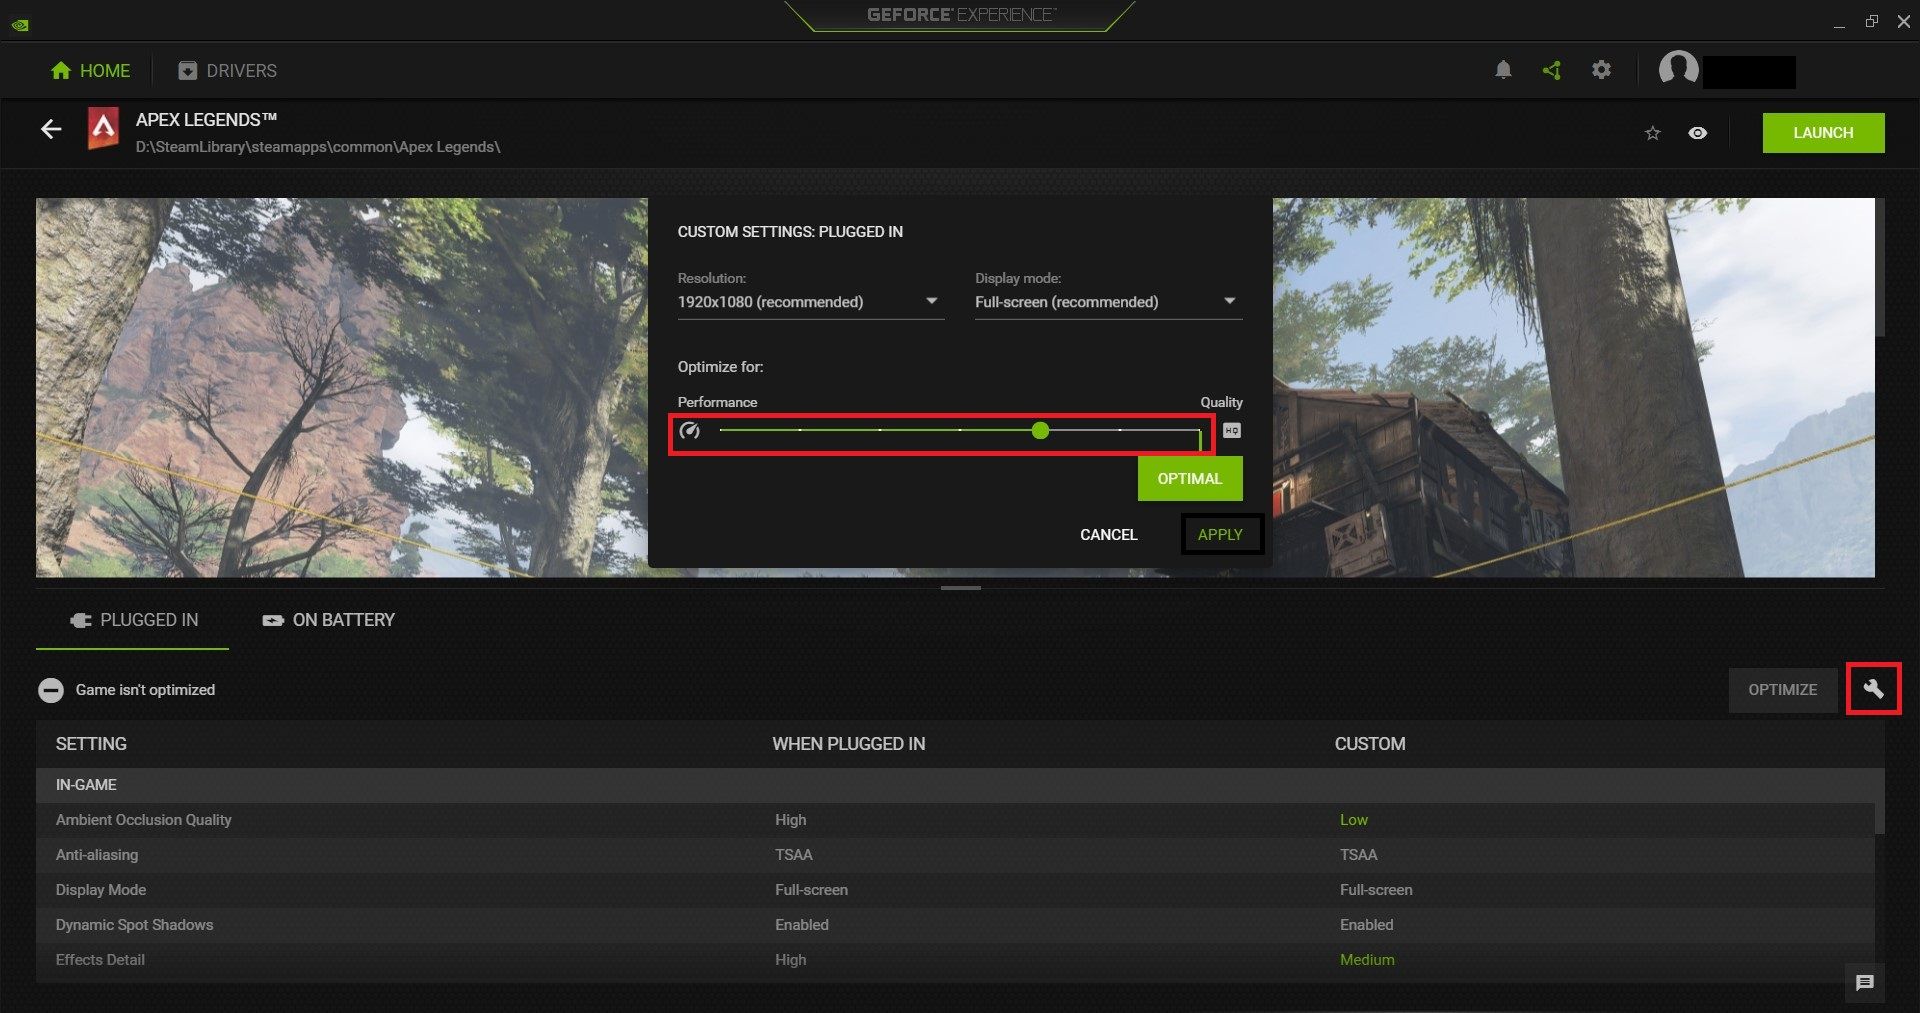
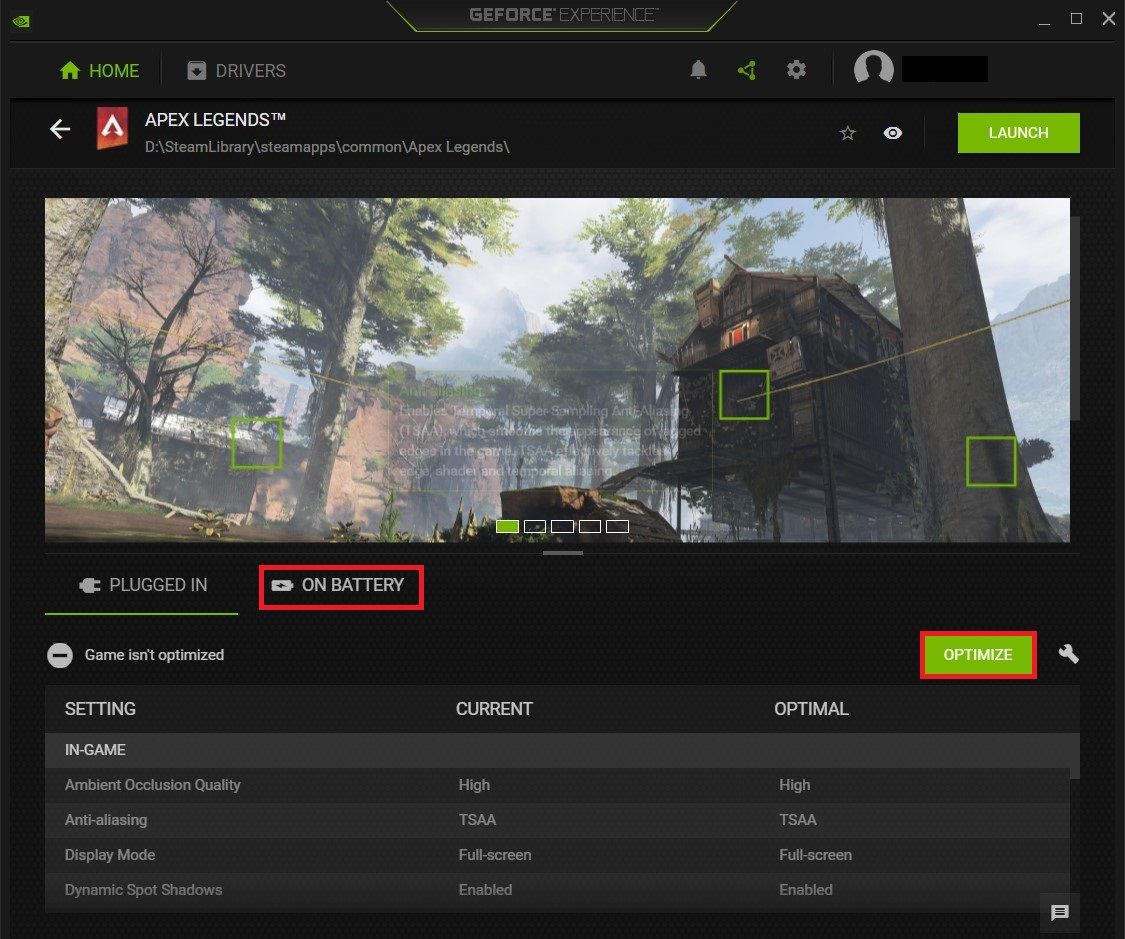
To achieve the same effect on Geforce Experience, navigate to the Home menu and click on the game you want to optimize. Next, click on the little wrench icon on the right hand of the game settings menu and find the Optimize for section in the popup menu that appears.
This section contains a slider that you can use to balance between performance and quality. As you move the slider, you will notice Geforce Experience making real-time changes to the game's graphics settings. After moving the slider, click APPLY to save your changes.
Unlike the NVIDIA Control Panel which provides only three presets on its slider, Geforce Experience provides seven, giving you a greater degree of customization.
2. Set Default Graphics Processor
There are two kinds of graphics processors on Windows PCs: integrated graphics and dedicated graphics. Depending on the game, power settings, and processing requirements, your PC automatically switches between them.
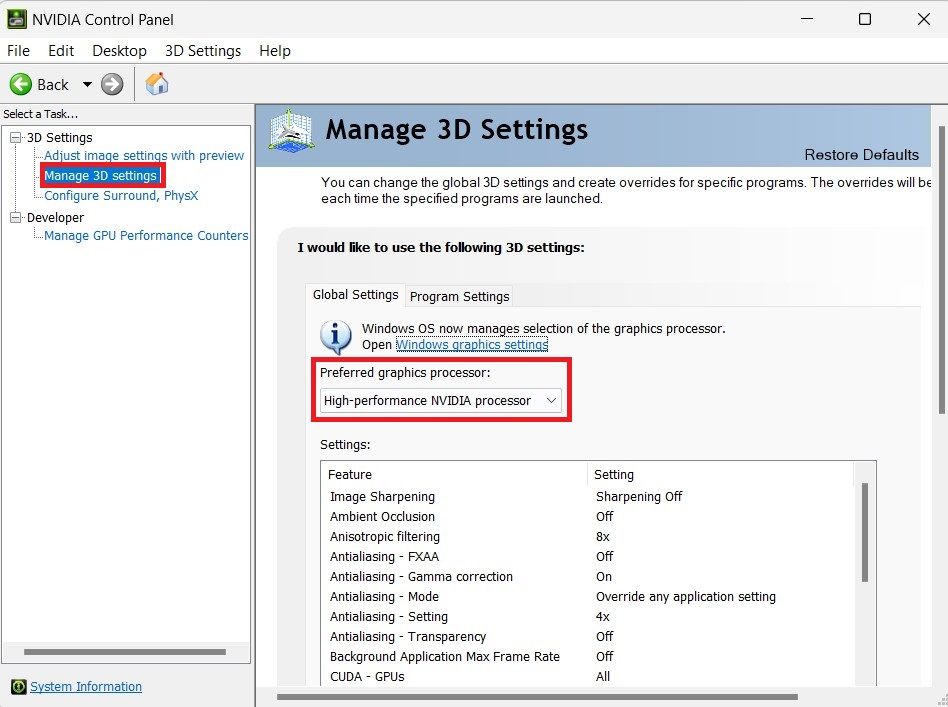
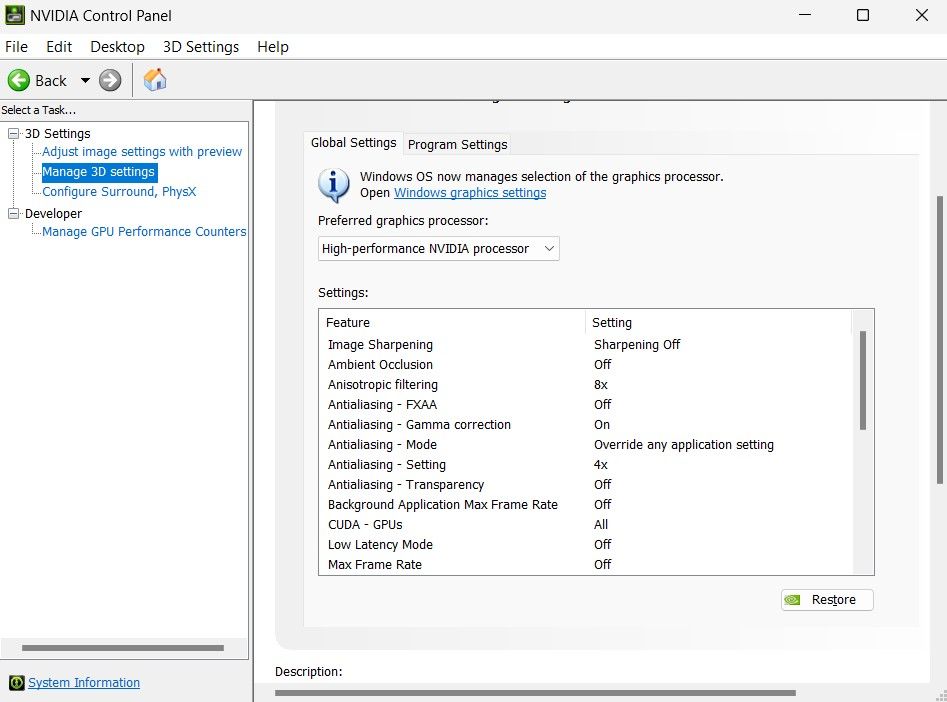
You can set a preferred graphics processor for your games, and your PC will default to it whenever possible. Also, you should note that this setting is only available on the NVIDIA Control Panel. So, open it and navigate to the Manage 3D settings menu. Then, select the Global Settings tab.
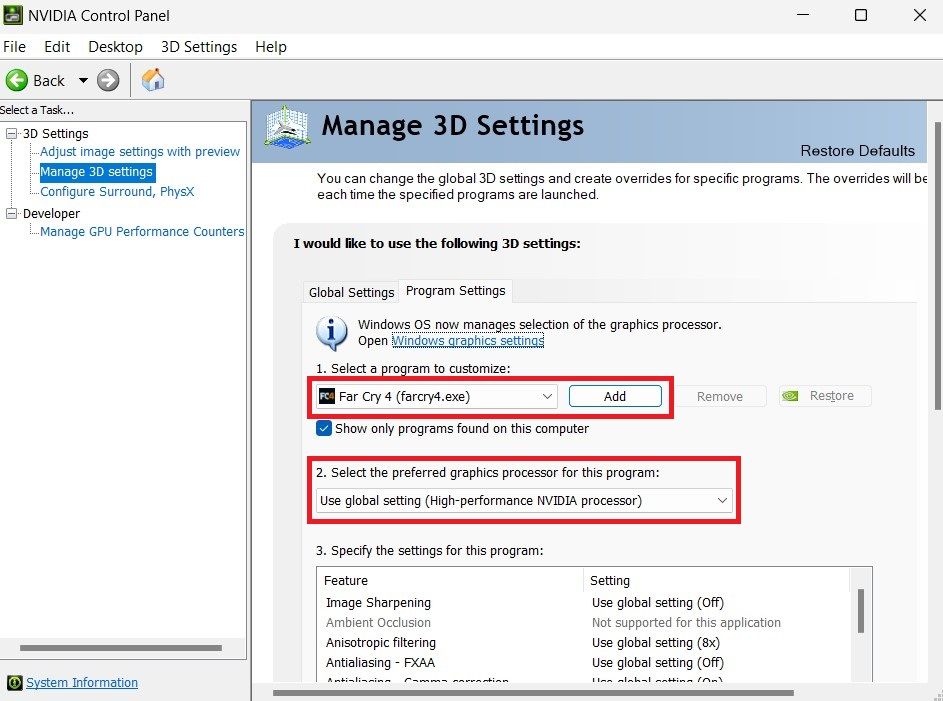
Next, find the Preferred graphics processor setting and select your desired graphics card. Doing this would set all graphics applications on your PC to use this processor. Select the Program Settings tab to use a different processor for specific applications.
From there, select the application from the drop-down menu. Then, select the graphics processor for that application; it's set to use the global setting by default. You can also add it from its installation folder if it's not on the list.
As of Windows 11, the NVIDIA Control Panel delegates the selection of the default graphics processor to the Windows OS.
3. General Graphics Settings
You can use either the NVIDIA Control Panel or Geforce Experience to tweak settings that affect the overall graphics quality of games. You can set ambient occlusion, VSync, anisotropic filtering, volumetric lighting, and many more.
The list of available settings is similar on both software, but you need the Control Panel to change image sharpening. On the other hand, you can only enable NVIDIA Reflex on GeForce Experience. To avoid conflicts, it's best to use the same selections for settings common to both software.
Unlike the NVIDIA Control Panel, GeForce Experience does not provide global settings for all games and graphics applications. Instead, you must customize the settings for each game individually.
Nevertheless, it provides an Optimise button you can use to generate recommended settings for each game. If you’re on a laptop, GeForce Experience also allows you to use separate settings for Plugged in and On battery modes.
Get the Most Use Out of the NVIDIA Control Panel and GeForce Experience Apps
Other than customizing graphics settings, these apps allow you to update your graphics card drivers, edit PhysX settings, and receive important gaming news. More importantly, many gamers use the in-game overlay Geforce Experience provides to record and stream gameplay.


