Using the Cricut Design Space app is a great way to add your own designs to clothing, coffee cups, greeting cards, and much more with your Circuit machine. Adding effects to your text designs elevates the products you create. And rather than boring, straight lines of text, you can design curved text in Design Space.
Cricut makes it easy to add this fun design feature on both the mobile app and the desktop version. Keep reading to learn how to curve text in the Cricut Design Space app.
How to Curve Text in Design Space
If you own any Cricut crafting machine, you probably make your designs in Cricut Design Space. So keep reading to see how to make curved text in the app.
Firstly, start a new project in Cricut Design Space. If you’re on a desktop, select New Project, or from the app, tap +.

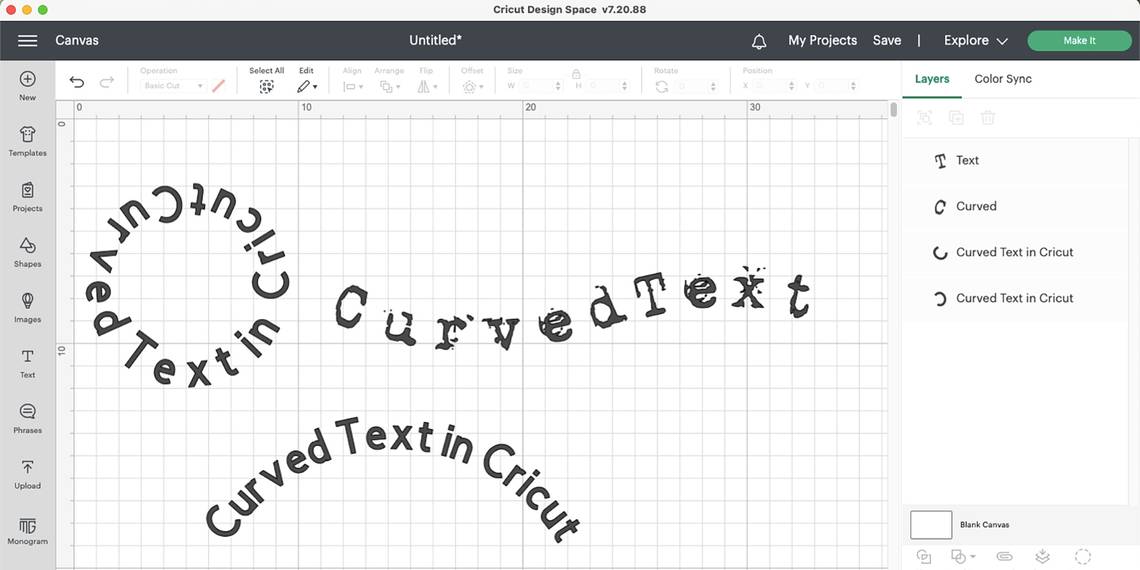
From the toolbar, select Text to insert a text placeholder. On the tablet app, the toolbar runs along the bottom, and from the desktop app it runs up the left side with more tools at the top. Double-click or double-tap the placeholder text to edit it, then type your desired phrase.
Curved text looks better with a mid-length phrase rather than just one small word, but it’s up to you how much writing you want to curve.
Once typed, use the text features on the toolbar to change the Font Name, Style, Size, or various alignment aspects. These can also be changed after you’ve applied the curve, but it's easier to set beforehand. Once you’re happy with the main aspects of your text, you can move on to curving it.

Select the text, then select Curve from the toolbar to pull up the curve settings. On the desktop version of Design Space, the Curve tool appears as a slider from the icon. You can preview the results directly on the canvas.

If you’re using the Design Space app, selecting Curve pulls up a preview window with a slider in it. Both the app and the desktop versions work in the same way to curve, but from the app, you need to tap Done to set the curve in place.

Pulling the slider to the right—with positive numbers—will curve the text from below the writing, into a convex curve. You can create a subtle arch or, by sliding all the way to the right, you can create a full circle. As a convex circle, the start and end of your text phrase will meet at the bottom. You can rotate the circle later on.

Pulling the slider to the left—into negative numbers—creates a concave curve. This curves the text from above. If curving into a circle, the first and last letters will meet at the top, but again, you can rotate it later. The concave curve direction makes a circle more difficult to read than a convex curve.

Once you’ve found your desired curve, tap Done if you're on the tablet app, or from the desktop app just select the canvas.

Select and drag the text to move it around the Canvas, and resize by dragging the anchor points. To rotate from the app, select the text box, tap the Rotate icon below the text box, and drag to rotate your text. From a desktop, hover the cursor over an anchor point until the cursor turns into a rotate arrow, then click and drag to rotate.
You can make curved text in Adobe Illustrator if you'd rather design elsewhere before creating the design with your Cricut machine. You could also make editable offset text in Illustrator to easily turn into a Cricut design.
Make Wavy Text in Design Space
Once you know how to make curved text, you can integrate multiple curved texts to create waves. The curve setting doesn’t have the option to create wavy text or other shapes, but it’s easy to create yourself.

For an equal, typical wave, start by creating a text box with a curve of around - 25 to -32.

Then create another text box with the same size and style but set the curve to around 25 to 32. Ideally, choose the same number for each side.

Place the positively curved box on the right of the negatively curved one, then line up the two text boxes so the text reads fluidly through the wave. Once you finish your project, the text boxes themselves aren’t visible, so the wave will read easily across the text.
After you’ve made your text curve, you can add any other extras to your design. With a finished design, select Make It to send your design to your Cricut machine, such as the Cricut Maker 3. You can also use your designs with the Cricut heat press machines, like the Cricut Hat Press, to make great hat designs.
Curve Your Words in the Cricut App
While you can’t add a curve to individual letters, you can easily add a curve or wave to words and phrases using Cricut Design Space. Whether you use the tablet app or the desktop version of Design Space, you now know how simple it is to add a curve element to your work.
Why be with boring straight text when you can add some shape to your designs? Play around with different fonts and experiment by connecting your curves to make waves or other fun shapes.