LUT creation. The final frontier. Few constructs in the world of post-production are as misunderstood as LUTs are. Demystifying them involves breaking them down and understanding how they work from the bottom up.
A LUT is little more than an adjustment in color and tone of a clip or a photo. It can be exported as a separate file and preserved so that it can be used elsewhere, such as in another creative app.
This allows you to maintain the consistency of your image and project as a whole; it also lets you invite other clips into this consistent look without requiring you to create the look from scratch every single time.
Remind Me, What Is a LUT Again?
A LUT, or Look-Up Table, takes an existing color space and assigns each possible value a new role, one slightly offset from its original place in the original gamut. It's a color correction tool that you create once and can exploit again and again.
For instance, one LUT might take all of the sky-like blues in an image and shift them more toward a purple-ish hue. Another LUT may be set up to compensate for skin tone under certain conditions, such as under fluorescents or even underwater. Some LUTs sap your image of saturation entirely, leaving only the luminant values behind.
Having a LUT in your back pocket for when push comes to shove can be life-saving, and time-saving as well. Mistakes happen every day on set; it's a contingency that should be included in every plan that you make. If time is money, a LUT is one advantage that you'll be able to take all the way to the bank.
What Makes a Great LUT?
The perfect cine LUT isn't difficult to define. A color grading LUT can be considered successful if it improves the footage and brings the project closer to the creator's intended vision. Excellent LUTs come in all forms—bright and vibrant, dark and brooding, monochromatic, and even strictly technical.
A great LUT embodies all of the following characteristics:
- It addresses any problems with the footage, like errors in exposure or color.
- It's technically correct and matches the native properties of the footage that it modifies.
- It's stimulating, attractive, arresting, and beautiful. It immerses the viewer and enhances the spectacle of the piece.
Aside from that, there really are no rules aside from what your Lumetri Scopes are telling you and your own artistic taste.
With that being said, LUTs can't fix every type of problem. A few important caveats to remember:
- A LUT will change nothing aside from the chromatic and luminant values across the entire field of the image. You can't mask parts out, and you can't really brighten areas selectively unless every part of the area is very similar in tone.
- The LUT, before being applied, waits in anticipation of a given color space. If you apply it to a clip that was shot in a different color space, it might not take on the LUT as expected.
- LUTs are full grades, not "filters" or "effects". We're dealing with a look-up table, which concerns the entire family of values making up the image, as opposed to just dumping something like a sepia effect over top.
Once you've gone through the charade a couple of times, these principles will begin to ingrain themselves into your workflow intuitively. Understanding the way that LUTs work will help you make the most of them when coloring your video projects.
How to Create a LUT for Your Video Footage
Getting started is easy. First, you need to identify just what exactly you would like your LUT to do for your footage. Ideally, you've already got a strong assembly cut down. What needs to happen next?
Chances are, if you're following a traditional post-production pipeline, you're just getting ready to color correct your footage technically. This should certainly happen before you begin grading it creatively. We recommend taking an initial pass at your assembly cut before creating LUTs unnecessarily.
An exception to this would be somebody who already knows that there's something wrong with the footage. If you have a large batch of footage that all needs the same treatment, you can begin authoring the corrective LUT as early as you need to.
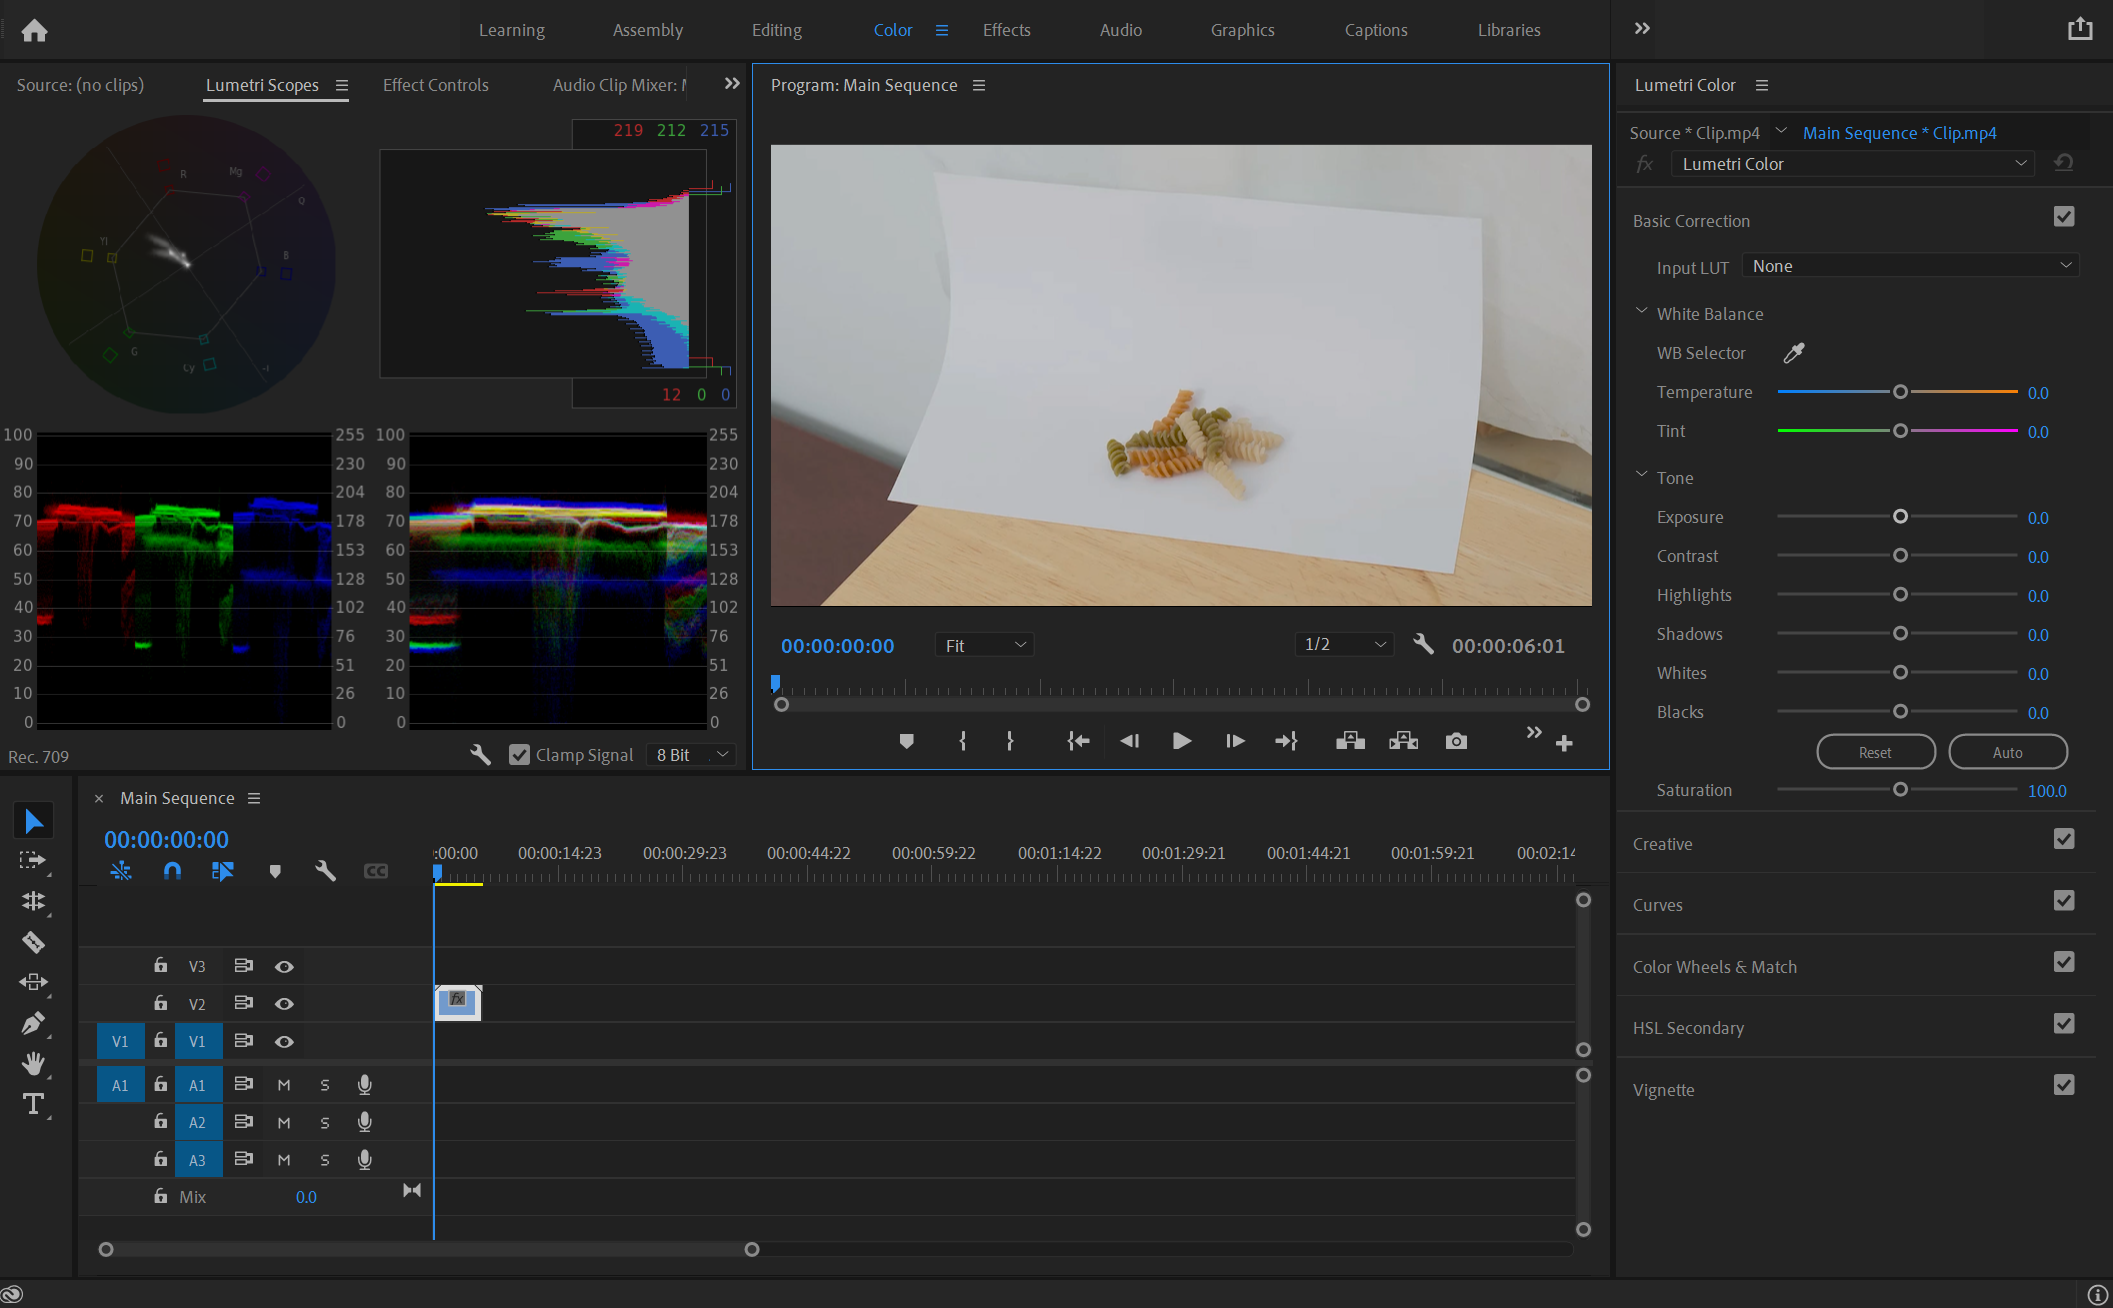
For this example, we're going to open up Premiere and import a random clip to work with. At the top of the app, choose the workspace dedicated to Color. Select the clip that you would like to create a LUT for; it should already be on the Timeline.
As you can see, we've got four Lumetri Scopes up for reference—the Vectorscope, the Histogram, the Parade, and the Waveform. This clip was shot very flat, so nothing is really peaking or diving below our tonal range. Where to begin?
You can start with things like white balance and exposure; anything that you notice right off the bat should be taken care of at this juncture. The goal here is to get yourself into the vicinity of where the clip should be in a technical sense, before all of the creative stuff that follows.
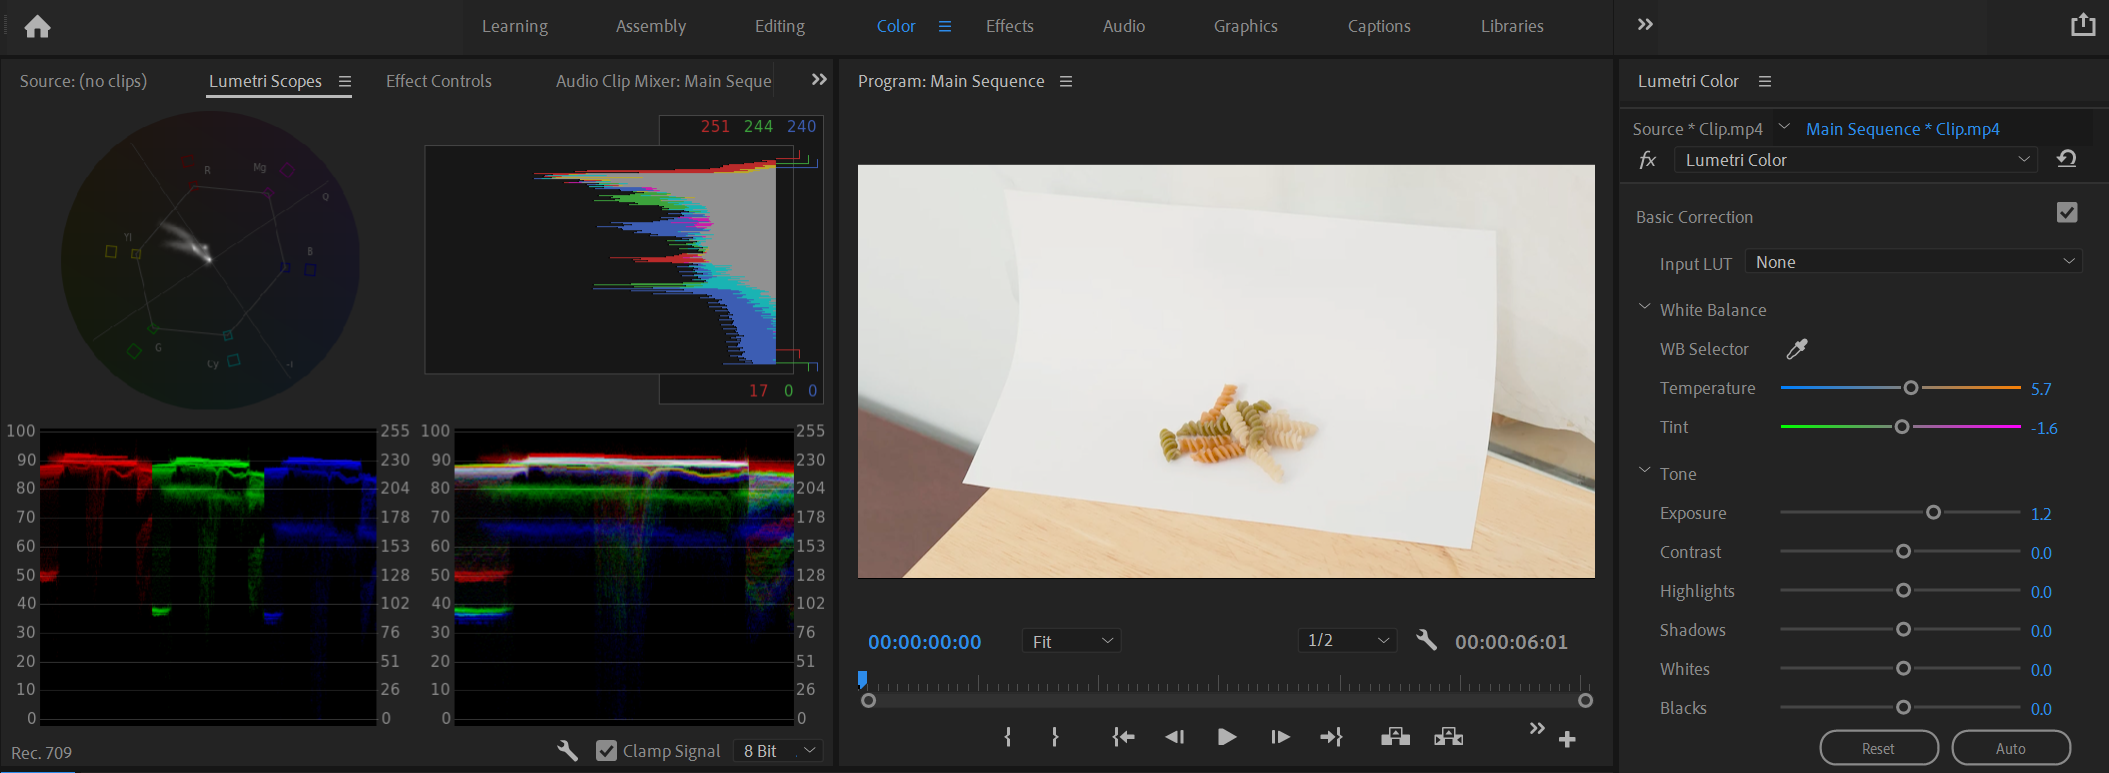
Right now, we're going to open up these values. Adjust the clip's exposure until the wad of values in your Histogram is just below the ceiling, without bumping anything else off.
We want our Waveform and Parade values to be hanging right around 80 to 204, without losing any of them above our gamut. We also want the image to be as bright as possible without clipping.
Now, let's do the same thing with the shadows slider; pull it down until you start to lose values below our range of acceptability. It's a well-exposed image, so we can use the blacks slider to add more depth to the frame.
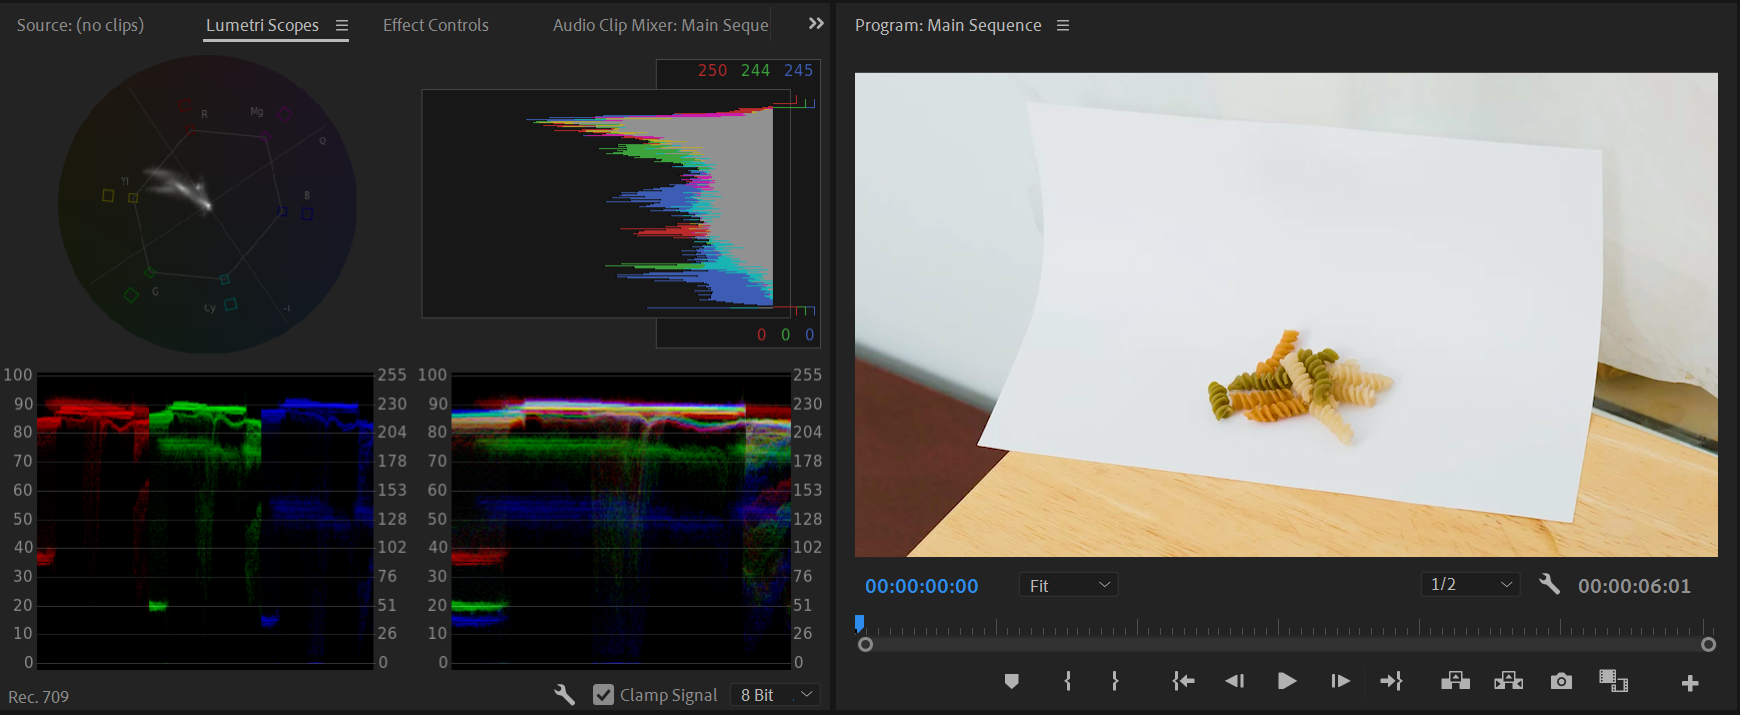
You'll notice that we've got a few stray hairs at the bottom-left of our Waveform; these are presumably our macaroni friends. They're darker than their surroundings, so we need to be careful about crushing them when adjusting the lighter areas of the frame.
Right now, when consulting both the picture and the scopes, the picture looks and feels fine. We'll increase the saturation just a touch and call ourselves satisfied with this one.
Once you're happy with how all of these modified values make the footage look, you can export the settings as a file and then apply it as a LUT to your other projects. But that's a tutorial for another day.
Make Your Video Footage Pop With Custom LUTs
Unless you live to suffer, eliminating redundant work when possible is probably something that interests you as a professional. A faster color turnaround gives you more time to play with the rest of your video footage; once your homework is done, you can get started on all of the extra credit.
Sure, you could always just do a quick Google search and download one of the thousands of awesome LUTs already available on the internet. But to really nail the principle and the craft down, we recommend giving LUT creation a shot by yourself.


.jpg)


