Apple Notes may seem like your average note-taking app, but it offers so much more. Among other features, the app includes capabilities for creating tables with the touch of a button. You can use these to take your notes to the next level, but our guidance doesn't end there.
Here are seven different tips to improve your Apple Notes skills when it comes to tables. We'll cover everything from the basics of creating tables in Apple Notes to advanced tips like deleting, or even rearranging, columns and rows.
But first, let's get started with the basics.
How to Create a Table in Apple Notes
Creating a table in Apple Notes is pretty straightforward. You can make a new note or add a table to an existing note.
Here's how:
- First, open a note or create a new one.
- Then tap the table icon on the bottom toolbar.
- If the table icon is not visible, tap the plus (+) button to reveal the toolbar menu, then tap on the table icon.


This will instantly insert a table with two rows and two columns into your note. By default, the table will occupy the entire width of your note. However, you can add more columns, and it will extend past the view width. At the time of writing, the only limitation is that you can't customize the table size to suit your preferences.
How to Add Columns to Apple Notes Tables
Apple Notes allow you to add more columns to the table. Follow these steps to create additional columns:
- Tap anywhere inside your table.
- A button with three dots will appear at the top of your table. Tap it.
- Select Add Column from the pop-up. Alternatively, if you see the rich pop-up menu with, among other things, Cut, Copy, and Paste appear, tap the right arrow to see the Add Column option.


By default, Apple Notes will insert the new column to the right side from where you select. To add a column to the very right edge of your table, tap anywhere on the last column. Similarly, to insert a column between two columns, tap on the left-hand column.
How to Add Rows to Apple Notes Tables
Adding a row is similar to the process of adding a column. However, there's a subtle difference. You have to select the three dots button on the left-hand side of the table instead of the one at the top.
Follow these steps to create a new row in Apple Notes:
- Tap near the location you want your new row placed.
- Tap the three dots button on the left of the table.
- Select Add Row from the pop-up.


How to Delete Rows and Columns From Apple Notes Tables
If you want to remove a row or column in Apple Notes, you can do so in two simple steps. First, tap anywhere inside the row or column you want to delete. Then tap the three dots button on the top (if you want to delete a column) or on the left-hand side (if you want to delete a row). Your row or column of choice will now be selected.
To delete the row or column, tap Delete Row or Delete Column. In some instances, Apple Notes might show you a richer pop-up with the Delete Row or Column options hidden. In this case, tap the Right arrow to reveal the hidden options.


How to Format Text Inside Tables
Text inside your table cells can also be formatted. There are four distinct formatting options available in Apple Notes. These include Bold, Italic, Underline, and Strikethrough.
To format text, you must first select it. Follow these steps to format text inside your table:
- Double-tap on the text to select it.
- Tap the BIU option from the pop-up.
- Finally, tap on a formatting option from the available options to apply.


Since formatting text per cell can be tedious, Apple Notes provides a handy way of doing this on many cells simultaneously. To do this, select an entire row or column, then tap on a formatting option to apply.
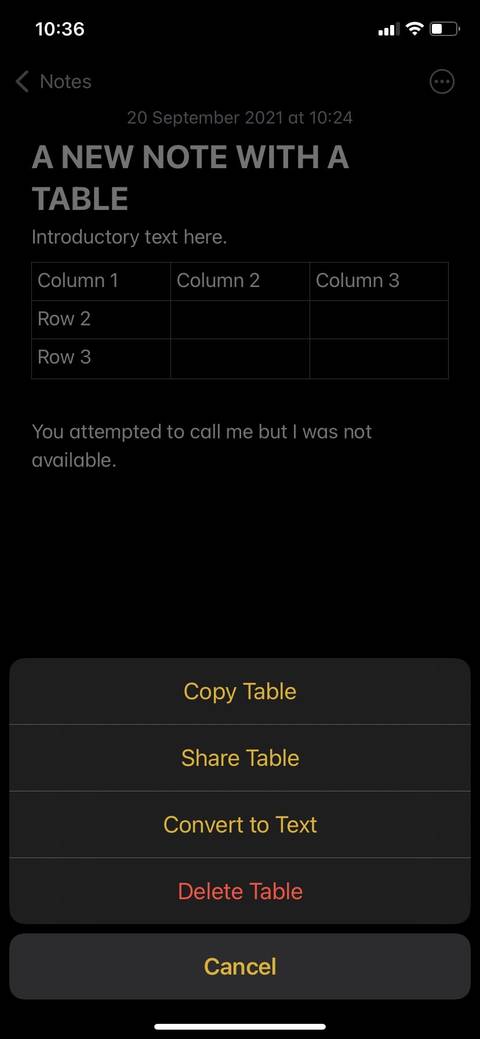
How to Convert a Table to Text in Apple NOtes
Apple Notes also allows you to convert your tables into the text if you want to. Here's how:
- Tap anywhere inside your table.
- Select the table icon on the toolbar. If you don't see the toolbar, tap the floating plus (+) button to reveal it.
- Select Convert to Text to finish.

How to Rearrange Rows and Columns in Your Apple Notes Table
One of the most exciting features of Apple Notes tables is the ability to rearrange rows and columns without much overhead.
You can move a column or row to whatever position you want in the table through drag and drop.
To do so, follow these steps:
- Tap on the row or column you want to move.
- Tap and hold the three dots button. Tap the three dots button at the left to select a row. If you want to choose a column, tap the icon at the top of the table.
- Drag the row or column to a new location, and drop it to finish.


Working With Tables in Apple Notes Is Easy
Tables can prove helpful in lots of different scenarios, and Apple Notes provides you with various features to get the most out of them. As we've shown you above, you can edit and customize tables in a lot of different ways, always with just a few taps, making them an incredibly useful note-taking tool.
If you plan to attach your table to an email, Apple Notes has built-in functionality for that as well.