Adding subtitles or closed captions to your YouTube videos is useful for a number of different reasons. You don't need special software to do it either—YouTube already provides all the tools you need in YouTube Studio.
You can use YouTube's subtitle tools in a few different ways, some of which take much more time than others. This guide will show you how to add subtitles to your YouTube videos, as well as how to save time by using automatically-generated captions.
Why Add Subtitles to YouTube Videos?
Subtitles in YouTube videos are useful for many reasons. For starters, they make your content accessible to people with hearing impairments.
They also enable viewers to watch your videos with the sound off. And, of course, they can be used to provide foreign language translations if your videos have an international audience.
Subtitles can also provide viewers with a means to search for particular words in YouTube videos—something that wouldn't otherwise be possible
How to Manually Add Subtitles to YouTube Videos
To manually add subtitles to your YouTube videos, the first thing you need to do is open YouTube Studio. Click on your profile in the top-right of YouTube, and select YouTube Studio.

You’ll be taken to your YouTube channel dashboard. This shows you some basic stats about your YouTube channel, such as your total number of subscribers and your top videos. There’s also some information here geared towards content creators.

You can upload videos from here as well. If the video you want to add subtitles to is already uploaded, you can get started. If it’s not, click the Upload Videos button, and upload your content as you would with any other YouTube video.
Once your video is uploaded, it’s time to start working on the subtitles. Select Subtitles from the menu on the left side of YouTube Studio. This will take you to the Channel subtitles page. From here, choose the video you want to work on.
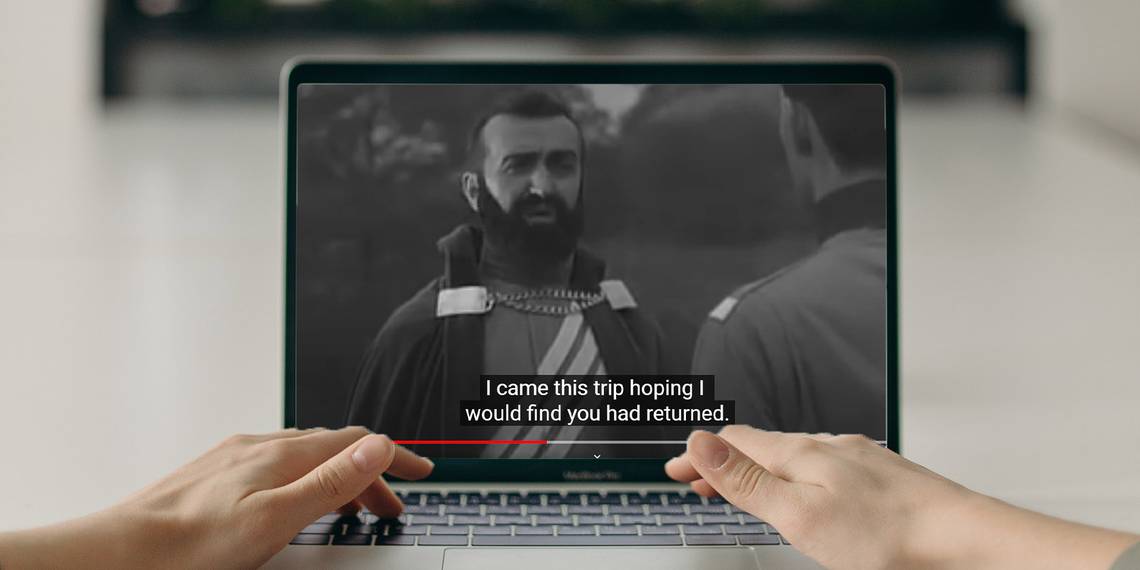
To demonstrate, we've chosen a 30-second clip from the 1959 sci-fi movie Teenagers from Outer Space, purely for its name and the fact that it's in the public domain.

YouTube will have already created some subtitle options for you. In our case, the first one is English (Automatic), and the second option is English (United Kingdom) (Video Language).
These will differ depending on the language that YouTube detects in your video and your own YouTube language settings.

If you choose the option that includes (Video Language), you’ll be able to add your own subtitles. Not only can you add captions and change timings with this setting, but you can also add subtitles by typing them in manually, uploading a file, or using auto-sync.
If you want to add your own subtitles manually, you can make it easier by toggling the Pause while typing tick box below the video preview. This will enable you to play the video and have it automatically pause while you add your captions.
It might take some practice to get this right, but it’s a big time saver once you’re used to it.

You can start adding subtitles by clicking the Caption button at the top left corner of the window. Each time you press Enter, it will create a new caption. This will automatically add timings as well, which you can edit afterwards using the basic timeline at the bottom of the captioning window.
You can also choose Edit as text, and write everything out as a single piece of text. In this mode, hitting Enter twice will turn the next line into a new caption. Hitting it once will create a line break in that caption, so you can have multiple lines appear on your screen at once.
Customizing Automatically Generated Subtitles
Manually typing video subtitles can be a long, painstaking process. Not only do you need to get all the words right, but you have to ensure your timing makes sense too. If you’re not a fast typist, that makes the task even more challenging.
YouTube’s auto-generated subtitles take a lot of that pain away. They detect dialog in videos and use speech recognition to turn it into text. They can even translate speech into different languages.

By default, YouTube's auto-generated subtitles are far from perfect, but with a little bit of tweaking, they can save you a significant amount of time and effort.
On the Channel subtitles page, click on the video you want to edit, and then locate the subtitle language option that says (Automatic). Select Duplicate and edit.
You can now start working on a copy of the auto-generated subtitles. How accurate they are will depend on the quality of the audio in your video, among other things.
In our case, the captions YouTube has generated for our clip are mostly accurate. There are a few instances of words being misheard, such as “watched” being interpreted as “lost," but it's close enough. And all the timing is perfect, so the subtitles appear on the screen as soon as the actors begin speaking.

The biggest problem is the complete lack of grammar and punctuation. The automatic subtitles are just one continuous chunk of text.
To fix this, the first thing you should do is add paragraph breaks where needed. Each break will be displayed as a separate caption. We’ve broken things mainly into single sentences.

YouTube Studio keeps all the timings as they were, so you shouldn’t need to edit this. If you do want to change when captions appear and for how long, use the timeline at the bottom of the subtitles window.
Now, it’s time to fix the punctuation and grammar. This is all straightforward—simply add some missing commas, periods, question marks, etc. It's also a good idea to correct any misheard words.

Once you’ve edited your subtitles to your liking, click Publish. You can also save your draft and come back to it later if you're not finished.
To make changes to your subtitles after you’ve published them, click Edit on the Video subtitles page.
Now, whenever anyone watches your video, they can select the subtitles you created. The auto-generated captions will also remain an option.
Adding a Different Language to YouTube Subtitles
You may want to provide a translation for foreign speakers. To do so, head to the Channel subtitles page, select the video you want to edit, and click Add language on the Video subtitles page. For this example, we've chosen French.

Click Add under Title & description, and you can add your video's information in your chosen language. There are various online translation services that can help you here.

Now click Edit, and you can start working on your translation. You can upload subtitles, type them manually, or use auto-translate.
If you’ve already edited your own subtitles, YouTube will use them as the basis of its translation—complete with punctuation and capital letters.
Improve Your YouTube Videos With Subtitles
Subtitles make your YouTube videos more accessible. By using auto-generated subtitles as a base, you can save yourself time and effort. Your subtitles can be clean and accurate, and your viewers will benefit.

Creating subtitles is just one of the many interesting things you can do with YouTube Studio. If you want to create better videos, it's well worth exploring all of its features.
Image Credit: cottonbro/Pexels