How many times have you intentionally shortened and simplified your password for the sake of remembering it? How about all the times you got paranoid typing in your password when out in public? These are real and common problems everyone faces today, all solvable with a neat little tool known as a security key.
Although YubiKey and Google Titan provides reliable security keys, they can be expensive. So today, learn how to make your own affordable security key with a Digispark programable board.
Reasons to Use a Security Key

Security keys have become a popular way to store passwords throughout the years. Many people use them for convenience and security purposes.
Since these keys automatically input usernames and passwords, users can enhance their online protection by using long and complex passwords that would take ages to brute force. Security keys also allow users to bypass physical keyloggers since typing on the keyboard is no longer required.
Another reason to use a security key would simply be for convenience. A lot of people are slow and unconfident typers. When typing a password, keying in one wrong character often leads to deleting everything and starting over again. With a security key, users no longer have to worry about making incorrect keystrokes.
Why a Digispark?

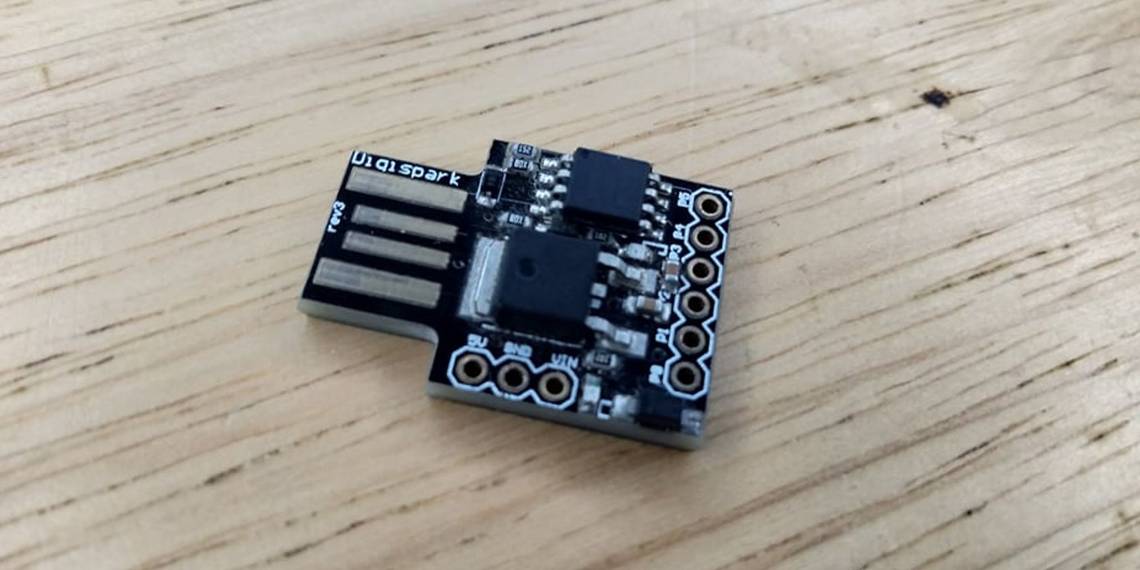
A Digispark is a programable board designed for varying applications—lightweight automation, RGB programming, exploitation tools, security keys, and an assortment of discreet electronics projects.
We want to use a Digispark primarily for its cost. As of writing, you can find one on eBay for between three and four dollars. You can even buy a clone that works just as well for less than two dollars. Since the microprocessor is already packaged in such a discreet board, soldering components are no longer required.
Making the Security Key
To make the security key work, you need to program the Digispark to input your password whenever it is inserted into a USB port in your device. Don't worry; this isn't complicated. The code is already provided below. All you need to do is to set up an IDE (Integrated Development Environment), install the Digistump drivers, and upload the sketch into the Digispark, and you're done.
Setting up the Arduino IDE
The Arduino IDE is software intended for programming all kinds of Arduino boards such as the Uno, Leonardo, and Pro Micro. Since you will be using a Digispark (a board not registered by Arduino), you first need to set the IDE for it.
Step 1: Download the Arduino IDE.

If you are using Linux and unsure which version to get, try using the 64-bit version of the IDE. For Windows and Mac, just go for the first provided option. After the download completes, install the IDE with all the default settings. Then fire up the program.
Step 2: Add Digistump to the board manager
Since Digispark is by default unsupported by the Arduino IDE, you'll have to communicate to the IDE that you want to use a third-party board by giving it a link to the Digistump database.
You can do this by hovering over File and clicking on Preferences or by using the shortcut Ctrl+Command.

Copy and paste "http://digistump.com/package_digistump_index.json" (without the quotation marks) on the Additional Boards Manager URLs, then click OK.

Step 3: Select your Digispark board
Hover over Tools > Boards, then click Boards Manager.

Search for digistump, then select Digistump AVR Boards and click install. It will take a moment to download and install all Digistump Boards into our IDE. After the installation, click Close.

Hover over Tools > Boards > Digistump AVR Boards, then click on Digispark(Default – 16.6mhz).

Your IDE is already set to program the Digispark. However, if your PC does not identify the Digispark when you plug it in, you must install its proper drivers.
Installing Digitump Drivers to your PC
Step 1: Download the Digistump Drivers.
Step 2: Extract the zip file and open the folder. Double click on Install Drivers to install.

You are all set and ready to program the Digispark.
Programming the Digispark
Programming in Arduino is relatively straightforward. However, it does require a bit of tinkering for you to get used to it.
The sketch (a script in Arduino is called a sketch) works by making the Digispark act like a keyboard. Using the DigisKeyboard library, the sketch will automatically print out your username, hit the enter key, type your password, and hit the enter key again to log you into your account. Here is the complete sketch:
        #include "DigiKeyboard.h"

void setup() {
}

void loop() {

    DigiKeyboard.print("Username Here");
    DigiKeyboard.sendKeyStroke(KEY_ENTER);
    DigiKeyboard.print("Password Here");
    DigiKeyboard.sendKeyStroke(KEY_ENTER);
    DigiKeyboard.delay(2000)
}
Let's break it down so you would at least understand what's happening.
#include "DigiKeyboard.h"
This command is used for importing the DigiKeyboard library to expand the sketch's capability with pre-coded functions to make scripting simple.
         void setup(){
}
The setup () function is used to set up the pins for when you add triggers like buttons on your programable board. You can skip this part since you haven't soldered any extra components to our Digispark. It is added here as a convention, so you can use it whenever you want to add more functionality to your Digispark security key.
        void loop(){
}
The loop () function allows the sketch to be in a constant feedback loop to let the Digipark security key repeat the functions below at a specified time. The DigiKeyboard functions under the loop make the Digispark type your username and password.
Now that you understand how the sketch works, start programming your Digispark security key.
Step 1: Delete everything written on the IDE and paste this script:
        #include "DigiKeyboard.h"
void setup() {
}
void loop() {

DigiKeyboard.print("Username Here");
DigiKeyboard.sendKeyStroke(KEY_ENTER);
DigiKeyboard.print("Password Here");
DigiKeyboard.sendKeyStroke(KEY_ENTER);
DigiKeyboard.delay(2000);
}
Step 2: Change "Username Here" with your username and "Password Here" with your password. Remember that your username and password have to be in quotation marks.
        void loop() {

    DigiKeyboard.print("<strong>JohnDoe@Protonmail.com</strong>");
    DigiKeyboard.sendKeyStroke(KEY_ENTER);
    DigiKeyboard.print("<strong>VeryComplexPassword</strong>");
    DigiKeyboard.sendKeyStroke(KEY_ENTER);
    DigiKeyboard.delay(2000)
}
Step 3: Click Upload
Step 4: Once you see "Plug in device now…", plug in your Digispark at your PC's USB port.

Once the sketch is successfully uploaded to your Digispark, you should see a prompt like this.

Congratulations, you now have a Digispark security key! Use it to store your username and password combination for your Facebook, Instagram, Google, and other accounts.
Possible Digispark Security Upgrades
Your new Digipark security key is ready to serve for your security and convenience. However, it is still pretty limited. That's because you can only store one username and password. Furthermore, there is a couple of seconds delay before the Digispark inputs your credentials.
If you are up for the task, you can do a few upgrades to make this security key better. You can remove the startup delay by installing a different bootloader on the Digispark. However, the startup delay was purposefully added to the default bootloader, so users can keep uploading new programs on the Digispark before executing the code. With this gone, you'll need to solder a switch to set the board into programmable mode or execute mode whenever you desire.
Furthermore, the Digispark has five usable pins, allowing you to potentially store up to four usernames and passwords (if you use one pin for the switch). You can do this by using four momentary buttons and a couple of resistors to select and trigger which specific credential you want to use.
Affordable Security
Whether you've chosen to do the upgrade or not, having a security key at hand will provide enhanced security and convenience whenever you try to log in on a new machine. For people interested in maximizing their security, sticking to commercial security keys with a dual authenticate function is ideal.
However, if you are not keen on spending a lot of money on a physical key, this cheap and cheerful security key is for you.