Collecting data from a website user can be done in several different ways. Forms on websites can have a simple function such as subscribing a user to a newsletter, or a more complex purpose like acting as a job application form.
However, one thing that all these simple to complex forms have in common is HTML and more specifically the HTML <form> tag.
Using the Form Tag
The <form> tag is an HTML element that is used as a container to enclose other elements that can be considered as building blocks for forms. Some of these fundamental elements include the <label> tag, the <input> tag, and the <button> tag.
The <form> tag has an important attribute that contributes to its functionality. This attribute is called “action” and is used to identify the file that the data entered into the form will be passed to.
Using the <form> Tag Example
        <!-– A form that will pass its data to a javascript document called process.js-->

<form action="process.js">

<!--close form tag-->

</form>
The example above shows how to use the form tag in your projects. One of the main takeaways is that if you open a form tag you should remember to close it. This will create a form structure and also ensure that the data entered into the form is processed correctly.
Using the <label> Tag
The <label> tag is used to describe the data in each input field in a form. This tag has a for attribute, which is used to enhance a form’s functionality.
If the id that is assigned to the corresponding input field matches the for value in the <label> tag, then that input field will be automatically highlighted when you click on the label.
Using the <label> Tag Example
        <!—using the label tag-->

<label for="fname">First Name:</label>
In the example above you can see that the for attribute is assigned the value fname. Therefore, if you create an input field with the fname id, this field will be highlighted each time you click on the First Name label.
Using the <input> Tag
In its most basic form, the <input> tag can be seen as a text box. The <input> tag captures data from the user and one of its more crucial features is the type attribute. The type attribute indicates the type of data that this text box can collect.
There are several different values that you can assign to the type attribute, but some of the more popular ones are as follows.
- Text
- Number
- Image
- Date
- Checkbox
- Radio
- Password
Using the <input> tag Example
        <!—using the label and input tags-->

<label for="fname">First Name:</label>

<input type="text" name="fname" id="fname">
The <input> tag in the code above has three different attributes that each have a unique function. The type attribute is assigned a text value which means that the text box will only accept characters.
The id attribute is a unique identifier for the text box, and it’s important because it provides access to this element from a CSS file. The name attribute is also a unique identifier; however, the name attribute is used to interact with an element from the server-side of development.
The id and name attributes are usually assigned the same value as one provides access to an element from the client-side and the other from the server-side.
Using the Checkbox Element
The checkbox element is very unique in comparison to the other elements that you can use with the <input> tag. It allows a user to select one or more options from a list of related choices. Checkboxes are easily identified because they are represented by tiny square boxes that contain a check when selected.
Using the Checkbox Element Example
        <!-using the checkbox value-->

<label for="Languages">Programming Languages:</label>

<input type="checkbox" name="languages" id="languages" value="Java"> Java

<input type="checkbox" name="languages" id="languages" value="JavaScript"> JavaScript

<input type="checkbox" name="languages" id="languages" value="Python"> Python
In the example above, each of the checkbox elements has a value attribute, and this is important because it helps to distinguish each checkbox option from the collection. Therefore, if a user selects "Java" from the options above, the data will reflect that.
Using the <select> Tag and the Radio Elements
The <select> tag and the radio elements are similar in the sense that they only allow a user to select a single value at a time; therefore, one can say that they have the same function. However, they’re very different in appearance.
The radio element is closer to the checkbox element in appearance, however, with the radio element you have circles instead of squares.
The <select> tag produces what is essentially a drop-down box, which allows a user to select a single value.
Using the <select> Tag and Radio Element Example
        <!-using the select tag-->

<label for="sex">Sex:</label>

<select name= "sex" id="sex">

<option value="male" selected>Male</option>

<option value="fmale">Female</option>

<option value="other">Other</option>

</select>

<!-using the radio element-->

<label for="positions">Positions Available:</label>

<input type="radio" name="positions" id="positions"

value="Junior Developer"> Junior Developer

<input type="radio" name="positions" id="positions"

value="Mid-level Developer"> Mid-level Developer

<input type="radio" name="positions" id="positions"

value="Senior Developer"> Senior Developer
Using the Date Element
The date element produces a small text box that generates a calendar when clicked. Using date as an input type in your forms safeguards against a user potentially entering an incorrect date, which can potentially lead to the collection of erroneous data.
Using the Date Element Example
<input type="date" name="dob" id="dob">
Using the Email and Password Element
When a developer assigns either the email or the password values to the type attribute of an <input> tag, they each produce an identical text box. However, when you start using these boxes the differences become apparent.
The email element monitors the data entered into the text box and ensures that each submission meets the standard requirement of an email address; which means having a local part, followed by the @ symbol, and ending with a domain.
Using the Email Element Example
<input type="email" name="email" id="email" placeholder= "Enter email address" >
In the example above you're introduced to a new attribute called placeholder, and this attribute takes a text value which is displayed in the text box in faded gray. This text is used to indicate the data that is to be placed in the text box as is seen in the example above.
The password element turns characters into asterisks as they are being entered into the textbox. Therefore, if your computer screen is visible to other people they won't see the password you enter.
Using the Password Element Example
<input type="password" name="pword" id="pword">
Using the Button Tag
In a form, there are usually two different types of buttons. The first is the submit button, which submits the data entered in the form to the value assigned to the action attribute (which is located in the <form> tag).
Submit Button Example
<button class="btn" type="submit">Submit</button>
The second type of button that's usually used in a form is a reset button, which clears the data in a form so the user can enter fresh data. The <button> tag has a type attribute, which is used to indicate the function of the button. In the example above the type attribute is assign the value submit, therefore, a button that has a type value of reset is used to reset the form.
Reset Button Example
<button class="btn" type="reset">Reset</button>
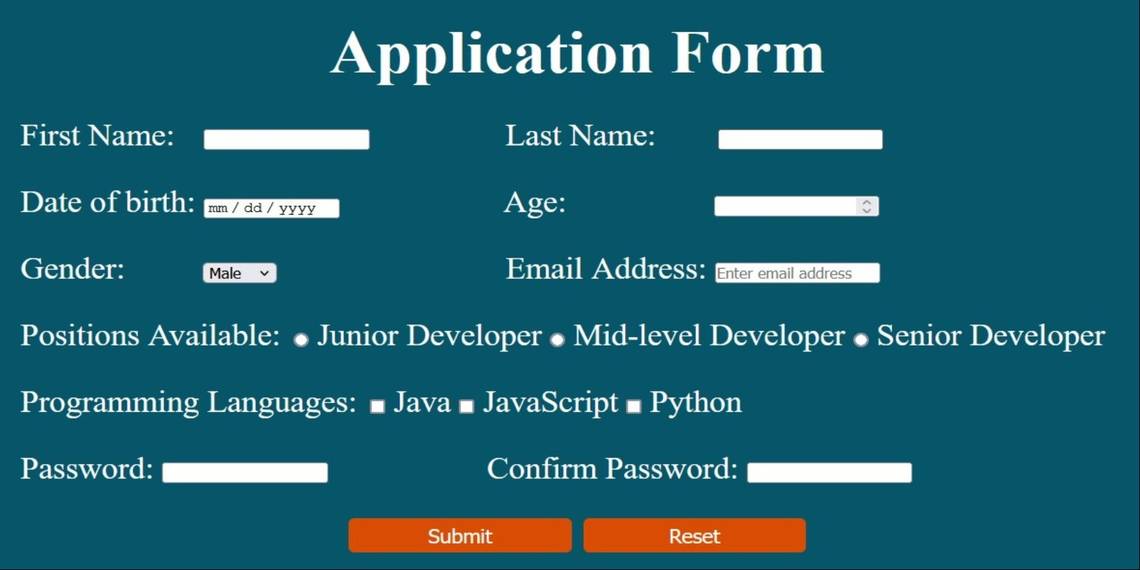
Creating a Form
To create a simple form in HTML you'll need to enclose all of the elements mentioned above in a <form> tag.
Creating a Form Example
        <!DOCTYPE html>

<html>

<head>

<meta charset="UTF-8">

<meta name="viewport" content="width=device-width, initial-scale=1.0">

<title>Forms</title>

</head>

<body>

<div id="container">

<h1>Application Form</h1>


<form action="process.js">

<div>

<label for="fname">First Name:</label>

<input type="text" name="fname" id="fname">

<label for="lname" >Last Name:</label>

<input type="text" name="lname" id="lname">

</div>


<div>

<label for="dob">Date of birth:</label>

<input type="date" name="dob" id="dob">

<label for="age">Age:</label>

<input type="number" name="age" id="age">

</div>


<div>

<label for="gender">Gender:</label>

<select name= "gender" id="gender">

<option value="male" selected>Male</option>

<option value="fmale">Female</option>

<option value="other">Other</option>

</select>

<label for="email">Email Address:</label>

<input type="email" name="email" id="email" placeholder= "Enter email address" >

</div>


<div>

<label for="positions">Positions Available:</label>

<input type="radio" name="positions" id="positions"

value="Junior Developer"> Junior Developer

<input type="radio" name="positions" id="positions"

value="Mid-level Developer"> Mid-level Developer

<input type="radio" name="positions" id="positions"

value="Senior Developer"> Senior Developer

</div>


<div>

<label for="Languages">Programming Languages:</label>

<input type="checkbox" name="languages" id="languages" value="Java"> Java

<input type="checkbox" name="languages" id="languages" value="JavaScript"> JavaScript

<input type="checkbox" name="languages" id="languages" value="Python"> Python

</div>


<div>

<label for="pword">Password:</label>

<input type="password" name="pword" id="pword">

<label for="cpword">Confirm Password:</label>

<input type="password" name="cpword" id="cpword">

</div>


<button class="btn" type="submit">Submit</button>

<button class="btn" type="reset">Reset</button>

</form>

</div>

</body>

</html>
The code above will produce the following form:

Now You Can Create a Simple Form in HTML
This article provides you will all the tools to create a functional HTML form. It identifies the different HTML tags that are used in form creation and explores the different attributes that can be used with these tags.
However, most forms that you see on websites have one additional component; CSS, which is used to bring the form to life and make it more aesthetically pleasing.