
When you press Cmd + Shift + 3 or 4 to take a screenshot on Mac, it saves the file in PNG format. However, if you like, you can change this to make Mac screenshots save automatically in other formats, like JPG, GIF, TIFF, HEIC, or even PDF.
So, whether you're only allowed to use JPG formats or you simply prefer working in PDFs, here are two ways to change the default screenshot format on your Mac. One makes a permanent change for all screenshots, and the works on a per-screenshot basis.
How to Use Terminal to Permantly Change the Mac Screenshot Format
Using simple Terminal commands, you can set your Mac to save screenshots in the format you want. This rule will apply to all screenshots you take from now on, unless you choose to revert it to PNG format again.
Here are the steps to change Mac's screenshot format using Terminal:
- Open Terminal from the Application > Utilities folder, or use Spotlight to open it.
- Copy and paste one of the following commands into Terminal and press the Enter key.
-
To save Mac screenshots in JPG format:
defaults write com.apple.screencapture type jpg;killall SystemUIServer
-
To save Mac screenshots in HEIC format:
defaults write com.apple.screencapture type heic;killall SystemUIServer
-
To save Mac screenshots as PDF:
defaults write com.apple.screencapture type PDF;killall SystemUIServer
-
To save Mac screenshots as GIF:
defaults write com.apple.screencapture type gif;killall SystemUIServer
-
To save Mac screenshots as TIFF:
defaults write com.apple.screencapture type tiff;killall SystemUIServer
-
Or, to return Mac screenshots back to PNG format:
defaults write com.apple.screencapture type png;killall SystemUIServer

As you can see, the command is the same for all formats. All you're doing is replacing png with jpg, heic, pdf, gif, or tiff.
To test it, press Cmd + Shift + 3 to take a screenshot. Next, select the saved file and press Cmd + I to view its information. As the Image Kind, you should see the new format you set.
How to Use Preview to Save Mac Screenshots in Any Format
If you don't want to change the format for all Mac screenshots, but you don't want to save a single screenshot in a different format, you can do so on a case-by-case basis using Preview.
This is useful if you don't always want to have the screenshot in just one format. For example, TIFF files are of high quality, but the file size is huge. PDF, on the other hand, is tough to insert into blog posts or documents. PNG is sharp, but its file size can be big. And at times, JPEG or JPG can blur the text and offer a lower image quality.
So, if one default format doesn't fit, you can use these steps to take a Mac screenshot and save it in any desired format you like. Here's how.
- Open the Preview app from the Applications folder or by searching for it with Spotlight.
-
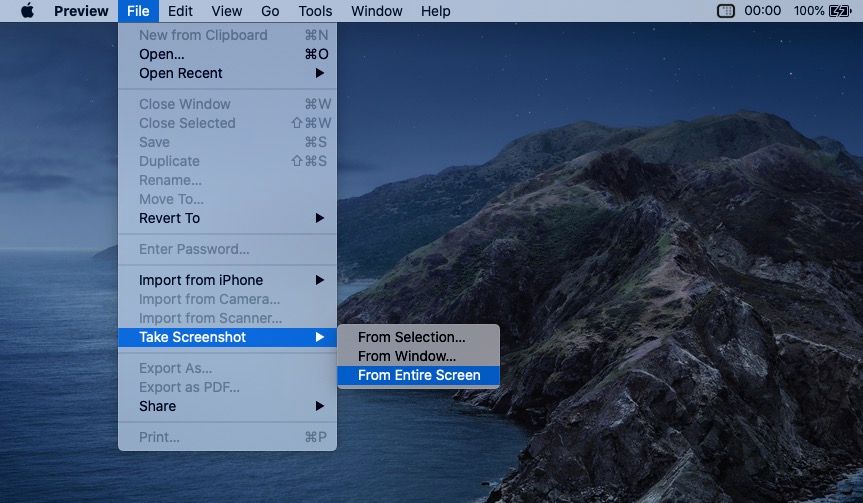
From the top menu bar, click File > Take Screenshot then choose From Selection, From Window, or From Entire Screen based on your needs.
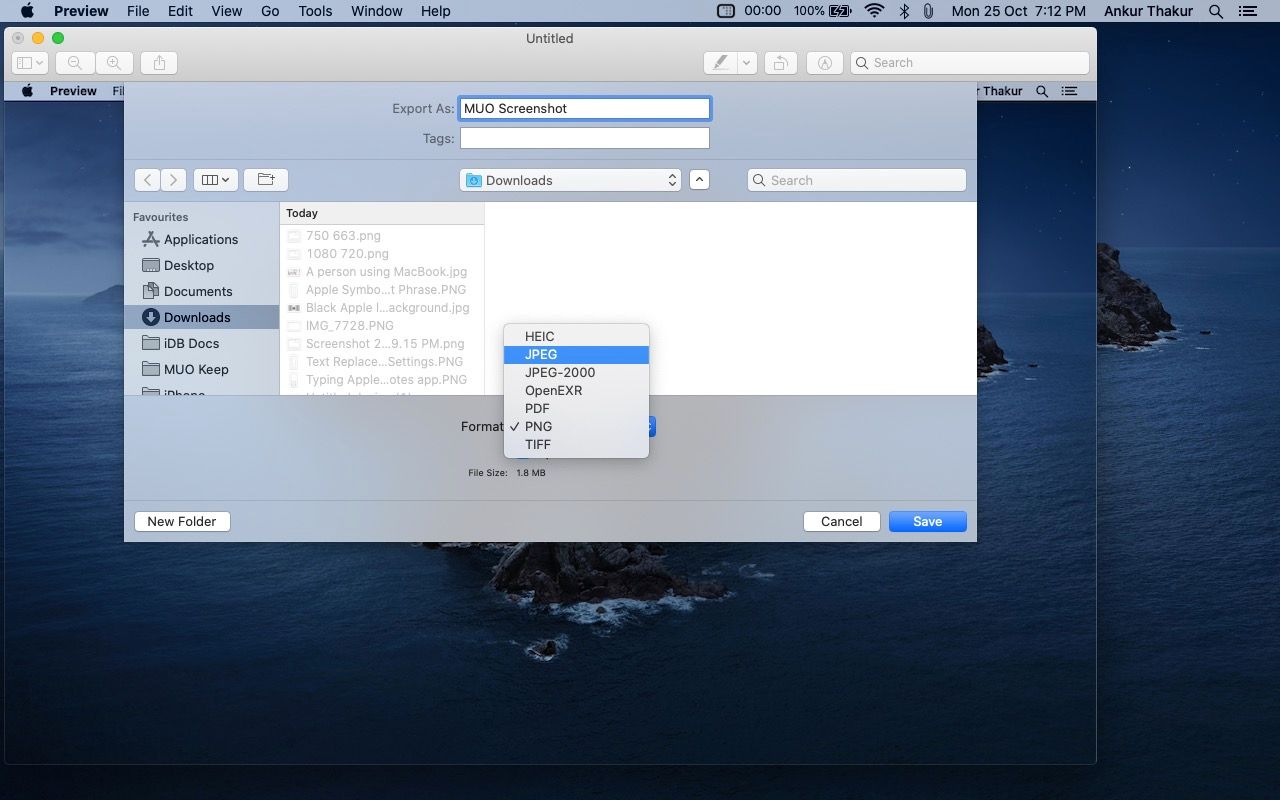
- After using Preview to take the screenshot, Preview automatically opens it. Click File > Export.
- Click the Format dropdown box and choose one of the desired formats for the screenshot like HEIC, JPEG, JPEG-2000, OpenEXR, PDF, PNG, or TIFF.
-
You can also enter any suitable filename and choose a location. Finally, click Save.


Once you get the basic idea, you can accelerate the process by pressing Cmd + S in the Preview window. Now choose the desired image file format for that screenshot and click Save.
Alternatively, you can click the Close button from the top-left corner of the Preview window and you'll automatically see the option to save the screenshot in the desired format.
Convert Mac Screenshots to Other Formats Later
Now you know how to take all your Mac screenshots in a non-PNG format. You've also learned how to save screenshots to any desired format on a case-by-case basis. With this, it should give you the flexibility to use screenshots for different works and projects.
Still, suppose you change your mind after taking a screenshot in a particular format. In that case, you can easily convert the images to other formats on your Mac instead of retaking the screenshot.