A motion-sensing light turns on when it detects motion. It is commonly used for staircases, washrooms, and outdoor areas, to switch on lights automatically once it gets dark. There are two different sensor types used to detect motion: microwave-based motion sensors and Infrared PIR sensors.
Microwave sensors can detect motion though a solid concrete wall while a PIR motion sensor has a limited field of view. You can choose either type based on your needs and the location where you want to install the sensor.
For this guide, we will use a PIR motion sensor to build a motion-sensing light switch that turns on and stays on when motion is detected, and turns off after a certain time when motion stops. We will also connect a switch to a smart home network via Wi-Fi.
Build a Standalone Motion-Sensing Light Switch
A PIR motion sensor such as the HC-SR501 can be used without a microcontroller to switch a relay module on/off to control an AC load for a specific duration, such as a lamp. The PIR sensor module comes with two presets that you can rotate to increase or decrease the sensitivity and time duration.
You can increase the duration or switch-on time to up to 5 minutes, after which the load (light) will shut down. You will need to tinker with the presets on the PIR sensor to find the sweet spot that fits your needs.
Things You'll Need
To build a motion-sensing light switch, you will need the following:
- PIR motion sensor
- Relay module
- Jumper wires
- 5V power supply
- Micro USB module (optional)
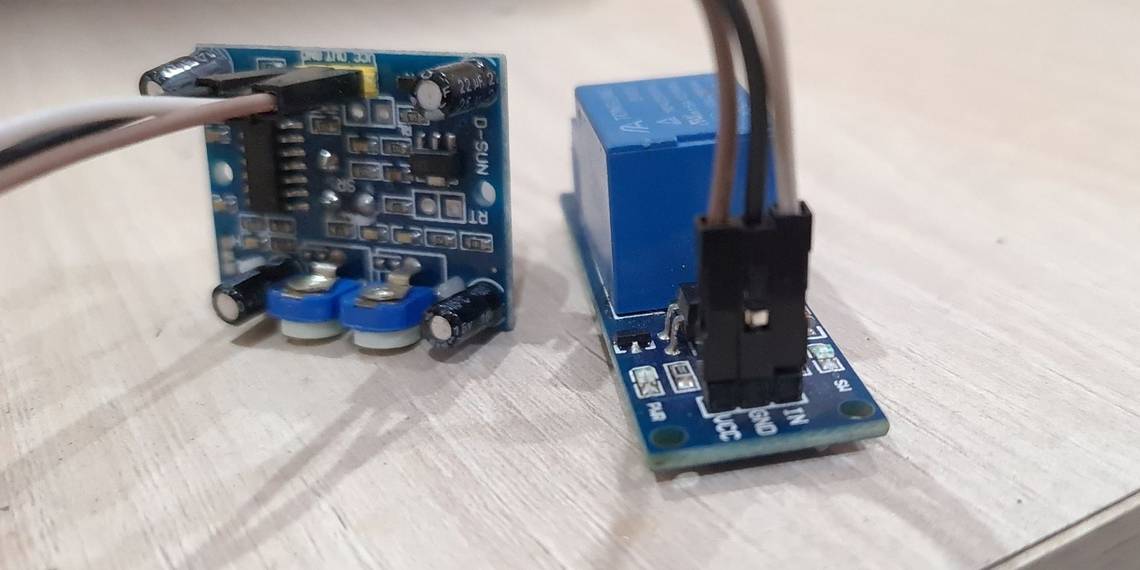
Step 1: Connect PIR Sensor to Relay
You'll need to connect the PIR sensor to the relay board and provide a 5V power input, such as via an optional micro USB module. Use jumper wires to make the connections between the relay module and the PIR sensor as in the diagram below.

Step 2: Test It Out
If anyone moves in front of the PIR sensor, it will detect the motion and trigger the output pin to a high state (3.3V). This signal is sent to the relay, which turns on the connected AC load (lamp or light in this case). Once the time is over, the output pin is set to low (0V) and the relay turns off, switching off the connected AC load. To increase or decrease the time duration and sensitivity, you can adjust the presets on the sensor, as shown in the photo below.

Step 3: Install the Switch
That’s your standalone motion sensor switch. After the test, you can solder all components on a PCB, enclose it in a 3D printed enclosure or any box, and install it where you want it to switch lights on/off automatically when someone walks in or out.
Build a Wi-Fi Connected Motion Light Switch
A Wi-Fi-based motion sensor can be integrated with a home automation server, such as Home Assistant, to automate or trigger other smart home devices, lights, switches, etc. installed in your home or office. You may also enable notifications that you can receive on your smartphone or via an Echo Dot (Alexa).
There are many great ways to use a motion sensor in your home. For instance, when the sensor detects motion, Home Assistant can switch on the smart lights installed in a location such as your staircase or washroom. Similarly, you can use this motion sensor to capture pictures or trigger recording on a Wi-Fi camera as soon as motion is detected.
The possibilities are endless when combined with home automation software. You can follow our guide on setting up Home Assistant on a Raspberry Pi to quickly get started.
Things You’ll Need
To build a Wi-Fi connected light switch, you will need the following:
- An ESP8266 chip-based microcontroller, such as NodeMCU or D1 Mini
- PIR motion sensor
- Jumper wires
- 5V power supply
Step 1: Flash the Firmware
To build a smart Wi-Fi-based motion sensor switch, we will use Tasmota firmware. Alternatively, you may use ESPHome to compile custom firmware for Home Assistant.
- Download the Tasmota-Sensors.bin firmware file and Tasmotizer tool.
- Launch the Tasmotizer tool and connect your NodeMCU or D1 Mini to the PC using a micro USB cable.
- Select the COM port in the Tasmotizer tool and click Browse to select the Tasmota-Sensors.bin firmware file.

- Click Tasmotize. The firmware will be flashed.
Step 2: Configure the Switch
After the firmware is flashed, you will need to connect the switch to your Wi-Fi network and configure it.
- Open the Wi-Fi settings in your smartphone and connect to the tasmota-xxxx Wi-Fi network. It’s an open network and so does not require a password.
- Once connected, switch off mobile data and open the web browser.
- Visit 192.168.4.1.
- Choose your Wi-Fi network, enter the Wi-Fi password, and click Save.
- Note down the IP address displayed on the web browser screen and then open the IP in the same web browser. You may also wait for a while and let Tasmota load the web page automatically.
- Click Configuration > Configure Module and select Generic (0) from the drop-down. Click Save. The page will reload in a few seconds.
- Click Configuration > Configure Module and select Switch_n in D6 GPIO12 and select relay 1 in D2. Click Save. The page will reload.
- Go to Console and then paste the following commands into the Enter Command field. You may use your PC or laptop for this.
        SwitchMode1 1

SwitchTopic 0

Rule1 on Switch1#state=1 do publish stat/%topic%/PIR1 ON endon on Switch1#state=0 do Publish stat/%topic%/PIR1 OFF endon

Rule1 1

Press the Enter key after entering each command. This configures the PIR as a sensor that sends an On/Off message via MQTT to the %topic% (find it under Configuration > Configure MQTT).
Step 3: Pair PIR Sensor With MCU
Connect the PIR sensor to the NodeMCU or D1 Mini as shown in the following diagram.

Step 4: Power On and Add to Home Assistant for Automation
Once everything is wired up as shown in the diagram, connect the power supply. Now to add the switch to Home Assistant.
- Open Tasmota and go to Configuration > Configure MQTT.
- Enter the MQTT host IP, username, and password. Click Save.
- Go to Configuration again, click Configure Other, and then give this sensor a name, such as MotionSensor. Click Save.
- Open Home Assistant and go to Configuration > Devices & Services and click Add Integration.
- Search for and add Tasmota integration.
- Restart Home Assistant and then go to Configuration > Devices & Services.
- Check the Tasmota section.

- Click on the MotionSensor and then click the + icon under Automations.

- Choose PIR Sensor started detecting motion and then add your device or light to turn on or off if motion is detected by the Wi-Fi-based motion sensor.
- Save it. Similarly, you can add or trigger more devices or install extra motion sensors around the house to trigger devices, send you alerts, etc.
Deploy Motion Sensor Switches for Added Convenience
Motion sensor switches can help you save energy with the added convenience of not needing to manually turn lights switches on or off while walking up or down a staircase or entering/exiting a garden or porch area.
Besides automating light switches based on motion, you can use the motion sensors to trigger automation in your home or office by integrating it with a smart home automation server, such as Home Assistant or openHAB. The possibilities are endless.