The PlayStation 5's built-in SSD is fast, but it doesn't have a ton of space for games. The 825GB doesn't last long, and once you run out of space, having to regularly delete games to make room for new ones isn't fun.
Thankfully, with a PS5 system update released in September 2021, you can now add an M.2 SSD to your system. We'll walk you through the process of adding an SSD to your PS5, from selecting a drive to installing it in the console.
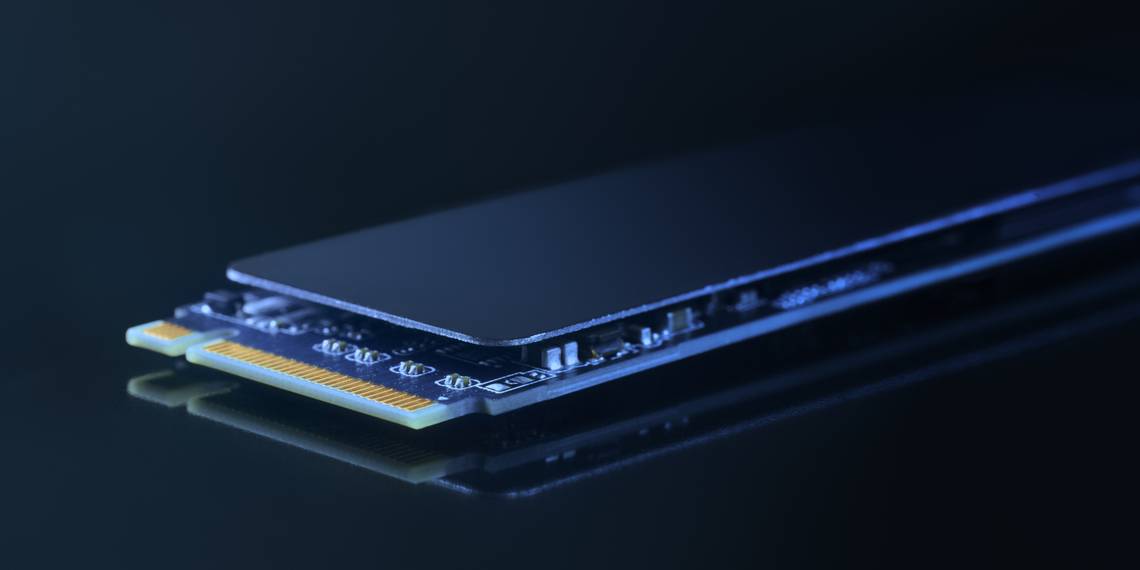
Choosing an M.2 SSD for Your PS5
First, you should know that the only expanded storage option for playing PS5 games is an M.2 SSD. This is different from a SATA drive you might have put in your computer or even a PS4. If you aren't familiar, see an overview of M.2 SSDs so you understand them before continuing.
While you can connect an external HDD or SSD to your PS5, you cannot play PS5 games from external drives. Instead, external drives can hold PS5 games for later transfer to the internal storage, and you can play PS4 games from them.
Sony has some fairly specific requirements for the M.2 drive you put in your PS5. Below is a summary; please see Sony's support page covering M.2 SSDs on PS5 for complete details, such as the maximum physical size:
- The drive's format must be a PCIe 4.0 M.2 NVMe SSD.
- Its storage size must be between 250GB and 4TB.
- A read speed of at least 5,500MBps.
- A heatsink to keep the temperature down.
The heatsink is a particularly important aspect. Some M.2 SSDs have a heatsink built-in, while others don't. If you buy an SSD model that doesn't include a heatsink, you'll need to purchase one separately and install it yourself.
This isn't too difficult (and we cover the process below), but it's an additional expense. Plus, you need to make sure the drive still fits inside the required dimensions even with the heatsink attached. Do not install an SSD without a heatsink; doing so could damage your system and/or drive.
Unfortunately, we can't cover all possible PS5 SSDs here. We used a Samsung 980 Pro 1TB SSD and the MHQJRH 2280 heatsink. If you buy something different, search reviews to be certain that other people have used the drive (and heatsink, if applicable) in their PS5 successfully.
Step 0: Preparing for the Process
Installing an SSD in your PS5 is relatively simple, but you should perform a few quick actions to get ready for the job.
You'll need a Phillips head screwdriver and a flat surface with enough room and light to work. You may also want to have a flashlight for additional visibility. If your PS5 is oriented vertically, you'll need a flathead screwdriver to remove the base screw. Finally, you might want to place something below your console for protection while you work.
The PS5 requires system software version 21.02-04 or higher to use an SSD, so make sure you're up-to-date by going to Settings > System > System Software > System Software Update and Settings > Update System Software.

Once this is done, fully shut down your PS5 by pressing the PlayStation button on your controller, selecting the Power icon from the quick menu, and choosing Turn Off PS5.
After your PS5's lights turn off, unplug the power cable and remove any other connected cables from your system. Give your PS5 a bit of time to cool down if it's been running, then bring it to your workstation.
In case you plan to repurpose an existing drive to use in your PS5, you should copy any data you want to keep from the drive to another location before continuing. You must format the SSD once you put it into your PS5, which will erase everything it contains.
Step 1: Installing the Heatsink (If Needed)
If your SSD came with a heatsink pre-installed, you can skip this step. For drives that need a third-party heatsink, you must attach it now before installing the drive.
For the heatsink we used, the process was pretty simple. The package came with the heatsink, thermal pads, and small screws with a screwdriver.

Remove the protective film from one pad and place it on the front or back of the SSD, then repeat the process with a second thermal pad on the other side of the drive. Be sure not to cover up any part of the driver's connection pins at the end, and handle your drive by the edges to avoid touching the sensitive electronics.

Once you apply both pads, remove the protective film from the other side of each of them. Then place your drive inside the bottom (solid) piece of the heat sink. Confirm that the connection end of the SSD faces the flat edge of the bottom piece of the enclosure. Be sure the drive isn't upside-down.
The back of the drive goes toward the Alignment side of the enclosure, which also has a cut-out circle. Use this to align your drive and make sure the connection pins are accessible.

Next, place the top part of the heat sink above the enclosure, with its cut-out circle matching the other parts. Then use the screwdriver to attach the six screws to the sides to secure it.

Each heatsink will be slightly different, so review the instructions that came with yours carefully. If you have trouble, look for a YouTube video detailing the process.
Step 2: Removing the PS5 and Drive Bay Covers
To begin the install process, you'll need to remove the base from your PS5.
If your PS5 sits horizontally, simply lift it up and gently pull the base out. For a PS5 in the vertical position, place it on its side, then use a screwdriver or coin to remove the screw in the base. Place the screw in the little compartment of the base for safekeeping.

Before you proceed, it's a good idea to ground yourself to avoid static discharges, which could damage your PS5 or SSD. Touch a grounded metal object to release any static. You can wear an anti-static wristband if you want, but it's not necessary.
Position your PS5 with the PlayStation logo facing down and the power button away from you (so you're looking at the back with the ports upside-down). Grip the corner at your top-left with your left hand, and the corner at the bottom-right with your right.

Gently pull up on the cover with your right hand as you slide it towards your left. It takes a bit of force, but not much—there are small hooks inside that you're sliding out of place.
You should be able to slide the cover off with your left thumb, while using your fingers to keep the system in place. If the system is rocking too much when you do this, try putting it on a more stable surface.
Now you've removed the cover and should see the M.2 expansion slot, which is next to the fan on the front side of the console. Use your Philips head screwdriver to remove the screw holding the slot cover in place.

Be careful not to drop the screw into the fan as you remove it, then set the screw and cover someplace where you won't lose them.
Step 3: Installing the M.2 SSD
Now you're ready to install your drive inside the console. Inside the expansion slot, you'll see a screw next to the text 110 (on the side opposite the connection port). Use your screwdriver to remove this screw and set it aside for a moment.

Beneath the screw you just removed is a spacer. Grab this spacer and place it in the slot that corresponds to your SSD size; the number should match up with the size on your drive's packaging. If you're not sure, it should be clear based on the length of your drive. Ours was 80.
Now, grab your M.2 SSD (by its edges). Align the end that has connectors with the notch inside the expansion bay of your console, opposite the side you just removed the screw from.
Then, at a slightly diagonal and upward angle, firmly insert the drive's connectors into the port on your console.

Once it's firmly connected, you need to secure the M.2 drive. Gently push down on it until it's resting on the spacer you placed a moment ago, then use the screw that was inside the bay to fasten the drive in place.

Step 4: Putting Everything Back Together and Formatting
Now your SSD is installed and it's time to put your PS5 back the way it was. Grab the expansion bay cover, put it back into place (there's a small notch on the side opposite the screw), and use its screw to secure it.

To put the cover back on, make sure you have it aligned correctly (with the front facing away from you). Slowly move it into place and you should be able to feel the hooks on the cover moving into their proper positions. Then give it a push from your left hand toward your right and you should hear a click as it snaps into place.

Finally, put the base of your PS5 back the way you want it. Then reconnect all cables and turn your console on. When you boot it up, you should see a prompt to format your M.2 drive for use with the console. Accept this, which will erase everything on the drive. You'll then see info about the read speed of your drive.

Now your M.2 drive is ready to use with your PS5. You can install games directly onto it, or move games from your internal storage onto the expansion drive. Head to Settings > Storage to take a look; you'll see a new M.2 SSD Storage entry.

Enjoy More PS5 Storage
While it took a while after launch, you finally have the option to expand your PS5's space for PS5 games. Adding more speedy storage lets you play more of the best PS5 exclusives and backward-compatible PS4 games without having to uninstall anything.
And as a PS5 owner, you should know about all the little tricks the system has to improve your experience.