One of the most crucial factors to consider when designing an application is the type of API architecture to use. Efficient API design is crucial in ensuring that apps are performant throughout their lifecycle.
RESTful architecture is the most popular approach, but it has one significant drawback: a fixed endpoint structure that returns predetermined data. This design can result in inefficient communication.
In contrast, GraphQL—an alternative to REST—offers more flexibility by letting you request only the data you need.
What Are GraphQL APIs?
GraphQL is a query language you can use to write backend APIs (Application Programming Interfaces). Unlike REST APIs, which have multiple endpoints for different data, GraphQL APIs have only one entry point.
Clients can specify the data they need in their queries from this single entry point, making it more flexible and efficient for retrieving only the necessary data.
Simply put, a GraphQL API implements the GraphQL architecture described by the GraphQL specifications. This design involves defining the schema, queries, and mutations that clients can interact with.
Here is a simplified breakdown of the essential components of the GraphQL API architecture:
- Schema: A schema is a description of the types of data and operations that the API provides. Basically, a schema defines the structure of the data available and the type of queries and mutations that a client can execute to modify the data.
- Queries: Clients use queries to fetch data from the database by specifying the structure of the data they require. Moreover, they can nest multiple queries in a single HTTP request to fetch related data from multiple endpoints.
- Mutations: Mutations are operations used to modify data on the database. Clients can send mutation requests to create, update, or delete data.
Set Up a MongoDB Database
To get started, create a MongoDB database. Alternatively, you can set up a MongoDB cluster in the cloud for free. Once you have your database set up, copy MongoDB's database connection URI string.
You can find this project's code in its GitHub repository.
Create an Apollo Server
Apollo Server is a popular GraphQL server implementation that will allow you to build GraphQL APIs in JavaScript environments, including Node.js, Express, and more.
Create a directory for a new project and cd into it:
        mkdir graphql-API-mongoDB
cd graphql-API-mongoDB
Next, initialize a new Node.js project.
npm init --yes
This command creates a package.json file.
Install the Required Dependencies
Run the following command to install the packages.
npm install apollo-server graphql mongoose
Finally, create an index.js file in the root directory of your project.
Set Up the Apollo Server
Open index.js and add the code below:
        const { ApolloServer } = require('apollo-server');
const mongoose = require('mongoose');
const typeDefs = require("./graphql/typeDefs");
const resolvers = require("./graphql/resolvers");

const server = new ApolloServer({
    typeDefs,
    resolvers
});

const MONGO_URI = 'mongodb://localhost:27017';

mongoose
  .connect(MONGO_URI, {
    useNewUrlParser: true,
    useUnifiedTopology: true,
  })
  .then(() => {
    console.log(`Db Connected`);
    return server.listen({ port: 5000 });
  })
  .then((res) => {
    console.log(`Server running at ${res.url}`);
  })
  .catch(err => {
    console.log(err.message);
  });
This code initializes a local GraphQL server using the Apollo Server library. It then establishes a connection to a MongoDB database with the given connection URI.
Notice how the code passes two arguments to the new instance of ApolloServer: typeDefs and resolvers. These specify the data types and the operations that the GraphQL API can execute.
After the connection to the MongoDB database is set up, the server begins listening on port 5000.
Define the Data Model
Create a new folder in the root directory of your project folder and name it models. In this folder, create a new file names dataModel.js and add the following code to it:
        const {model, Schema} = require('mongoose');

const employeeSchema = new Schema({
    name: String,
    department: String,
    salary: String,
});

module.exports = model('Employee', employeeSchema);
Define the GraphQL Schema
A GraphQL schema defines the structure of the data that you can query using the GraphQL API. The schema also outlines the queries and mutations that the API can run. You can use queries to fetch data and mutations to modify it.
In the root directory of your project, create a new folder, and name it graphql. Inside this folder, add two files: typeDefs.js and resolvers.js
Add the code below in the typeDefs.js file:
        const {gql} = require("apollo-server");

const typeDefs = gql`
  type Employee {
    id: ID!
    name: String
    department: String
    salary: String
  }
  input EmployeeInput {
    name: String
    department: String
    salary: String
  }
  type Query {
    getEmployee(id: ID): Employee #return Employee by id
    employees: [Employee] #return array of Employees
  }
  type Mutation {
    createEmployee(employeeInput: EmployeeInput): Employee
    updateEmployee(id: ID, employeeInput: EmployeeInput): Boolean
    deleteEmployee(id: ID): Boolean
  }
`;

module.exports = typeDefs;
This code above uses the gql function provided by the apollo-server package to create a GraphQL schema for the Employee data.
The schema consists of four main elements: data types for employee information, input types, queries, and mutations that the API can perform.
Define the Resolvers for the GraphQL API
A resolver is a GraphQL function that defines the data to be passed on when a client sends an API query to fetch data. Essentially, its primary role is to retrieve the required data from the specified data source and return it to the client.
Add the code below to the resolvers.js file in the graphql folder. The resolvers, in this case, are specified within the Query and Mutation objects.
The Query object defines two methods: employees and getEmployee. These methods are responsible for fetching employee data from the database upon request by a client.
        const Employee= require("../models/employeesModel");

// GraphQL Resolvers
const resolvers = {
  Query: {
    employees: async () => {
      try {
        const employees = await Employee.find({});
        return employees;
      } catch (error) {
        console.error(error);
        throw new Error('Failed to fetch employees');
      }
    },
    getEmployee: async (parent, args) => {
      try {
        const employee = await Employee.findById(args.id);
        return employee;
      } catch (error) {
        console.error(error);
        throw new Error('Failed to fetch employee by ID');
      }
    },
  },
The Mutation object has three methods: createEmployee, updateEmployee, and deleteEmployee. These methods make changes to the data stored in the MongoDB database.
          Mutation: {
    async createEmployee (_, { employeeInput: { name, department, salary } }) {
      const newEmployee = new Employee({
        name: name,
        department: department,
        salary: salary
      });

      const response =  await newEmployee.save();
      console.log(newEmployee);

      return {
        id: response._id,
        ...response._doc
      }
    },

    async updateEmployee (_, {id, employeeInput: {name, department, salary}}) {
      const updatedEmployee = await Employee.updateOne(
        { _id: id },
        { name, department, salary }
      );

      if (!updatedEmployee) {
        throw new Error(`Employee with ID: ${id} not found`);
      }

      return true;  // Return a boolean value indicating update success
    },

    async deleteEmployee (_, {id}) {
      const deletedEmployee = await Employee.deleteOne({ _id: id });

      if (!deletedEmployee || deletedEmployee.deletedCount === 0) {
          throw new Error(`Employee with ID ${id} not found`);
      }

      return true;  // Return a boolean value indicating deletion success
    },
 },
};

module.exports =  resolvers;
Finally, run this command to spin up the server:
node index.js
Once it has established a database connection, the server will start on port 5000.
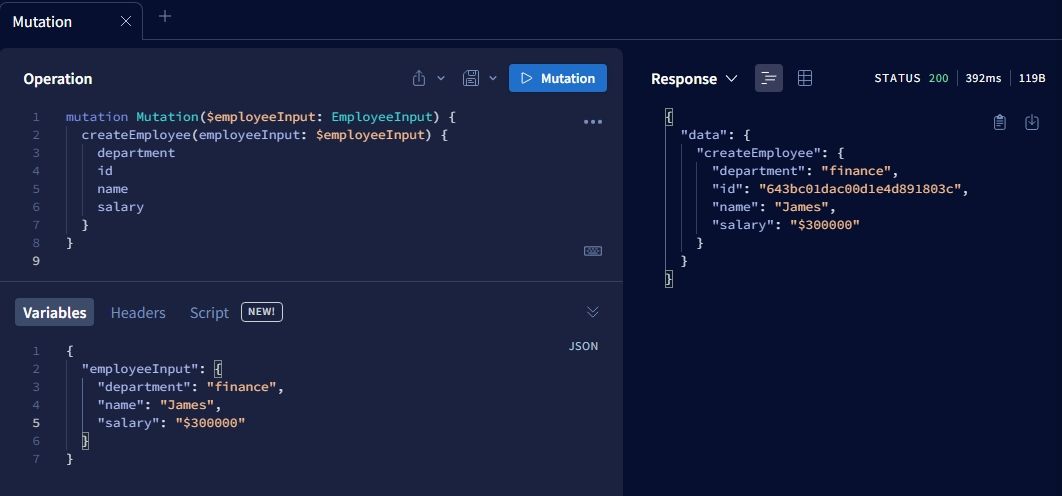
You can go ahead and test the functionality of the GraphQL API by making HTTP requests from the GraphQL playground in your browser.
For instance, you can use the createEmployee mutation to add new employee data in the MongoDB database.
GraphQL Popularity in the Developer Community
GraphQL is gaining traction in the developer community as an alternative API design approach to the popular REST architecture.
This is due to its ability to provide a more flexible and efficient way to retrieve data from various sources, all from a single entry point. This avoids having to manage multiple endpoints for different data, which is a common issue with REST API architecture. This design solution streamlines the process of building and managing backend APIs.


