With colors abound, the Govee Flow Pro Wi-Fi Light Bars can light up any room, making them a solid RGB smart lighting option for all budgets. The automatic light changing Video mode doesn't live entirely up to expectations, but the customization options, easy to use app, and general color output make the Govee Flow Pro's a decent RGB lighting option for any home.
Govee Flow Pro Wi-Fi Light Bars


With colors abound, the Govee Flow Pro Wi-Fi Light Bars can light up any room, making them a solid RGB smart lighting option for all budgets. The automatic light changing Video mode doesn't live entirely up to expectations, but the customization options, easy-to-use app, and general color output make the Govee Flow Pro's a decent RGB lighting option for any home.
- Brand: Govee
- Integrations: Alexa, Google Home
- Protocol: 2.4GHz Wi-Fi, Bluetooth
- Hub Required: No
- Music Reactive: Yes
- Multicolor Capable: Yes
- Lots of customization options
- Good array of colors
- Very easy to install and configure
- Integrates with other Govee products
- ColorSense camera is low quality
- Video mode only outputs one color
RGB lighting is everywhere, turning homes and offices across the land into beautiful light shows. Portable RGB lighting is even better, allowing you to bring an ambiance to your living room for a film then turning your kitchen into the scene of a rainbow-colored rave.
Govee's Flow Pro Wi-Fi TV Light Bars tick those boxes nicely, and while they're not the flashiest or most stylish of RGB light-towers, the end product and customization options make them a worthwhile contender in this increasingly busy (and color-filled) space.
What's In the Box?

Before delving into the hardware specs and shiny RGB lighting configurations, here's what you'll find in the Govee Flow Pro Wi-Fi TV Light Bars box:
- 2x Flow Pro Light Bars
- 2x Light Bar desktop stands
- 2x Light Bar screen mounts
- 1x camera
- 1x control box
- 1x power adapter
There are also some foam stickers, which you'll use to configure the ColorSense camera, and the configuration and user manual.
Govee Flow Pro Specifications & First Impressions
The Govee Flow Pro light towers are Wi-Fi and Bluetooth enabled, and integrates with Alexa and Google Home, but does not offer Siri support. Furthermore, the maximum supported screen size for the Flow Pro is 45 inches.
Here's the full spec list:
- Size: 47 x 3.31 x 3.31 inches
- Color Temperature: 2200-6500k
- Lumens: 400lm
- LED Type: RGBICWW
- Power: AC 100-240V
- Input: 12V/2A
- Camera: 2MP
- Connectivity: 2.4GHz Wi-Fi and Bluetooth 5.0
- Controls: Desktop control box, Govee Home app for Android and iOS, or voice command via smart assistant
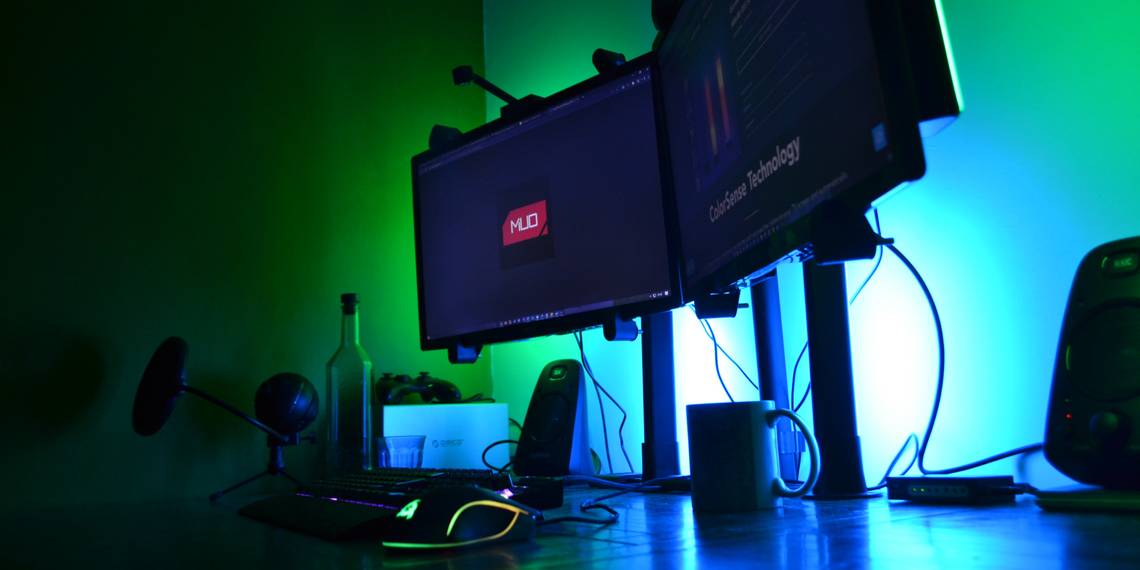
Out of the box, the Govee Flow Pro lights feel decent enough. They don't carry a substantial weight to them, but this is to be expected for a lighting product you can mount on the rear of your TV or monitors. That said, the desktop stands are weighted to stop them toppling over, and along with the screen mounts, are extremely easy to install.

Plugging the light towers and camera into the control box and a power source only takes a moment, and you can find yourself cycling through the myriad color schemes and lighting modes within a couple of minutes of unboxing.
Overall, it's a good first impression.
Wondering why there is a camera? The Govee Flow Pro camera monitors your screen, analyzing the colors on display and changing the RGB lighting in response. Here's a short video of the RGB color changing camera response underway. The first game is Red Dead Redemption 2 Online, the second is Day of Infamy, and the third is Project Cars 2.
How to Setup the Govee Flow Pro
Govee's Flow Pro Light Bars are very easy to setup and get up and running. It's a four-part process:
- Position your stands and attach the light bars
- Connect the light bars and overhead camera to the control box
- Configure the camera via the Govee Home app
- Customize your light bars with the Govee Home app
1. Position the Govee Flow Pro Light Bars
The first thing to do is decide where you're placing your Govee Flow Pro light towers. How you decide may depend on your existing TV setup. The screen mounts with attached lights protrude 5cm from the surface of the device. If you have a wall-mounted screen, you may not find enough clearance directly behind your hardware.

If this is the case, you have a few options: switch out for the desktop mounts, mount them behind a storage cabinet or TV stand, or you could even lay the light towers atop your TV itself, provided you have a strong enough stand. The light towers themselves are lightweight and shouldn't cause an issue regarding weight, but you might have to fiddle with placement if you go for this.
The second thing to consider is the light bar USB cable length and the control box's positioning. You can control the lights using the Govee Home smartphone app or a smart home assistant, but the light bar cable length will also dictate your lights' location in relation to the control box, which serves as the power source.
Once you decide on where you want your Govee Flow Pro Light Bars, it's time to reach for the mounts. The desktop mounts are weighted and freestanding, so you can move them around to adjust the lights' position. Whereas, the screen mounts come with a self-adhesive patch ready to stick to your TV or monitor.
Attaching the light bar to the stand is easy in both cases. With the desktop stand, you slot the cable end into the stand, allowing the cable to escape at the bottom. The screen mount stands attach to the back of the light bar with a handy secure notch. Once they click into place, they won't budge unless you attempt to remove them specifically.
2. Connect the Govee Flow Pro Light Bars and Camera to the Control Box
The control box has three inputs:
- Power
- USB Type-A for the Light Bars
- USB Type-C for the overhead camera
You must now decide where you want to position the ColorSense camera. I've tried overhead and underneath the screen, and it makes little difference to the camera picking up on-screen color changes. You can go with whichever configuration suits your setup or is most aesthetically pleasing.

Stick the camera to the top of your screen, in the center, using the tear-off sticky strips, then attach the USB cable to the control box.
Next up, plug the USB cable for the Light Bars into the control box, followed by the power cable.
At this point, you can take the Govee Flow Pro Light Bars for a spin—you don't have to wait to configure the camera to play with the lights and try out some colors. Tap the power button on the control box. The lights should default to the camera video mode, instantly illustrating how the colors change in response to your screen.
You should also note that video is the default lighting mode. Once you switch away from it using the control box, you must enable it again using the Govee Home app.
3. Configure the Camera and the Govee Home App
Your next step is to configure the camera and the Govee Home app. Although the lights work without the app, it is well worth installing and learning how to use because it features customizable light colors, color schemes, lighting patterns and modes, and much more.
Download: Govee Home for Android | iOS
Download the app, then fire it up. In the top right corner, hit the + icon, then search for h6054. Your Flow Pro Light Bar should appear. Select it, confirm any permissions requests, then pair with your device using Bluetooth. Once the pairing completes, you can give your Govee Flow Pro Light Bars a name (which you can change later for use with smart assistants).

Now the proper configuration phase begins
- Lighting Bar Position: Switch each lighting bar on and off, confirming its location. If the light bar is on the opposite side, select Switch Positions > Position Correct.
- Foam Stickers: Take the eight foam stickers from the box, position them according to the image on your screen, and select Ready.
- Calibration: You'll see an image snapped by the camera. Drag the four points across the screen, then make sure the top-center point is aligned. Hit Next. Now, drag the yellow points to the suggested locations, making sure they're aligned. Hit Submit.


Once the configuration ends, you can begin experimenting with color schemes and lighting modes in the Govee Home app.
Selecting Govee Light Studio opens Govee's suggested lighting schemes, a color gallery, and some interesting-if-garish videos from other Govee users. Note that in the final section, the other users are using various Govee lighting products, not just the Govee Flow Pro. Still, it may well inspire you!


You can also use the Govee Home app to combine multiple Govee lighting products into a single Scene. Once paired, you can set the lights to turn on or off at a specific time or use a similar color scheme.
Govee Flow Pro Lighting Performance
The video earlier in this review illustrated how responsive the Govee Flow Pro lighting system is while using the monitoring camera, known as Video mode.
In short, the Flow Pro video mode isn't responsive enough and with enough overall lighting quality to use as a permanent feature. The changes can be stark and choppy, and the lighting doesn't always reflect the main color on the screen nor pick up subtleties in color.
Furthermore, even though the light bars can display multiple colors at once (as you'll find in Music mode), Video mode cannot make use of this, presumably because images move too fast for the 2MP to respond to. Add in some ambient lighting in the room, and the Flow Pro camera struggles even more.
Is this a reason to dismiss the Govee Flow Pro?

Absolutely not. The Govee Flow Pro adds a nice splash of color to a room.
The Govee Home app makes it supremely easy to customize color schemes, chop and change modes and settings, and generally adapt the aura of your RGB setup to your liking.
For example, the DIY mode enables you to build custom color sets matched with different lighting effects, while the Music setting responds to audio and displays lights accordingly across several different color modes.
Just make sure the control box can hear the music directly, as that's where the microphone is housed. You can also adapt the sensitivity of audio-lighting response, as well as between dynamic and ambient modes.
Govee Flow Pro Light Bars Repairability
As you might expect, these RGB light towers don't offer much by way of repairability. The product user guide states, "the internal light source of the light bars cannot be replaced. If damaged, the light bars must be replaced."
On the flip side, these are very low wear and tear parts, and most owners will keep the Flow Pro Light Bars in a single location. The LED lights in the towers should last for tens of thousands of hours. One thing you can do to make sure the light bars last longer is to keep the cables slack, reducing tension and the chance of accidental breakage or overstrained cables or connections.
Govee Flow Pro Light Bars: Budget-Friendly Customizable RGB Lighting
The Flow Pro won't suit everyone. If you want your RGB to be color accurate to whatever is displayed on the screen, the Govee Flow Pro will probably disappoint you.
But the Govee Flow Pro Wi-Fi Light Bars is a great budget RGB lighting option that will fit easily into most homes or offices. I've been using the Light Bars on my desk with dual 24-inch monitors, and the result is excellent.