Geeetech A10M


A printer which on paper gives a lot for a low price, but it is not that simple in practice. You'll spend more time fiddling with settings than using the Geeetech A10M. There's potential here, but finding it takes some patience. Use coupon code MAKEUSE10 for a discount!
- Brand: Geeetech
- Build Volume: 8.66 x 8.66 x 10.2 inches (220 x 220 x 260mm)
- Printing Accuracy: Up to 0.1mm
- Connectivity: SD card, USB, optional Wi-Fi upgrade
- Heated Build Plate: Yes
- Feed Type: Bowden Tube
- Dimensions: 7.4 x 9.25 x 18.31 inches (18.80 x 23.50 x 46.50 cm)
- Weight: 16.7 lbs (7.6 kg)
- Dual-Color Printing: As standard, color mixing
- Color Mixing is impressive when it works
- Easy to find replacement parts
- Very cheap for a dual-extrusion printer
- Completely moddable and easy to upgrade
- Incredibly hard to get good prints
- Flawed design on the filament spool holders
The Geeetech A10M is a low budget dual-extrusion color mixing 3d printer costing just $239. While the initial setup and general use are easy, getting decent 3d prints from it is difficult to master.
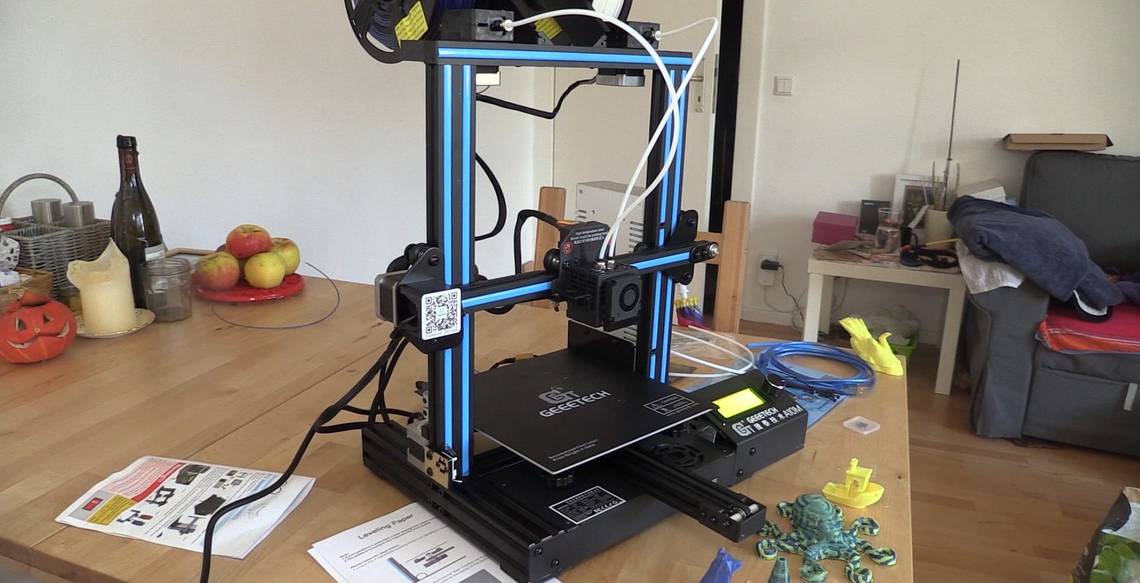
Two Extruders, One Nozzle
At first glance, the Geeetech A10M has a very familiar design. It shares the same frame and stepper motor configuration as many other 3D printers at this price range. The build volume is 8.66 x 8.66 x 10.2 inches and it has a heated bed featuring a composite sticky-backed build plate cover.

Where things differ is the dual extruders mounted to the top of the frame, feeding into a single color-mixing chamber via two Bowden tubes. The filament is then printed via a single 0.4mm diameter brass nozzle, allowing for two-color printing along with mixed colors and gradients.

It also features a 360-degree fan ventilation system at the hot end, which does a decent job of regulating temperature, but makes quite a lot of noise when in operation. A nice touch is the filament run-out sensors, which send stop signals to the printer when no more filament is available.
It has a simple LCD 2004 display, which is one color and has a backlight, controlled via a rotary encoder. It also features a hard reset tactile button for when things inevitably go wrong.

The A10M takes both regular SD cards and microSD cards and can be connected to a computer directly via a USB cable. There is an optional Wi-Fi module and 3D leveling sensor for the printer, but they weren't supplied for this review.
- Build volume: 8.66 x 8.66 x 10.2 inches (220 x 220 x 260mm)
- Printing accuracy: 0.1mm
- Frame: Aluminum
- Nozzle diameter: 0.4mm
- Max. print temperature: 250C
- Connectivity: SD Card, USB
- File format: G-code, STL
- XY-axis positioning accuracy: 0.011mm
- Z-axis positioning accuracy: 0.0025mm
- Voltage: 110-240V
- Power: 360W
- Weight: 7.6kg
- Dimensions: 7.4 x 9.25 x 18.31 inches (18.80 x 23.50 x 46.50 cm)
Fully Assembled, Apart From the Bits That Aren't
Many 3d printers come assembled but in two parts, and setting them up is as simple as attaching the z-axis gantry to the base. The A10M is slightly more involved, as you need to attach both extruders to the frame, along with the LCD screen.
Putting it together is a mostly simple process, and the full-color guide with photographs gives step by step instructions. Attaching the Z-axis limit switch took some doing, however, as it's tucked down near the bottom of the frame, but those with nimble fingers might not have an issue.

The power supply for the A10M isn't in the base. It comes as a separate unit that attaches to the Z-axis frame. Geeetech provides all the tools required for assembly, along with various spare parts, screws, cleaning tools, and a metal scraper for freeing prints from the build plate.
Preparing to Print
Before printing, the quick-start guide advises leveling the build plate. Like many printers, the A10M comes with a tool for making sure your nozzle is at the correct height - a piece of card.

There is a menu option for leveling the bed, which moves the nozzle to each corner before prompting to move to the next when ready. Leveling is done by hand, using four plastic hand screws under the bed. It's an easy process, and once done, I didn't find the bed slipped at all during the rest of the review.
The extruders have spring-loaded plastic catches allowing you to push filament down into the Bowden tubes. From there, you can set the printer to pre-heat for PLA or ABS use via the menu and extrude some filament from each extruder to check there are no blockages.
A Test Print in Two Senses
You get enough filament in the package to print a test file provided by Geeetech, which is a gradient colored dog. Printing was seemingly all going to plan, but there was a power cut halfway through. This turned out to be a fortuitous way to test the automatic continue function of the Marlin 1.1.8 firmware the A10M uses, which is designed for this eventuality.
Things didn't go to plan. There was an ominous line around the dog's neck at the end of printing, and attempting to get it off the build plate did not end well.

I'm not sure what went wrong here, but given the unusual circumstances, I moved on to other prints without thinking too much of it. Unfortunately, that's when things got quite difficult.
A Forest of Failed Prints
From here, I had issues with almost every print I did. Most 3D printers need some adjustments to get things right, but after multiple attempts, tweaking setting after setting, things didn't improve all that much.
Some of my prints had evidence of significant layer shifting, despite there seeming to be nothing that would cause it.

Other prints had problems with retraction, leaving a stringy mess behind and prints with a mottled surface. Unusually, changing settings that would typically result in this getting better did not seem to do all that much. This, like all FDM printers, is never going to get prints quite as detailed as resin printers like the Nova3d Bene4 Mono we recently reviewed, but it should be capable of printing with an accuracy of up 0.1mm layer height.
Color mixing was hit and miss, with gradients generally coming out well, but block colors sometimes appearing blended and sometimes just not working at all. I could go on, but the simplest way to express how hard this printer can be to use is this: Out of perhaps 20 prints, I'd consider 3 to be fully successful.

In truth, hitting the sweet spot can be tough with all 3D printers, so this is the stuff that might improve over time, but there are some design flaws that can be game-breaking.
A Large Oversight
The filament run-out sensors are a great idea in principle. When your filament runs out the printer stops. They are attached right behind each extruder so that filament can run through them off the spool before being extruded to the hot end.

The problem is that regular-sized spools hang down into the runout sensors and even get caught on the plastic spring switch for loading filament into the extruder. Because of this, I never could test the runout sensors. During one print, the plastic switch even caught on to the spool, ruining it.

You could always point out that this printer might not have been designed for these types of spools, but I was using Geeetech's own branded PLA on spools I consider to be regularly sized for 3D printing.
While many of the other issues of this printer can be put down to requiring patience and specialist knowledge to master, this seems like a large oversight in design.
Great Customer Service and an Active Community
On the plus side, Geeetech's customer service is excellent, and it provides support via their Facebook group, forum, and email. Its official YouTube channel also has a number of videos showing how to clean, configure, and maintain the printer, including one I followed to combat layer shifting in the Y-axis.
Due to this printer's budget nature and the potential color-mixing can bring, there is also a committed community using the A10M, and a Facebook group for Geeetech Printer Owners.
If you own this printer and are having a hard time, there is a lot of help out there to work out what is wrong, which is something many beginners will appreciate.
The Software Side
Geeetech recommends using Repetier-Host for slicing models before printing, which is easy to use and similar to most other programs for producing Gcode. There are also profiles for the A10M for Cura, Simplify3d, and Slic3r, among others.

Repetier-Host uses the CuraEngine slicer and produces Gcode for printing via USB, SD card, or Wi-Fi if you've got the module. They also provide software called Color Mixer for importing Gcode to add gradients, color steps, or mix filament colors.

It's easy to use, and a simple way to visualize how colors will turn out before printing.
A Printer for Tinkerers
Despite all the issues, I don't think the Geeetech A10M is a bad printer. It's just one aimed at people who are willing to put the time in to learn it's quirks. The design is completely modular, and you can swap out hardware and software at will. The mainboard even has a bootloader and is compatible with the Arduino IDE.

One thing is certain: The A10M is not for beginners or those looking for a stress-free 3D printer that's functional out of the box. If you like tinkering for hours on end and prefer fixing broken toys to buying new ones, it might just be for you.
Who knows, at the end of the tunnel, there might just be a perfect dual-color 3D print.