Your SD card is a handy data storage alternative for keeping and accessing your data on the go. Like other storage devices such as USB sticks or hard drives, you can easily format your SD card after you don’t need the data or want to store something else.
In this article, we'll cover the top two methods to format your SD card into a fresh one. Remember, neither of the methods discussed here is ' the best' or ' the fastest'; depending on your situation and requirement, you can choose either of the methods listed below.
So let's jump right in.
How to Format an SD Card on Windows
As we've said above, there are different ways to format your SD card, depending on how you want to use or store your things in it. The most popular formats to keep your SD card in are exFAT or NTFS (see FAT32 vs. exFAT for information as to where each one shines).
NTFS is more relevant if you wish to use a driver, or in this case, the SD card, only in the Windows operating system. exFAT, on the other hand, will be more helpful if you intend to make your SD Card more system independent.
With this covered, let's now look at the different ways to format your SD card.
Format the SD Card on Windows Through File Explorer
After you’ve plugged your SD Card into the PC, a new driver should have appeared in the File Explorer.
Note that some computers don’t have a specific slot for an SD card. If that’s the case for you, too, then you’ll have to use a card reader. Put your SD card in the card reader, and plug it into your USB slot.
If you face any troubles with the SD card reader, check out our simple guide on addressing problems with the SD card reader.
After you've plugged in your SD card, here’s how you can get started with the SD card format on Windows:
- Right-click on the SD card drive and select Format.
- In the Format dialog box, set your File system as exFat.
- Finally, click on Start to begin the format.
- Click on OK.

Depending on the size and data of your SD card, it’ll be wiped clean in a few seconds.
Format Windows SD Card With the Command Prompt
The Command Prompt is the default command line interpreter on Windows that lets you interact and control your PC all from a single place. We've covered the beginner's guide to the Command Prompt if you'd like to learn more about how to use this handy tool.
You can also use it to format your SD card with ease. Here’s how:
- Head to the Start menu search bar, type in ‘cmd,’ and launch the command prompt as administrator.
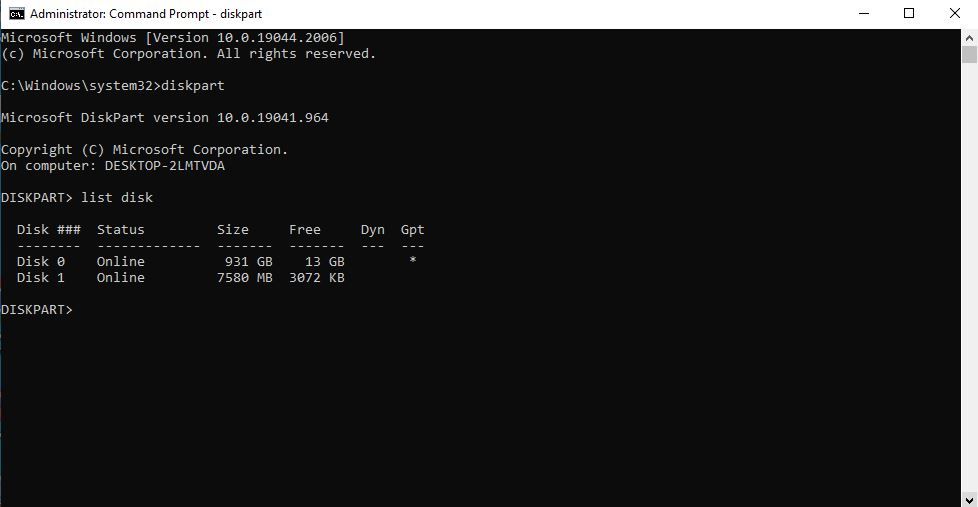
- In the Command Prompt, type in ‘diskpart’ and hit Enter.
-
Next, type in “list disk” and hit Enter again. You’ll now see the serial number of the SD card.
-
In the next command, type in the following command and hit Enter:
select disk 0 -
In the above command, replace ‘0’ with the allocated disk number of your SD card from the third command. In our case, it's 'Disk 1'. So, our command becomes something like:
select disk 1 - Finally, type in ‘clean’ and hit Enter.

That’s it. Your SD card will be wiped clean of all its data.

But the format is only half done. Remember, whenever you format any drive with the Command Prompt, you’ll have to partition it after cleaning it out. To get started, type in the following command and hit Enter:
create partition primary
After this, type in one of the following commands (either NTFS or exFAT) and then hit Enter:
“format fs=ntfs”
or
“format fs=exfat”
Depending on your PC's capabilities, the partitioning will be over in a couple of minutes.
You can add a drive letter from cmd itself if you like. Replace “E” with whichever you’d like to assign to your drive with the following command:
assign letter=E
Formatting Your SD Card on Windows
And that’s it, folks. A quick format is all you need to keep using your SD card repeatedly; until it breaks, at least. If there is indeed some problem with the SD card itself, then buying a new one is probably your best option.