Have you made changes to your computer's Group Policy Editor or Registry and found that your changes do not stick? This behavior can disrupt your system's functionality and might even signal a deeper problem, such as user account issues, conflicting policies, or even malware.
Thankfully, there are effective solutions available to address this issue. We will outline four troubleshooting methods you can try to resolve the problem once and for all. These solutions will help you regain control over your settings and ensure that your Group Policy and Registry changes persist as intended.
Understanding the Causes
Several reasons can prevent Group Policy settings and Registry settings from staying applied. Here are some of the most common ones:
- Problem with the user account: your user profile might be misconfigured or corrupt. There is a chance that it does not have sufficient permissions to save the changes, causing them to revert.
- Conflicting policy or setting: another possible cause could be a conflicting group policy or registry setting set by another administrator. It reverts the changes as soon as you implement them. Malware in the system could also be overriding these settings.
- System restore: if you have restored the system to a previous state using the System Restore utility, it may have undone the changes you made in the Group Policy Editor or the Registry Editor.
- Incorrectly configured policies: when you apply policies in a multi-domain controller environment, there can be a delay in the replication process of the policies across all domains, resulting in inconsistencies. In this situation, the policy may not be applied to all domains, resetting the changes you made.
These are just some reasons why policies or Registry settings might revert. If you have experienced the issue only once, and it's not recurring, you can start by restarting the utility, as it may resolve temporary glitches or software conflicts causing the problem.
However, if you have already tried restarting the utility or the issue is recurring, we recommend proceeding with the methods listed below for a more comprehensive solution. Remember to proceed with caution and back up any important data before making any changes.
1. Restart the Group Policy Service
If you face the reverting issue with the Group Policy Editor, we first recommend restarting the relevant service—Group Policy Client. There is a chance the service might be corrupt, preventing you from successfully making the changes.
Here is how you can proceed:
- Press the Win + R to open Run.
- Type services.msc in the text field and press Enter.
- In the following window, look for the Group Policy Client service and right-click on it.
-
Choose Properties from the context menu.
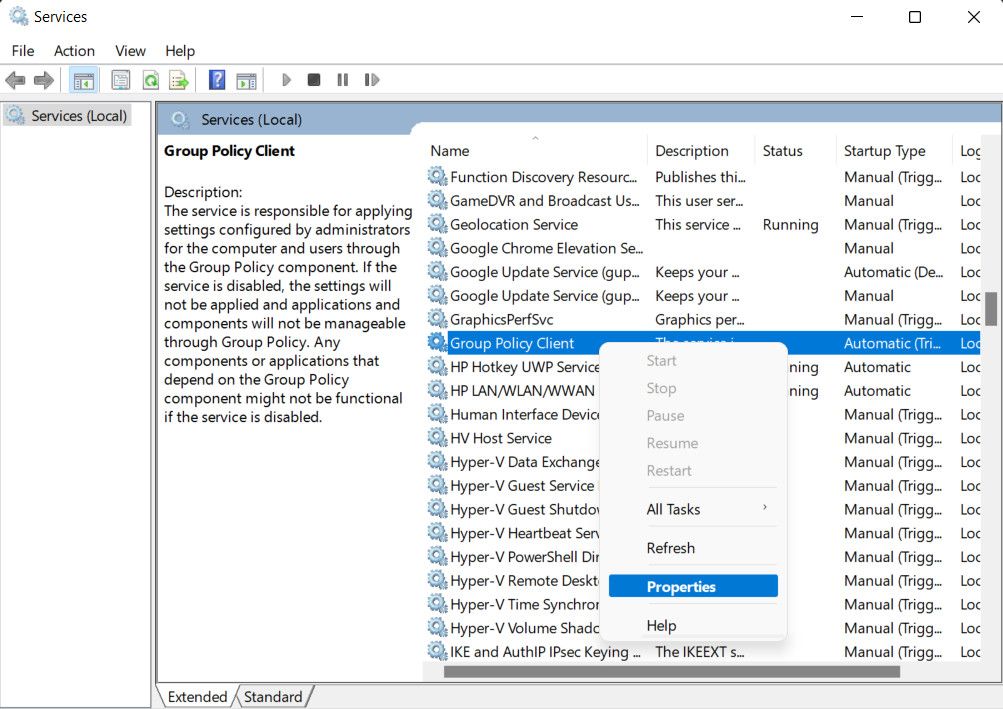
- Now, click the Stop button in the Properties dialog, wait for a few seconds, and click Start.
- Make sure that the Startup type of the service is set to Automatic.
- Finally, click Apply > OK to save the changes and close the Services utility.

You can now try making the changes again in the Group Policy Editor and check if the problem has been resolved.
2. Create a New User Account
As previously mentioned, another possible cause of the issue could be a problem with your user account, such as a damaged or corrupt user profile or incorrectly configured settings. To determine if this is the case, you can create a local user account and attempt to make the necessary changes from there.
If the changes are successfully applied from the new user account, this would indicate that the issue was with the previous user account you were using. From here, you can troubleshoot and fix the problem with the previous account or continue using the new account without the problematic issues.
3. Make the Changes in a Clean Boot State
You can also clean boot your Windows 11 computer to start it with minimal drivers and applications. This ensures that any third-party applications or services conflicting with your system won't launch.
To perform a clean boot, you can use the System Configuration utility. Once the system is booted into a clean state, try implementing the targeted changes and see if they are executed successfully. If the problem does not arise in the clean boot state, it suggests that a third-party program is likely causing the issue.
In such a case, you can use the System Restore utility to revert the system to a stable state or opt for a system reset. The latter will reset the Group Policy Editor and the Registry Editor, effectively resolving any issues. We have discussed the steps in our guide on the differences between System Restore and Windows Reset, which you can refer to.
4. Export the Registry Settings (Workaround)
This workaround is specific to users who encounter problems while making changes in the Registry Editor.
To resolve this issue, you can export the registry key containing the desired settings, edit the file to retain only the relevant settings, and create a shortcut to the file. You can use this shortcut to implement the changes whenever you boot your computer.
It's important to note that this method is just a workaround to try if the problem is not resolved by the other solutions we have discussed in this guide. We also highly recommend creating a Registry backup, just to be safe.
Here is how you can proceed:
- Open the Registry Editor and make the targeted changes.
-
Right-click the key that includes the changes and choose Export from the context menu.
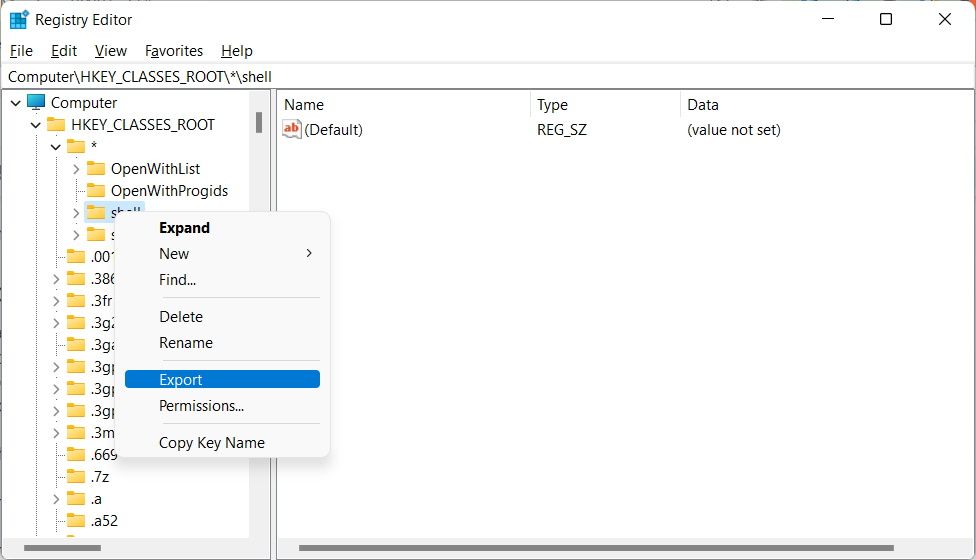
- Give the file a name and save it in the .reg format.
- Once done, open the exported file in Notepad by temporarily changing the file type to .txt and deleting everything from the file except for the settings you want to keep.
- Save the changes and convert the format back to a .reg of the file.
-
Now, navigate to your desktop, right-click on a space, and click New > Shortcut.
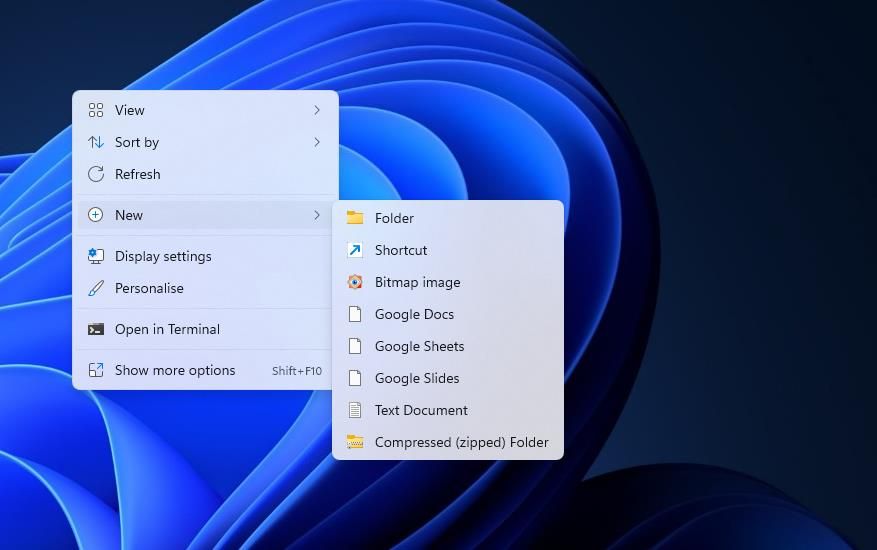
- In the Create shortcut dialog, navigate to the location of edited .reg and select it.
- Click Next and give the shortcut a name.
- Click Finish to save the changes.


You can either use this shortcut to implement the changes every time after reboot or simply move it to the Startup folder.
Implement Changes With Ease
Being unable to make important changes in the system can be frustrating. Hopefully, the troubleshooting methods listed above will help you fix this issue in the Group Policy Editor and the Registry Editor successfully.
However, ensure that you always proceed cautiously when making changes in these administrative-level utilities. We recommend seeking professional help if you are unsure about any steps.