Windows blue screen errors are never fun, appearing when you least expect it, crashing your computer, and taking your work with it. The UNEXPECTED KERNEL MODE TRAP error is just one of the many blue screen events that can cause frustration, not least because of the seemingly cryptic error name.
So, what is an unexpected kernel mode trap error, and how do you fix it?
What Is an Unexpected Kernel Mode Trap Error?
The unexpected kernel mode trap error usually relates to your system drivers or system memory and is accompanied by the 0x0000007F stop code.
As frustrating as the unexpected kernel mode trap error is, it isn't a particularly difficult error to resolve. Run through the steps below, and your computer will be up and running in no time.
1. Restart Your Computer
Windows 10 runs into errors from time to time, but they don't all require a specific fix. Sometimes the best and quickest fix is to restart your computer. Restarting your computer resets all your system processes, potentially clearing the error in the process.
2. Reseat Your Hardware
The unexpected kernel mode trap error relates to drivers and system memory, so it could be possible that something has come loose inside your computer case. Check out the video below for a guide on reseating various hardware components.
While you're in there, give your computer a little cleaning. Dust build-up inside your computer case is a hardware-killer! That doesn't mean you should take a sponge and hot soapy water to the motherboard. Use an air duster to blow dust out of the case and gently wipe surfaces clean of dust with a lint-free cloth. Proper PC maintenance can add years to your hardware's lifespan, saving you money!
3. Update Windows 10
One final easy check before heading into the more advanced fixes: check for any pending Windows 10 updates. Press Windows Key + I, then head to Updates & Security > Windows Update. Download and install any pending updates, then restart your system.
4. Update Faulty Drivers
Windows 10 takes care of your driver updates, keeping everything up to date. At times, driver updates can fall through the cracks, you might receive a faulty update, or your drive might become corrupt for whatever reason. In that case, you can update your drivers manually.
Type device manager in the Start menu search bar and select the Best Match. Head down the list and check for a yellow error symbol. If there is nothing, a faulty driver is likely not the source of the issue.
Several tools let you update all your system drivers at the same time. Their usefulness is debatable, especially as many try to force you to pay for freely available drivers. If you would like to know more, check out the best free tools you can use to fix any Windows 10 issue.
5. Run Windows 10 Integrated Memory Diagnostic Tool
Windows 10 has an integrated Memory Diagnostic tool. It scans your RAM for any errors, then creates a system log for further analysis. Check out the following video for a short guide on using the Windows Memory Diagnostic tool and where to find the logs.
Input windows memory in your Start Menu search bar and select the Best Match. You now have two options: reboot immediately and run the utility or set the utility to run after your next reboot.
As you are trying to fix a potential issue with your RAM, save any important documents, and reboot your system immediately. The Windows Memory Diagnostic runs immediately after reboot.
When the process completes, Windows 10 will restart. Once you boot back into Windows 10, press Windows key + X and select Event Viewer from the power menu. In the Event Viewer, head to Event Viewer (Local) > Windows Logs > System.
In the right-hand column, select Find and type MemoryDiagnostic into the box. Hit Find Next. Your diagnostic results will display at the bottom of the window.
If there is an error, you should complete any internet search for further analysis and troubleshooting.
6. Run MemTest86+
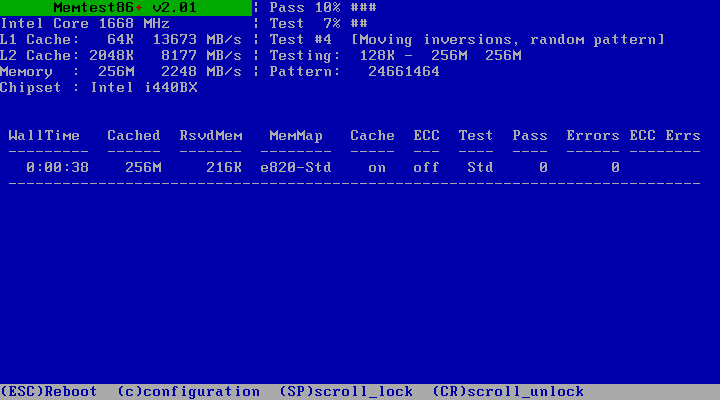
If Windows Memory Diagnostic tool doesn't reveal any errors, but you want a second opinion, you can run the open-source tool MemTest86+.
MemTest86+ is a free, standalone memory testing tool. You boot MemTest86+ from a USB flash drive (or bootable disc) and leave it to check your system RAM.
- Head to the MemTest86+ Download page and download the latest version of the Pre-Compiled Bootable ISO (it should be the first set of links you see).
- Now, you must burn the MemTest86+ ISO to a USB flash drive. Here is a list of tools you can use to create a bootable USB flash drive.
A MemTest86+ RAM check takes a long time to complete; a single pass takes hours depending on the amount of RAM you have installed.
7. Run SFC and CHKDSK
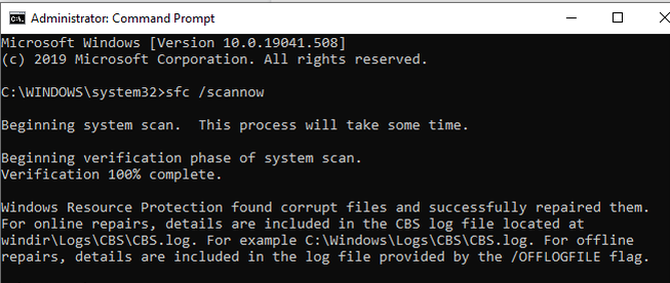
Another potential fix for the 0x0000007F stop code on Windows 10 is to run the integrated Windows System File Check (SFC), a system tool that scans your drive and fixes errors.
Before running the SFC command, it is important to check it is working properly. To do this, we use the Deployment Image Servicing and Management tool, or DISM.
Like SFC, DISM is an integrated Windows utility with a wide range of functions. In this case, the DISM Restorehealth command ensures that our next fix will work properly.
Work through the following steps.
- Type Command Prompt (Admin) in the Start menu search bar, then right-click and select Run as administrator to open an elevated Command Prompt.
- Type the following command and press Enter: DISM /online /cleanup-image /restorehealth
- Wait for the command to complete. The process can take up to 20 minutes, depending on your system's health. The process seems stuck at certain times, but wait for it to complete.
- When the process completes, type sfc /scannow and press Enter.
CHKDSK is another Windows system tool that checks your file structure. Unlike SFC, CHKDSK scans your entire drive for errors, whereas SFC scans your Windows system files specifically. Like SFC, run the CHKDSK scan from the Command Prompt to fix your machine.
- Type command prompt in your Start menu search bar, then right-click the best match and select Run as administrator. (Alternatively, press Windows Key + X, then select Command Prompt (Admin) from the menu.)
- Next, type chkdsk /r and press Enter. The command will scan your system for errors and fix any issues along the way.
Fixing the Unexpected Kernel Mode Trap Error on Windows 10
The seven fixes above will resolve your unexpected kernel mode trap error. In fact, these fixes should make up your first port of call for almost any Windows 10 error. The combination fixes your file structures, checks for errors, and tidies up your system.


