
So you launched a program in Windows 10 and instead of the software interface, you were met with a message that read, "The program can’t start because VCRUNTIME140.dll is missing from your computer. Try reinstalling the program to fix this problem."
While a wonderful operating system, Windows 10 is prone to a lot of errors, one of which is the vcruntime140.dll missing error.
But don't lose heart if you've encountered the vcruntime140.dll error; because we've got your back. Here are the top eight methods to fix the vcruntime140.dll not found error.
1. Restart Your PC
Sometimes, one of the easiest and seemingly trivial solutions, like rebooting your PC, will do the trick. So, before you move ahead and dabble with more tricky methods, a simple reboot is worth a shot.
2. Run the Windows Troubleshooter
The vcruntime140.dll missing error can be caused by the installation or update of an application, which will often result in the loss of critical data or files.
If that's indeed the case, then the Windows Troubleshooter app will be the right solution for you. The Windows Troubleshooter is an integrated Windows 10 tool that helps you solve small issues such as problems with Windows updates, driver problems with Bluetooth, audio, and so on.
- To get started, open the Windows Settings by clicking on Windows Key + I, and from there, click on the Update & Security.
- In the next window, go to the Troubleshoot section, and click on the Additional Troubleshooter option.
- From there, navigate to Program Compatibility Troubleshooter and click on it. The troubleshooter will then run its course, check and try to fix any errors it finds.
If this was indeed the cause of the 'vcruntime140.dll was not found error' in your PC, running the troubleshooter should quickly get rid of it.
3. Reinstall the Microsoft Visual C++ 2015 Redistributable
Since the 'vcruntime140.dll was not found' is caused due by the loss or corruption of DLL files relating to Visual C++, reinstalling it is definitely worth the effort.
Follow the steps below to do that:
- Go to the Official site of Microsoft Visual C++.
- Download & Install the relevant version of the program.
- After the installation is complete, restart your PC for the changes to take effect.
If the error was due to this, it will be resolved after the reinstall of Visual C++.
4. Update Windows 10
Microsoft periodically releases new updates for Windows 10.
These updates include solutions to new security threats, fixes for simple bugs, etc. Also included are driver updates, and since, the vcruntime140.dll missing error is linked to the DLL file, a Windows update may resolve the issue.
Follow the steps below to get started:
- Open the Windows Settings by pressing Windows Key + I.
- Select the Update and Security option.
- In the next windows tab, click on the Check for updates option.
- If there is any new update then simply click on the update & install button.

After the system is successfully updated, re-launch the application which was giving you the vcruntime140.dll was not found error. If it was due to an update problem, then it should be resolved by now.
5. Reinstall the Specific Program
Another way to tackle these issues is to re-install the application that is giving you trouble.
To do that, press Windows Key + I to open Settings, then click on the Apps option.
In the next window, select the particular app that is giving you the vcruntime140.dll missing error. For example, in this case, we’ve selected to uninstall Google Chrome.

Go ahead with the uninstall, and then reinstall your application.
If the vcruntime140.dll run time error still persists, don’t give up just yet. Just jump to the next method.
6. Update Windows Driver
If you were working with some specific driver and you encountered the vcruntime140.dll error at that time, then updating those drivers could be the solution.
To do that, you can use the Windows Device Manager. Windows Device Manager is a free tool created by Microsoft that lets you manage the hardware connected to your PC.
- To open it, right-click on the Windows Start button and then click on Device Manager.
- Then, choose the driver that's giving you the trouble. For example, if it's the AC Adapter driver, select the icon to expand it, then right-click on it and click on Update Driver.
If there’s a new update available, the Device Manager will install it automatically.
7. Run the System File Checker
System File Checker (SFC) is another free tool from Microsoft that can help you with fixing vcruntime140_1 DLL not found error. It works by scanning your PC for any errors and corruption issues and then repairs them.
To run the SFC scan, you have to open the command prompt as an administrator. To do that, type cmd in the Start Menu search bar, then right-click and select Run as administrator.
In the Command prompt, type sfc /scannow and hit the Enter.

It will take some time to complete the scan and repair your files. After it is done, reboot your PC for the changes to take effect. Generally, the SFC resolves a lot of Windows errors like this. If, however, you are still facing the vcruntime140.dll is missing error, then move to the next solution.
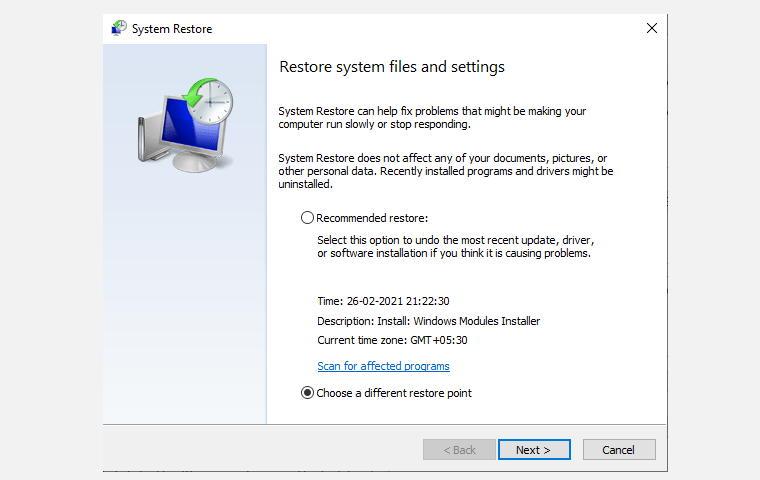
8. Use Windows System Restore
System Restore works by taking your PC back to a previously known good working state.
Note that to implement a system restore, you first need to have a previous backup. If you've never backed up your PC, this method will not work for you.
To check if you have a System Restore backup, simply open the System Restore app. To do that, type system restore in the Start Menu search bar and select the Best Match.
From there, click on System Restore as shown below. The System Restore will set up the wizard. Then click on Next, select a restore point, and click on Next again. When you click on Finish, the restoration process will start.
If everything was done right, you will not see the 'vcruntime140.dll was not found 'error now.
9. Windows 10 Factory Reset
If you've tried all the above methods, but still haven't been unable to get rid of the vcruntime140.dll was not found error, then as a last resort, you can try the Windows Factory Reset.
As its name suggests, the Factory Reset will let you completely format your Windows device, and thus, delete all the files and apps from your computer. It will then reinstalls the Windows and apps that came pre-installed from the manufacturer.
Say Goodbye to Vcruntime140.dll Not Found Error
It is not uncommon to encounter the 'vcruntime140.dll is missing' error while installing new programs on your Windows Operating System.
We hope that through this guide, you were able to resolve this paralyzing error for good.