Color correcting is an important skill to have as part of video editing. It’s essential in making your scenes look realistic and consistent. We’ll show you all the color correcting options that are available in Final Cut Pro and go over what they do.
What Is Color Correcting?
In video editing, color correcting refers to the technic of adjusting elements of color—hue, exposure, saturation, and so on—to create an accurate or neutrally balanced scene. Basically, it’s adjusting the settings, so scenes look the way they’re supposed to.
Note that color correcting and color grading are sometimes confused, but they are two separate things. Color correcting comes before color grading and is the foundation you need to add layers of stylistic colors later while color grading.
With that being said, let’s get into color correcting in Final Cut Pro.
Getting Started With Color Correcting in Final Cut Pro
To start, you should make sure the white balance is properly set for your footage. This basically means you’re training the software to know what white should look like in the footage, which will then serve as the basis for setting all the other colors.
White balance in Final Cut Pro is set to automatic by default. But, if you have a neutral white color in your footage, you can manually set the white balance based on that color which might be more accurate to the scene.
To do this, make sure you have the video selected on the timeline, and click on the color balance option from the main viewer to open the menu on the sidebar.
From there, press the video clip icon and select the Balance Color option. Change the method of Balance Color from automatic to manual and use the eyedropper to select the part of the video that you want to set as your standard white.

You’ll notice that it’s sometimes better to use the automatic option because the footage you’re using may already have been color-treated. This is where it comes in handy to use references to check what the scene should look like.

Once the white balance is set, you can move on to the adjustment options by going to Window > Go To > Color Inspector. The Color Inspector menu will then open on the sidebar. By clicking on the dropdown tab you’ll find four color correction options: Color Board, Color Wheels, Color Curves, and Hue/Saturation Curves.
For the best results, you should calibrate the hardware that’s going to display the colors you’re working with. Read our guide on how to calibrate your monitor.
How to Use the Color Board
The Color Board is just that, a board arranged with a color gradation with four controls. Although this is the most straightforward of the color correcting tools, it’s also limited in how granular you can get with your changes. Making changes is mainly limited to the four controllers in the setting.
From left to right, the first control is used to adjust hues globally, meaning the entire footage. The second is used for adding hues to the shadows, the next control is for the midtones, and the last one is used for the highlights.
Choose the hue adjustment that you want for each part—shadows, midtones, and highlights—by moving the controls left and right.

Then, adjust the intensity by moving the controls up and down.

In the example above, you can see the original footage and the footage with adjusted midtones and highlights to reflect the cold environment it might have been taken in.
One tab over on the Color Board is the Saturation tab, which you can use to fine-tune the color adjustments you made from the first tab. The Exposure tab on the far right is used to fine-tune the light or perceived contrast of the footage.
If you want to reset any of the changes you made, click on the reset arrow icon from the tab you’re working on.
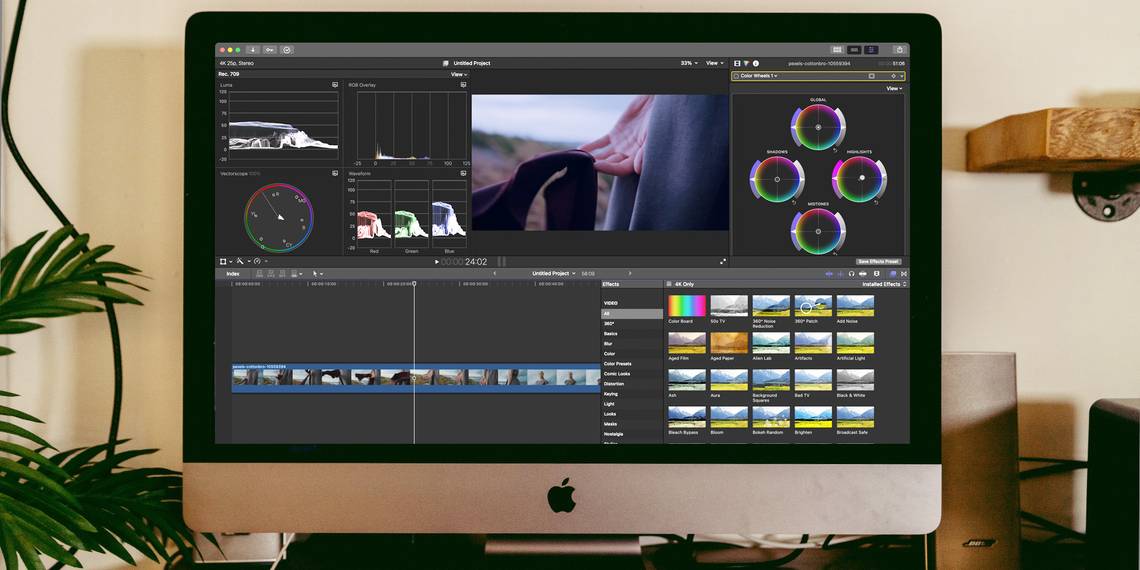
How to Use the Color Wheels
The Color Wheels, a lot like the Color Board, are used to adjust the shadows, midtones, and highlights in your video. Instead of a linear gradation, you’re using four wheels to guide you through the adjustments.

You can move the control in the center of each wheel to adjust color values. Like before, there’s a wheel to control hues globally, one for the shadows, one for the midtones, and one for the highlights.
With the bars on the side of each wheel, you can adjust saturation and brightness. And, you can make finer adjustments to each of the four wheels by entering specific number values on the sliders below.
The Color Wheels option also adds temperature, tint, and hue adjustments, so you don’t have to open separate menus.
Moving the temperature control to the left introduces more blue or colder tones while adjusting it to the right introduces warmer yellow and red tones. Adjusting the tint to the left introduces more green and moving it to the right introduces more magenta.
By rotating the hue control, you can shift the entire spectrum of hues in the image, which is useful if you need to change all the colors at the same time instead of changing them one at a time.
How to Use the Color Curves
Unlike the other options so far, Color Curves use lines to adjust the primary colors and luma of the video. Fine-tuning the shadows, midtones, and highlights is done by adjusting the line specific to the points.

From left to right, the farthest to the left and the lowest point of the line is the adjustment area for the shadows, which is followed by the midtones in the middle, and highlights on the far right.

Clicking on the line adds more adjustable points, which you can move to adjust the intensity of the color or color range you’re working on. Moving the point up on the far left of the green line, for example, means you're intensifying the green tone for the shadows. Maybe the scene is of a lush forest on a cold day.
How to Use the Hue and Saturation Curves
The Hue/Saturation Curves option takes fine-tuning to another degree of granularity. By default, this option has six layouts for adjustment control: Hue vs Hue, Hue vs Sat, Hue vs Luma, Luma vs Sat, Sat vs Sat, and Color vs Sat.

The level of detailed fine-tuning in this option is useful, for instance, if you wanted to bring out more details in the scarf in the examples shown.

What makes this option different from the other color correcting tools is that, instead of making adjustments based on shadows, midtones, and highlights, you’re making changes in relation to hue, saturation, luma, and color.
All the changes in this method are done in two or more steps.
First, click on the eyedropper tool for the relationship you want to adjust. Then click on part of the video you want to adjust. This creates three points representing the shadows, midtones, and highlights for the hue you select. By clicking on the control points created, you can make the adjustments you want to the relationship.
Note that for the Color vs Sat setting, you can use the eyedropper tool as with previous options, or click on the name of the color to choose from a popup wheel with defined colors.
If you’re a Resolve user, check out our guide on the color correction tools in DaVinci Resolve.
A Balanced Outcome With Color Correcting
Color correcting is one of the most useful technics in video editing. And, if done correctly, brings a level of realness to your video project. By balancing your footage to a neutral color base, you create the foundation you need to properly add a layer of stylistic coloring presets—or lookup tables (LUTs)—on top of the video creating mood.