Creating a webpage is not just creating a webpage. An important aspect of front-end development is ensuring user interfaces are accessible to everyone on the internet, including people with visual and auditory disabilities. You have to write your code with these people in mind. How do you give visually challenged people equal access to your website as non-visually challenged people? Read this article to find out.
Why Should Developers Be Concerned About Web Accessibility?
Web accessibility revolves around the idea that everyone should have equal access to the web, regardless of any disability or disabilities. Having an accessible website makes it easier to reach a larger audience (about 16% of the world suffers from one disability or the other).
Digital accessibility should not be an option for developers. It is a necessity for any professional brand. This is taken seriously: as reported by Variety, someone sued The Pokémon Company in 2019 because of a non-accessible website.
Web Accessibility With HTML
In HTML, there are rules to ensure the development of accessible websites. This section will explain some of those rules.
Use Semantic Elements
Semantic elements in HTML are elements that have meanings. In HTML5, there are around 100 elements. Some elements, such as <div> and <span>, are non-semantic, while other HTML tags are semantic. Although it might be impossible to stop using these non-semantic elements, it is important to incorporate as many semantic elements as you can into your work. Here is a list of popular semantic elements:
-
<article> -
<aside> -
<footer> -
<header> -
<main> -
<nav>
Consider this example from Taaskly:
A glance at the image above will reveal the following elements:
- A heading
- An image
- A paragraph
- Three buttons
It is easy to assume that the developers used <div> tags to arrange the elements on the screen. With a closer look at the codes, you will observe that they used six semantic tags instead. The simplified code looks like this:
<section>
<img src="/hero.png" alt="hero">
<article>
<h1>Find the right Products and Services at the right time.</h1>
<p>
Handmade footwear, hair revamp, social media manager, sending errands, source of income</b> — you name it, Taaskly got it. Find every product or service you need today when you sign up and use Taaskly.
</p>
<a href="/main/home">Outsource a Task</a>
<a href="/main/services"> Find a service</a>
<a href="/main/marketplace" >Find a shop</a>
</article>
</section>
From the HTML snippet, you can observe the following:
- The images, text, and buttons are inside a <section> element.
- The <section> element equally divides the <img> and <article> elements.
- The <article> element holds the <h1>, <p>, and <a> elements.
- The buttons are coded as <a> elements; hence, they are links, not buttons. As a general rule, always use links to direct the user to another page or view, and use buttons when you only want the user to perform an action in the same view. See Angular's Button page for more info about this.
Use Landmarks to Provide a Clear Page Structure
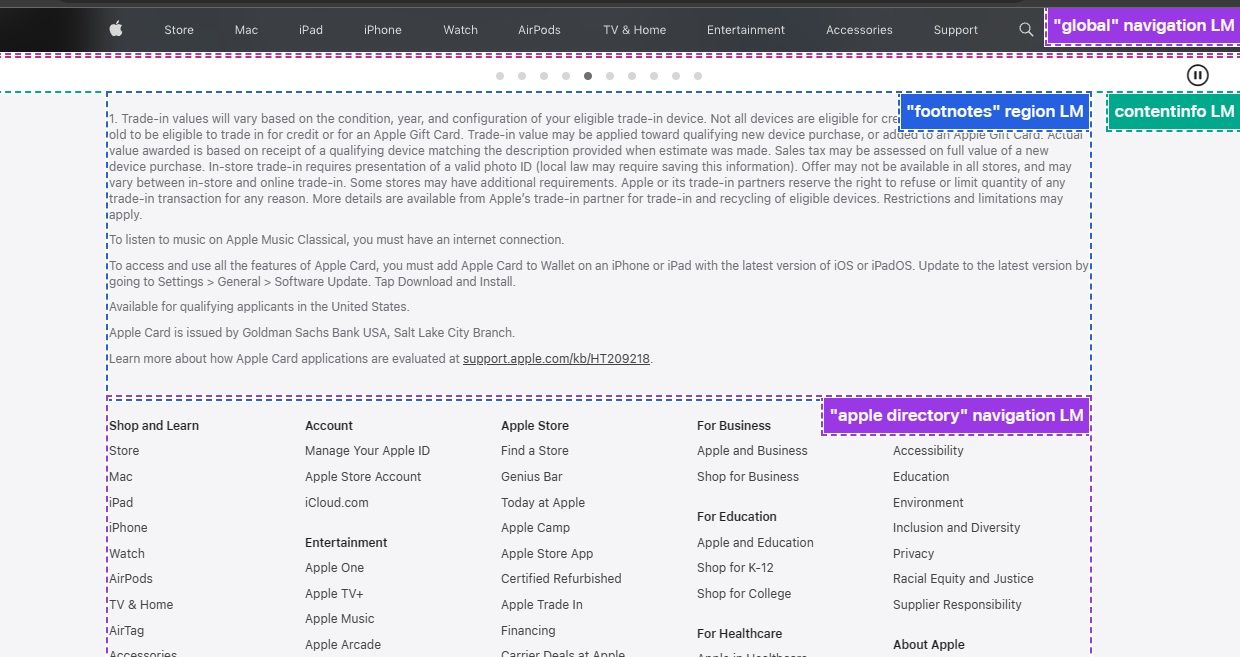
Landmarks are semantic tags that help blind users navigate a web page with screen readers. With landmarks, it is easy to define different parts of a web page. Apple’s website uses Landmarks.
The image above shows four different landmarks. You can use the Accessibility Insights extension to visualize these landmarks.
In the image, we can deduce a <nav> at the top, a <footer> containing a <section>, and a <nav> element. Noticeably, the image shows “navigation”, “region”, and “contentinfo”. These are known as the roles, which we'll look at later.
Whenever you have to use multiple landmarks for a page, always differentiate them by a label. For instance, if you use multiple <nav> elements as Apple has, you have to label them. You should label them with the aria-label attribute. So you can write something like any of these:
        <nav aria-label = "global">
<nav aria-label = "local navigation">
<nav aria-label = "apple directory">
Using labels can help screen readers skip to any navigation.
Utilize Role, Name, and Value Attributes
Sometimes, it might be impossible to use HTML elements with built-in accessibility features. Such cases can be either of these two:
- There is no native HTML element for what you want to achieve. For instance, if you have to use a <div> because no other element seems to fit the role.
- You are unable to use semantic elements due to technical issues. If you use a framework that uses <header> when it would have been better to use <nav>, it will be your duty to define a custom control.
To define a custom control, you need a role, a name, and a value (sometimes) for your element.
Role
By default, a <nav> element has the navigation role, while a <header> element has the banner role. You should only use these elements for their intended purposes to help assistive technologies understand the structure of a web page. If you have to use one in place of the other, you should specify the role like this:
        <header role = "navigation">
<nav role = "banner">
<div role = "navigation">
Name
A name is a descriptive text or label associated with an HTML element. The easiest form of a name is the text of an element. Here is an example:
<div role = "button">Click me!</div>
In the above snippet, "Click me!" is the name of the <div> element. It is also known as the accessible name.
For elements such as navigation, drop-downs, etc., assigning a name is more complex than in the previous example. It is different because these elements have child elements in them. To assign a name for the navigation above, use the aria-label attribute. Look at this example:
<nav role = "navigation" aria-label = "global-navigation">...</nav>
You should note that a name attribute is different from an accessible name. This code snippet gives a better understanding:
        <!-- name attribute -->
<nav role = "navigation" name = "global-navigation">...</nav>

<!-- accessible name -->
<nav role = "navigation" aria-label = "global-navigation">...</nav>
See TGPi's article on accessible names to get a deeper understanding of this.
Value
In HTML, the value attribute can provide additional information about an element. Values provide information about the component’s state for custom components such as accordions. For instance, an accordion can either be opened or closed.
You can add value to your elements in several ways. This snippet shows some of the ways you can do that:
        <!-- aria-valuenow -->
<button class="play-button" aria-label="Play audio" aria-valuenow="0"></button>
<audio src="audio-file.mp3"></audio>

<!--aria-expanded-->
<div role="button" aria-expanded="false">FAQ 1</div>

<!--value-->
<input type="checkbox" name="product[]" value="1">
Prioritizing Web Accessibility for an Inclusive Online Experience
Web accessibility is beyond following rules; it is also about ensuring that everyone has equal access to your website. Incorporating semantic elements, landmarks, and attributes like role, name, and value into your HTML can make your website more accessible to people with disabilities. Do not think of web accessibility as an option; consider it a necessity.


