While Windows has ramped up its cybersecurity protection over the years with continual antivirus development, adding regular patches that fix security vulnerabilities, and even improving the good old Firewall, your data is still susceptible to being stolen or hacked. In short, you're still susceptible to losing your data.
This is where write protection can help. By enabling the write protection on your SD cards or USB stick, you can add another layer of security to protect your data. So let's look at the best ways to write-protect your SD cards or USB sticks.
How to Enable Write Protection on USB Stick on Windows
When you write protect your USB stick, it prevents anyone from writing, modifying, or erasing other data from your device without prior authorization. In fact, only through formatting can you tamper with the data on a write-protected USB stick. Like almost anything on Windows, there's a variety of ways to enable write protection on your USB.
First, we will look at how you can enable write protection through the Windows Registry.
Enable Write Protection on USB Stick by Windows Registry
To turn on write protection on your USB stick through Windows Registry, follow the steps below:
- Press Win + R to launch the Run dialog box.
- Type in 'regedit,' and click on OK to open the registry.
-
Head to the following path and hit Enter:
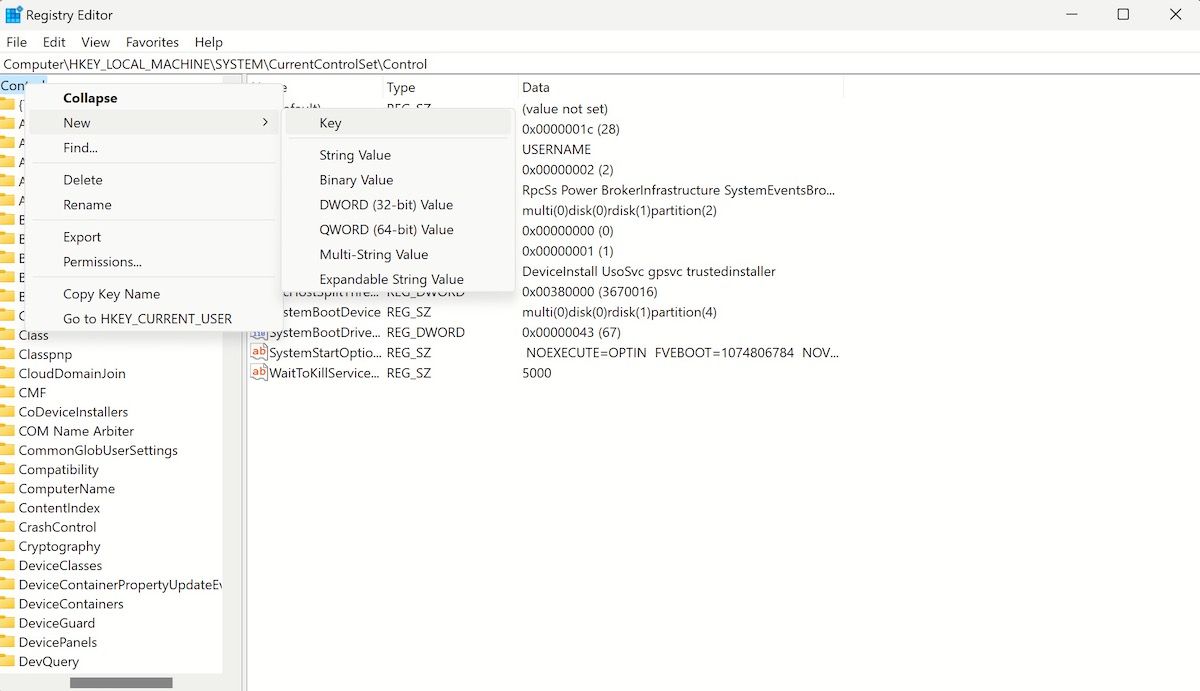
HKEY_LOCAL_MACHINE\SYSTEM\CurrentControlSet\Control - Now, right-click on the Control key, select New, and click on Key.
- Name the new key StorageDevicePolicies and press Enter.
- Finally, select the newly created key, right-click on right side and select New. Click on DWORD (32-bit) Value.
- Name the new DWORD as WriteProtect and hit Enter.
- Double-click on the newly created DWORD and change its value from 0 to 1.
- Finally, click on OK.
That's it—do this, and the write protection will be enabled on your USB.
Add Write Protection to USB Using Command Prompt
You can enable write protection settings with the help of the Command prompt as well. Here's how you can get started:
- Open the Run dialog box by pressing Win + R. From there, type in "diskpart" and hit Enter.
- You'll then get the User Account Control prompt. Click on Yes to continue.
- Now, type in the "list disk" command and hit Enter.
Here, look at the disk size to figure out your which disk represents your USB stick.
- Then, select your USB stick with the select disk command. In this example, we want to work with Disk 1, so the command is select Disk 1.
- List down all the attributes of your disk with the command attribute disk.
- To enable write protection, type in the "attributes disk set readonly" command and hit Enter.
- Finally, type in "exit" to quit the program.
That's it; write protection will be enabled on your USB stick from here on.
Use Write Protection on Your SD Card on Windows
Like with your USB stick, you can also enable write protection on your SD cards.
One of the simplest ways to enable write protection on your SD card is using the command prompt as well. As with the USB stick above, type 'diskpart' in the Run dialog box and hit Enter.
From there, follow the steps below:
- Type in "list disk" to see all the disk connected to your device. Note down the name of SD card. (In our case, it's Disk 1)
- Type in 'select Disk 1' and hit Enter.
-
After this, type in the following command to enable write protection on your SD card and hit Enter:
attributes disk clear readonly
The write protection feature will be enabled on your SD Card.
Toggle on the SD Card's Physical Lock
Many SD cards come with an in-built physical switch that will let you enable or disable the write protection mechanism on your SD card.
Slide it away from the "Lock" option you might have on your card and keep it that way. As soon as you do this, write protection will be enabled on your SD card.
Enabling Write Protection on SD Card or USB Stick on Your Windows PC
Although we don't recommend keeping it on at all times, write protection does protect your data from outside tampering or accidental deletions.
However, you may have to disable write protection for your SD card or USB stick eventually. To do that, all you have to do is roll back from the steps from above. If you need help with that, you can simply go through our write protection disabling guide from before.


