
Are you looking to give your Windows PC a more educational feel? Education Themes are the perfect way to do just that! With these vibrant and engaging visuals, you can easily transform the look and feel of your computer into something that is more conducive to learning.
In this article, we will show you how to enable Education Themes on Windows so that your PC looks great and supports educational activities.
Do Windows Themes Affect Performance?
The design of your computer can have a huge impact on how you approach work and play. A clean, organized desktop environment can help you stay focused and productive. So does this affect performance? In a way, yes.
Themes do change the way your computer looks and works, but they don't actually slow it down like other programs. Instead, they're just a way to customize the look and feel of your computer without putting in any extra effort. In fact, some users find that changing up their theme helps to keep them more engaged with their work.
However, certain themes may require more memory or processor power in order to run correctly than others. Therefore, if you are looking for maximum efficiency from your device, it would be wise to select a lighter-weight option such as the Education Themes offered by Windows.
How to Enable Education Themes on Windows 11
To enable Education Themes on your computer, you'll need to edit your registry. Keep in mind, however, that editing the registry can be tricky, and one mistake can cause your computer to stop working. For this reason, you should always back up your registry before making any changes.
- Press Win + R on your keyboard to open the Run command dialog box.
- In the text box, type regedit and hit Enter.
- Click Yes in the UAC popup when it appears on your screen.
-
In the Registry Editor, navigate to the following path. Alternatively, you can jump directly to the location using the address bar in the Registry editor. For this, paste the given path into the address bar and press Enter.
HKEY_LOCAL_MACHINE\SOFTWARE\Microsoft\PolicyManager\current\device
- In the left pane, right-click on the Device folder.
- Then select New and choose the Key option from the context menu.
- Give this new key the name Education.
- Next, right-click the Education key you just created.
- Then select New and choose DWORD (32-bit) Value from the context menu.
- After creating the key, name it EnableEduThemes.
-
Double-click the EnableEduThemes key and this will open a pop-up window.
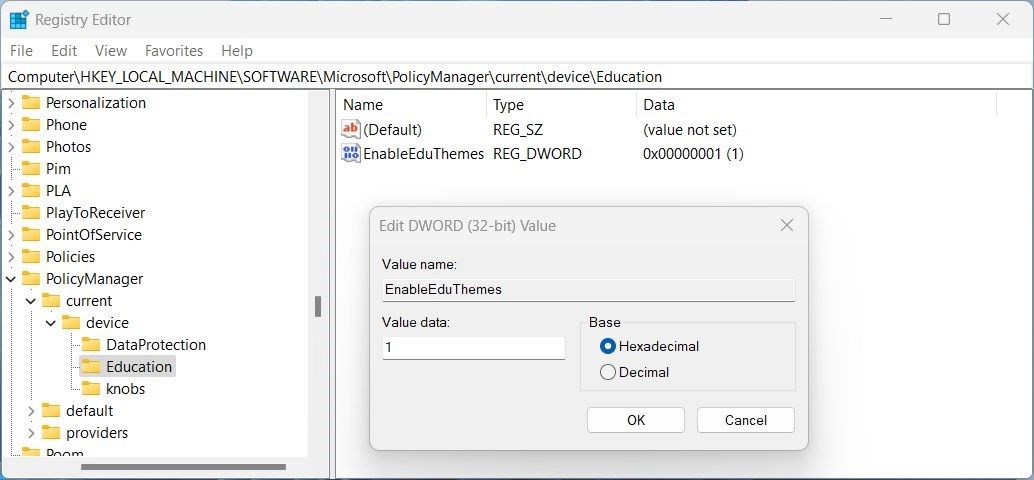
- Change the value of it from 0 to 1.
- To save the changes, click the OK button.
- Close the Registry window and restart your computer.

Once you have completed the above steps, your Windows operating system will start downloading the new themes for you. As a way of applying it, you just have to follow these steps:
- Press Win + I on your keyboard to open the System Settings window.
- In the left pane, you will find a tab named Personalization. Click on it.
-
Go to the right side of the screen, then select Themes. You will see all the newly downloaded themes here on this page.
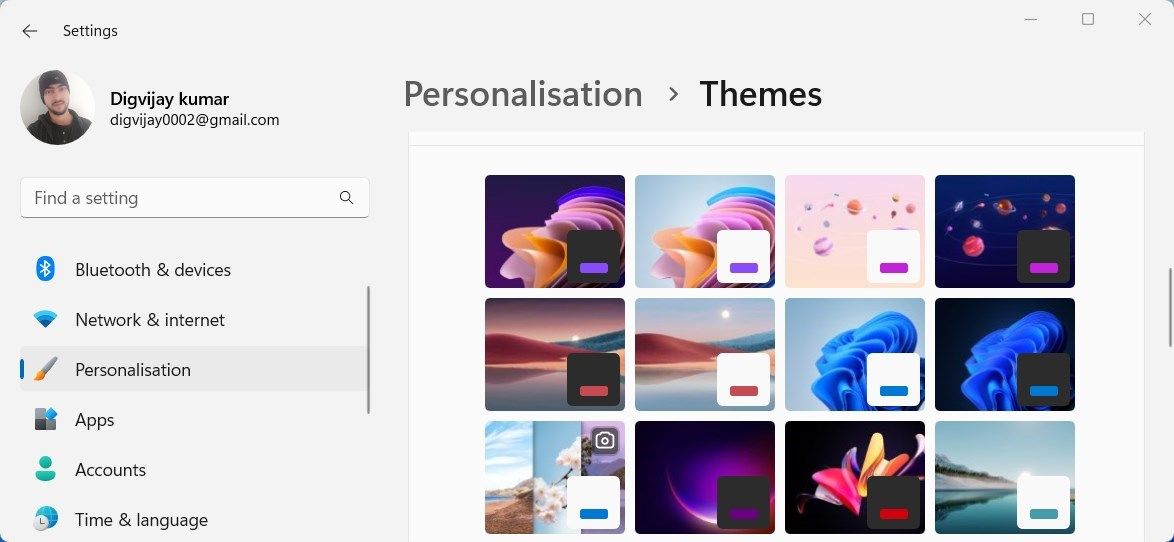
- Select the theme you prefer for your device, and it will be applied.

If you ever need to disable the Education Theme on your computer, you simply need to open the EnableEduThemes registry key. Then, change its value from 1 to 0.
When you're done, click OK, then restart your computer. You will no longer see the Education Theme under Themes in the Settings window.
Getting Education Themes on Windows Is Easy
Education is a vital part of life and having the right tools can make all the difference in learning success. Windows offers an Education Theme that helps users have an engaging educational experience. This guide walks you through the steps you need to take in the registry to enable the theme in Windows 11.