
With the Windows Spotlight feature enabled, your lock screen gets updated every day with spectacular images from Bing. That said, not everyone may like seeing a different lock screen background daily.
In any case, it’s fairly simple to enable or disable spotlight images on your Windows lock screen. Here's how you can go about it.
1. How to Enable or Disable Windows Spotlight Images Using the Settings App
The Settings app in Windows gives you several options for customizing the lock screen, including the ability to enable or disable spotlight images. It is also the quickest method for turning spotlight images on or off on Windows. Here are the steps you can follow.
- Right-click on the Start icon and select Settings from the list.
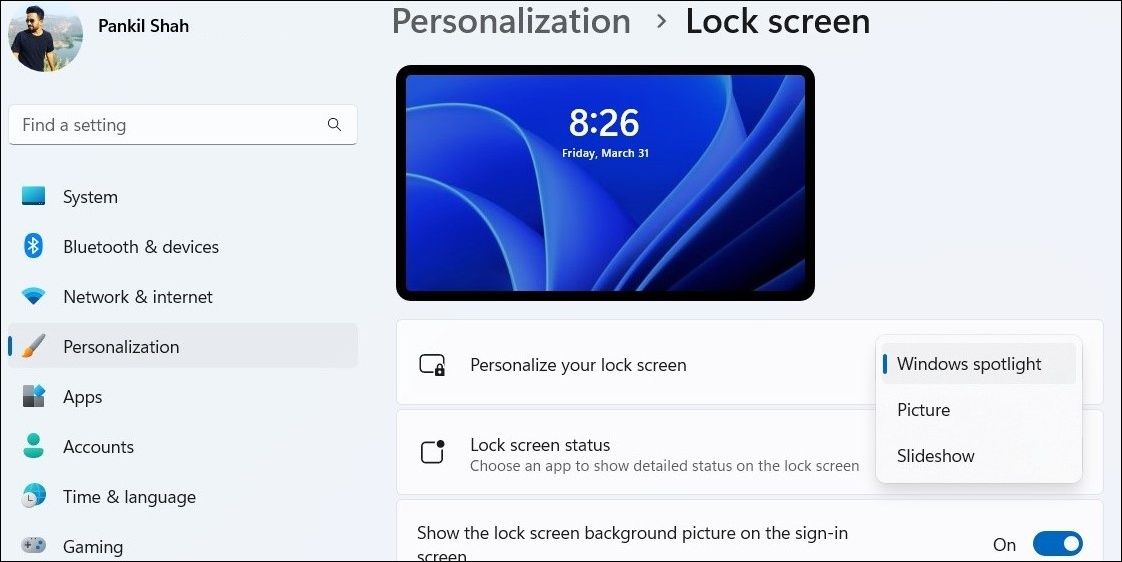
- Select Personalization from the left pane.
- Click on Lock screen.
-
Click the drop-down menu next to Personalize your lock screen and select Windows spotlight to enable the feature. If you want to disable spotlight images, select Picture or Slideshow instead.

2. How to Enable or Disable Windows Spotlight Images via the Group Policy Editor
The Group Policy Editor is a useful tool for implementing system-level changes on Windows. If you have the Education, Enterprise, or Professional edition of Windows, you can enable or disable spotlight images on the lock screen via the Group Policy Editor. If you use Windows Home, however, check our guide on how to access the Group Policy Editor in Windows Home before proceeding.
To enable or disable Windows spotlight images on your lock screen, use these steps:
- Press Win + S to open the search menu.
- Type gpedit.msc in the box and select the first result that appears. This will open the Local Group Policy Editor.
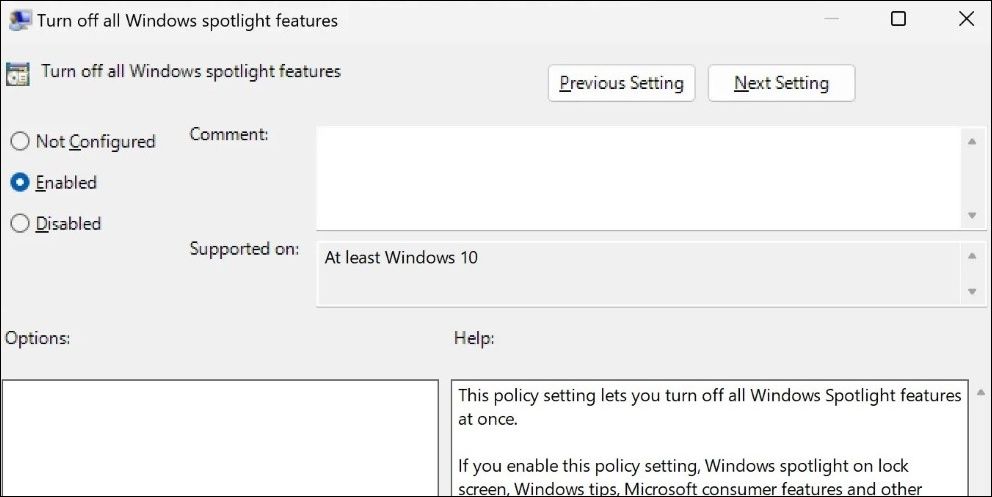
- Use the left pane to navigate to User Configuration > Administrative Templates > Windows Components > Cloud Content.
- Double-click the Turn off all Windows spotlight features policy in the right pane.
- Select Enabled to get spotlight images on the lock screen. If you want to turn them off, select Not Configured or Disabled.
-
Click Apply followed by OK.

3. How to Enable or Disable Windows Spotlight Images With the Registry Editor
Registry Editor in Windows provides yet another way to enable or disable spotlight images on the lock screen. However, this method may not be suitable for everyone, especially those who are not familiar with the Registry Editor.
If you decide to use this method, make sure you back up the Windows registry or create a restore point before proceeding. Once you’ve done that, use the following steps to enable or disable spotlight images via the Registry Editor.
- Press Win + R to open the Run dialog.
- Type regedit in the text box and press Enter to open the Registry Editor.
- Select Yes when the User Account Control (UAC) prompt appears.
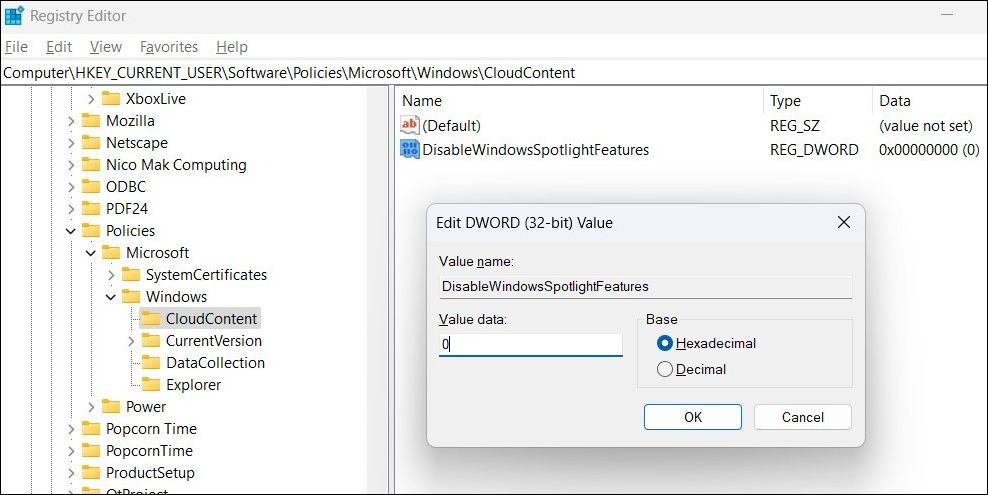
- Use the left pane to navigate to HKEY_CURRENT_USER > Software > Policies > Microsoft > Windows > CloudContent.
- Right-click on the CloudContent key and select New > DWORD (32-bit) Value. Rename the DWORD to DisableWindowsSpotlightFeatures.
- Double-click on the newly created DWORD to edit it.
- Enter 1 in the Value data field to disable spotlight images. If you want to enable them, enter 0 instead.
-
Click OK.

Exit the Registry Editor and restart your PC to apply the changes.
Get a New View Every Day With Windows Spotlight
As we just saw, you can enable or disable Windows spotlight images on the lock screen via the Settings app, Group Policy Editor, or Registry Editor. No matter which method you opt for, turning Windows spotlight images on or off should not take long.
Since Windows stores all the spotlight images locally on your computer, you can even save them and use them as your desktop wallpaper if you want.