3D printing is increasingly popular, but it remains far from perfect. Printing takes a long time, it can be hard to get your settings just right, and many people get frustrated with painting models to enjoy more than one color.
Most consumer 3D printers are only able to print in a single color. It is possible to create multi-color prints at home, but how exactly can you achieve this goal? Here, we'll explore some of the best ways to bring your 3D prints to life with multiple colors.
Multi-Color 3D Printing: The Options

Several methods enable you to create multi-colored 3D prints, and you need to choose the one that works best for your setup and situation. You may have to purchase additional hardware to make this work, though this can be cheaper than buying a 3D printer that can do it out of the box.
Printing Multi-Colored Filament
The first option we’re going to look at is by far the most affordable, but it may also seem a little bizarre. Most people wouldn’t consider the idea of printing their own 3D printable filament. However, this can be one of the easiest ways to start printing multi-colored designs, as you only need to use software to make it work.
It’s worth keeping in mind that this type of 3D printer filament gives you little control over the colors used at each stage during the printing process. You can estimate when colors will need to change, though it can be challenging to get this right without spending a long time on trial and error.
Using a Filament Control System or Upgrade
Many people decide that they want to dip their toes into multi-colored 3D printing after they’ve already bought a printer they like. Rather than replacing your new printer, you can choose to get an upgrade pack or a separate system for controlling the filament used by your printer.
The 3D Chameleon Color Changer is a great example of tools like this, offering the chance to make just about any printer into a multi-color one. Alongside this, companies like PrusaPrint also provide their own 3D printer upgrades that support dual-color 3D printing, but these will only work with specific printers.
Dual-Nozzle 3D Printers
There are a lot of dual-nozzle 3D printers available on the modern market, though many of them are best suited for industrial environments. Printers like this have two extruders that move together as a print is made. This enables two colors to be printed onto the same model without worrying about making special filament for it.
There are plenty of examples of printers like this available today. The Geeetech A10M is an affordable example, though you can find options in just about any price range. It’s important to make sure that you always do plenty of research when considering the purchase of a new 3D printer.
IDEX 3D Printers
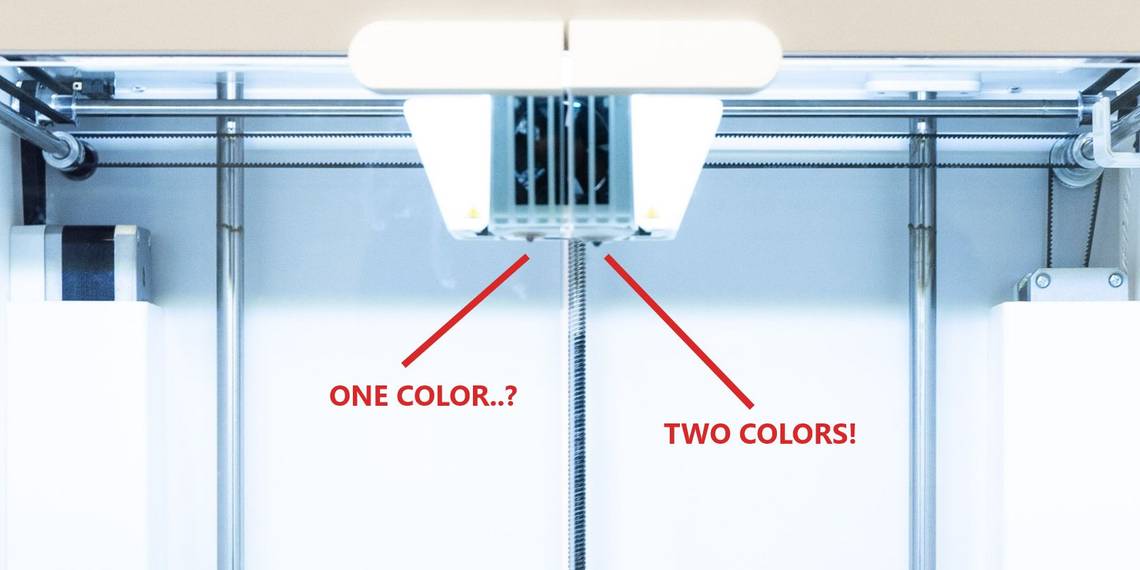
IDEX stands for Independent Dual Extruders and refers to printers with two extruders that can move independently. In most cases, the extruders will share two axes while moving along the third freely. This enables printers like this to print two models simultaneously, either mirroring or duplicating the same shapes. Of course, it also allows dual-color printing.
This type of printer is rarer than simple dual-extruder options. The printer we are using for this article is a FlashForge Creator 3, an IDEX machine that has become very popular amongst small businesses. There are other companies making printers like this, giving you loads to choose from.
Using an IDEX Printer to Print Two Colors

Since we have access to an IDEX printer, we will be using this machine for this article. Despite this, many of the steps you have to follow will be the same for other types of dual-color 3D printers. Hence, it should be nice and easy to get started yourself.
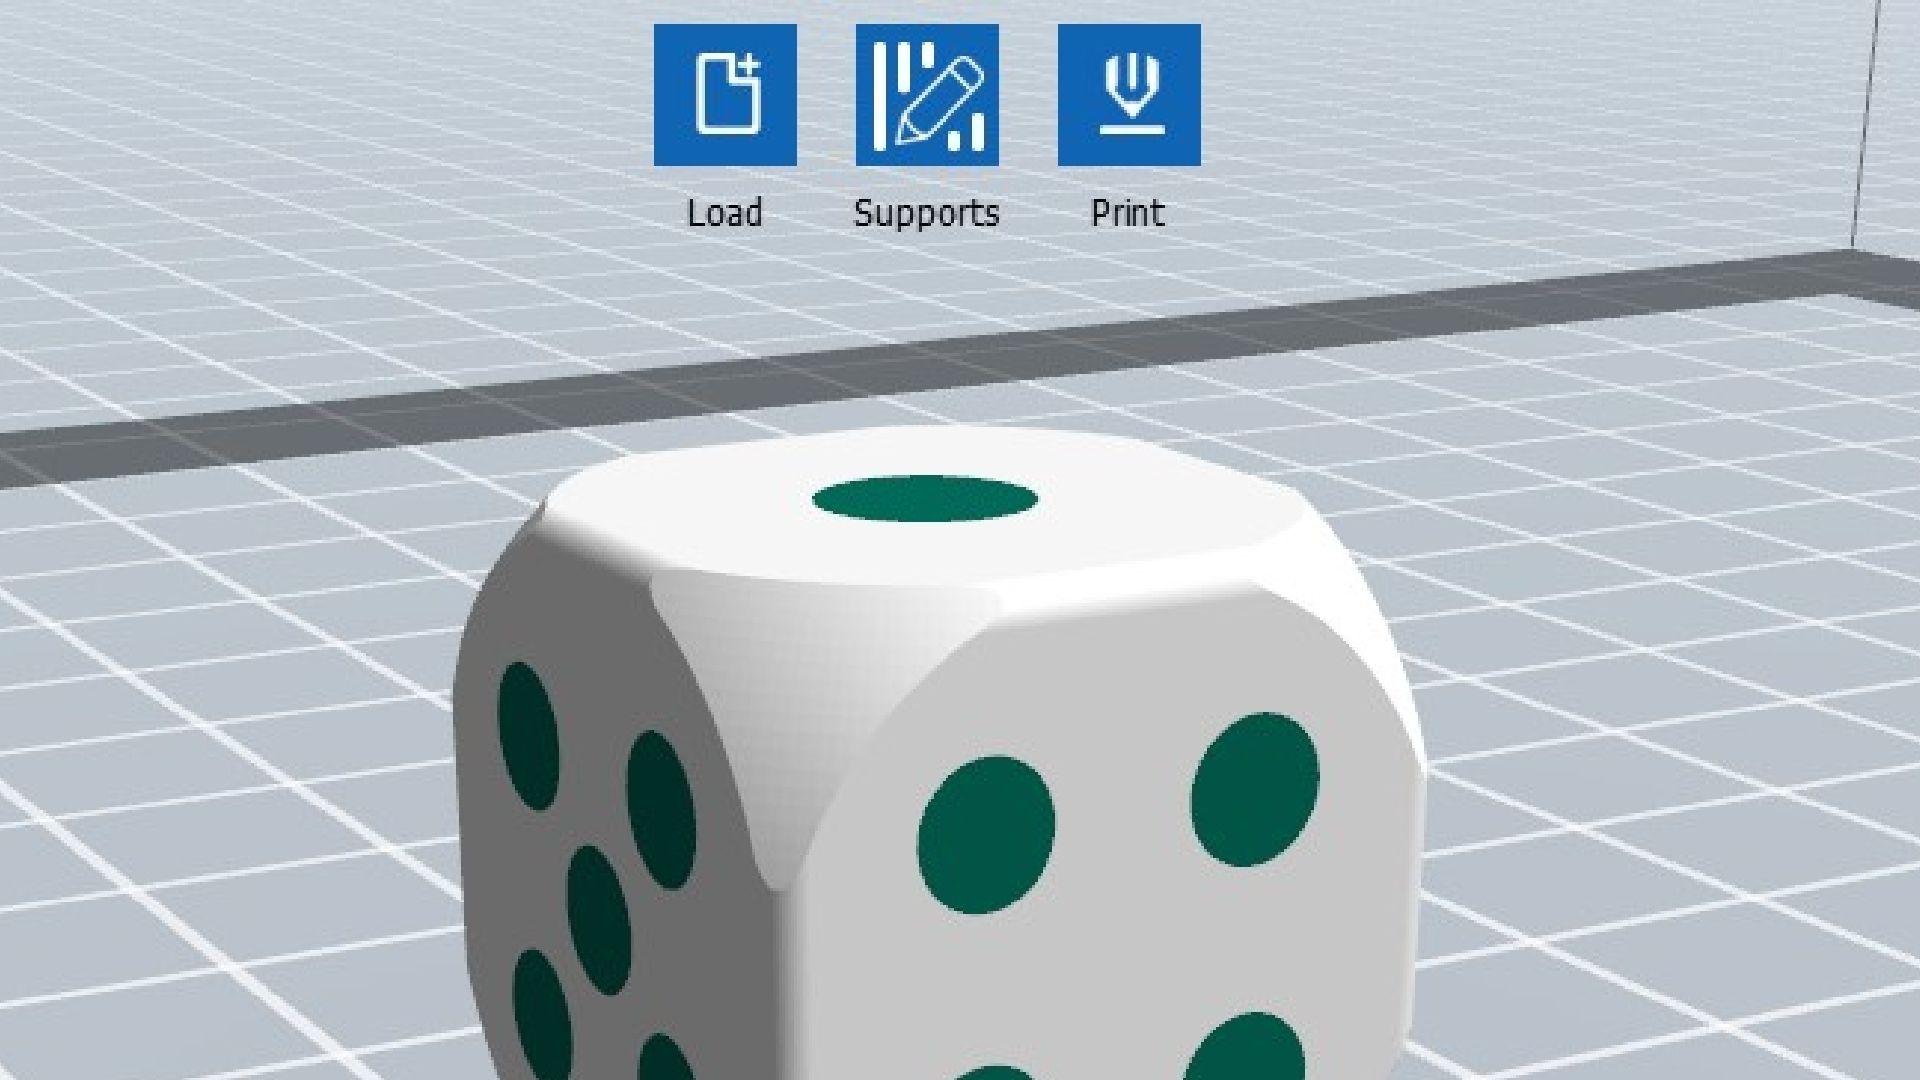
The example we are using for this guide is a 3D printable dual-color die from Thingiverse. This project is free to download and comes with everything you need.
Preparing Your Files
As your first step, you need to prepare your files. You heard that right; you need more than one file to use a dual-color printer. Each of the colors you use requires its own STL file, and this means that we are using two for our die. We are using FlashPrint for this, but the steps will be very similar in your own slicer. Here's what you need to do:
-
First, click Load and select the files you will be using with FlashPrint. They should load in the right positions, but you can adjust this as needed using the Move tool found in FlashPrint.
-
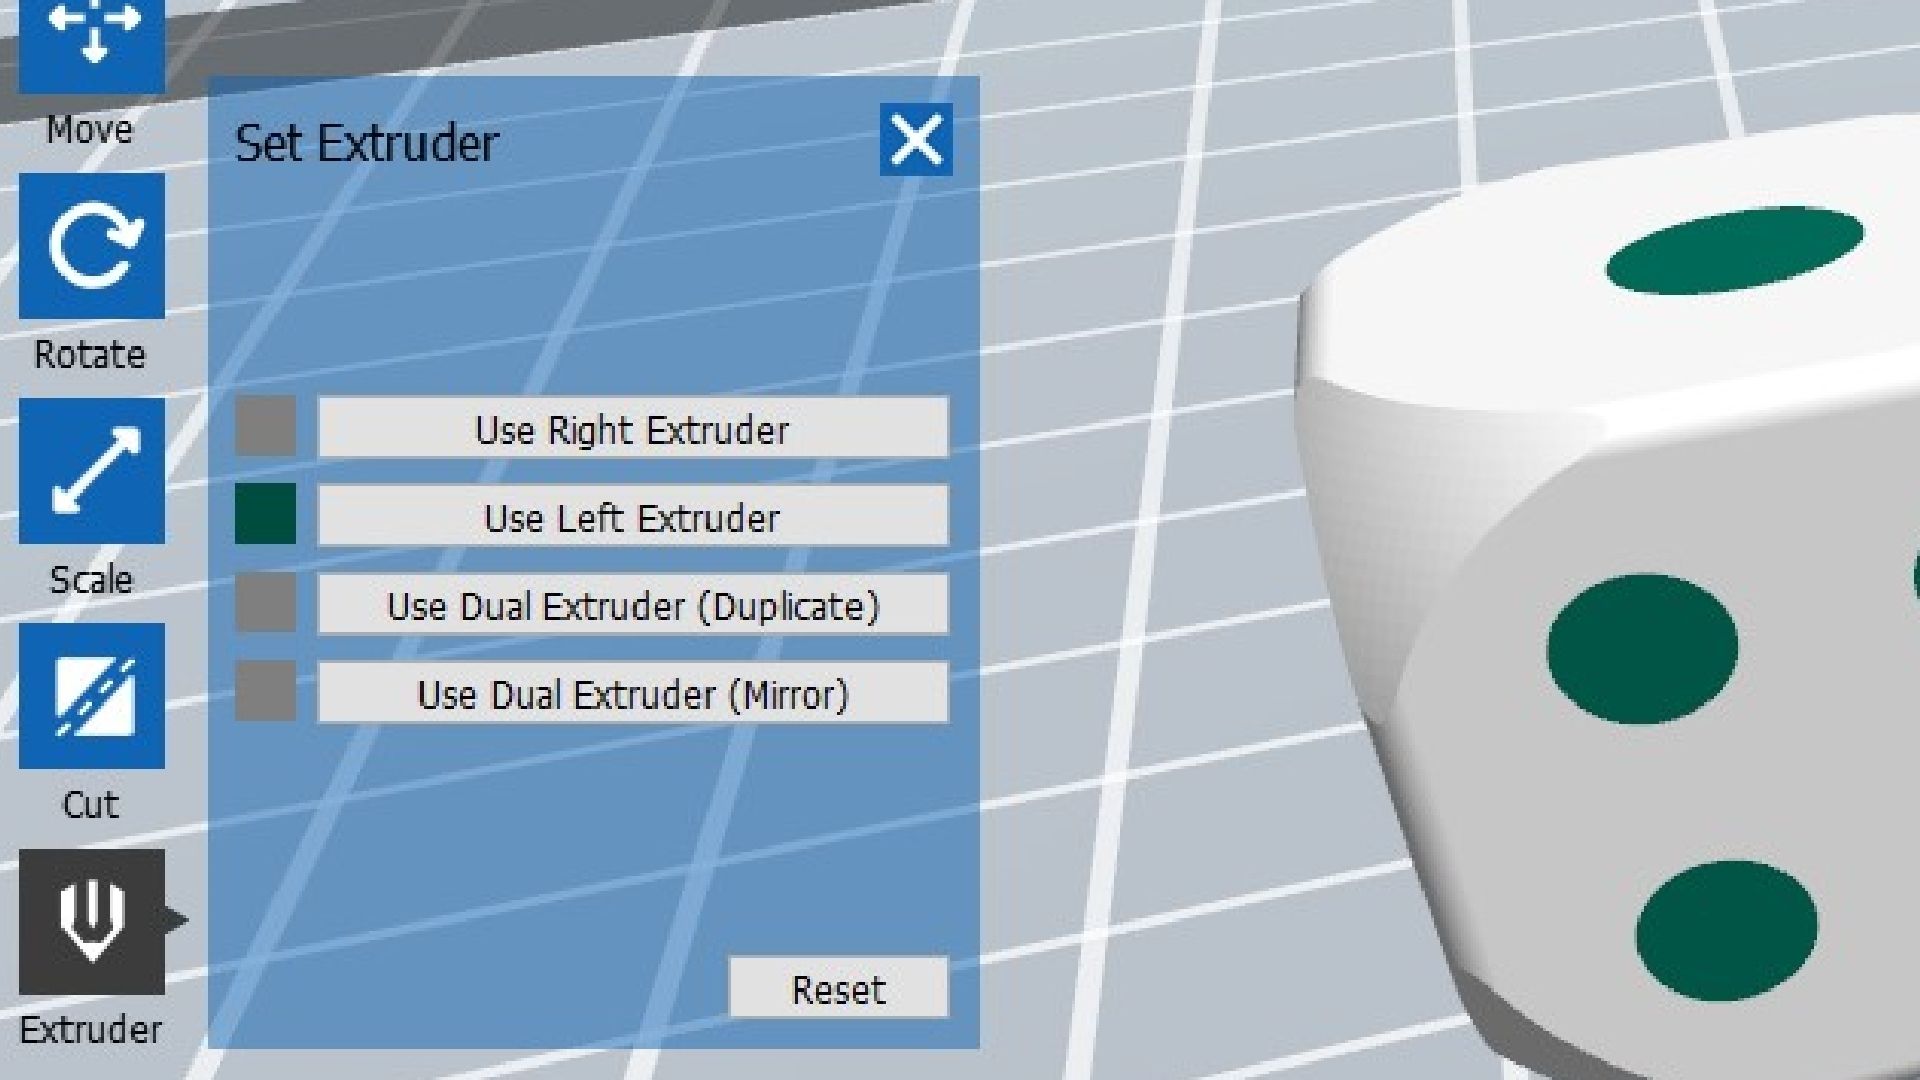
Select one of the models and double-click on the Extruder tool. Choose the extruder that is using the correct color for the model you have selected, and change the other model’s extruder if needed.
-
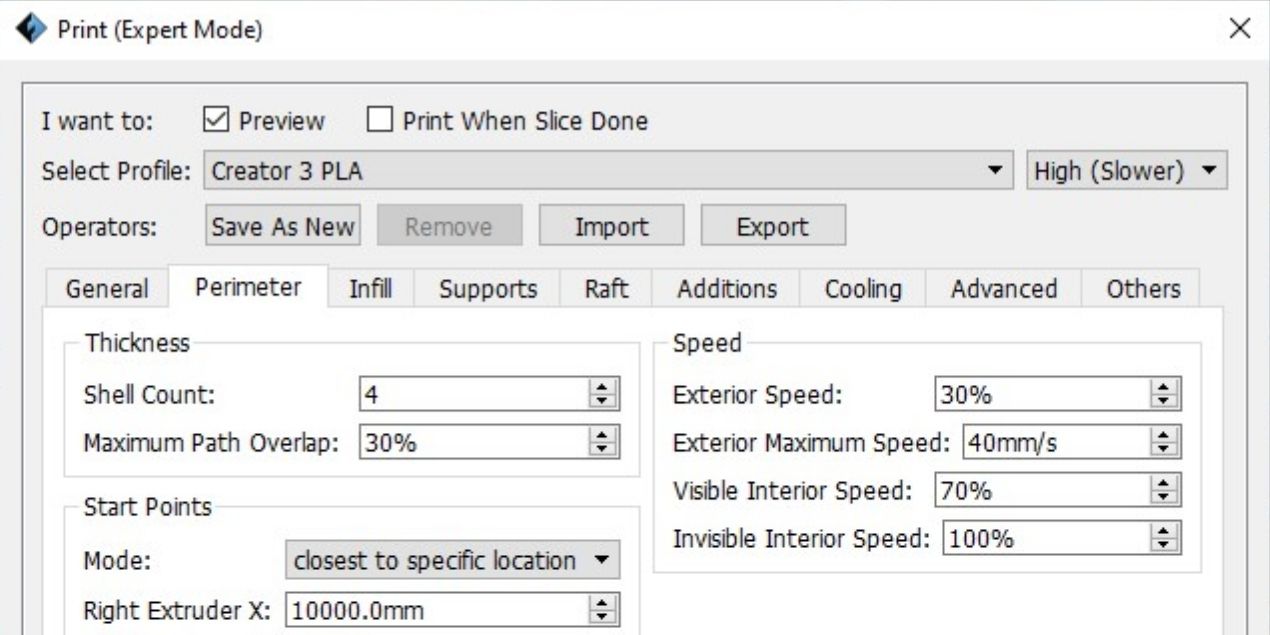
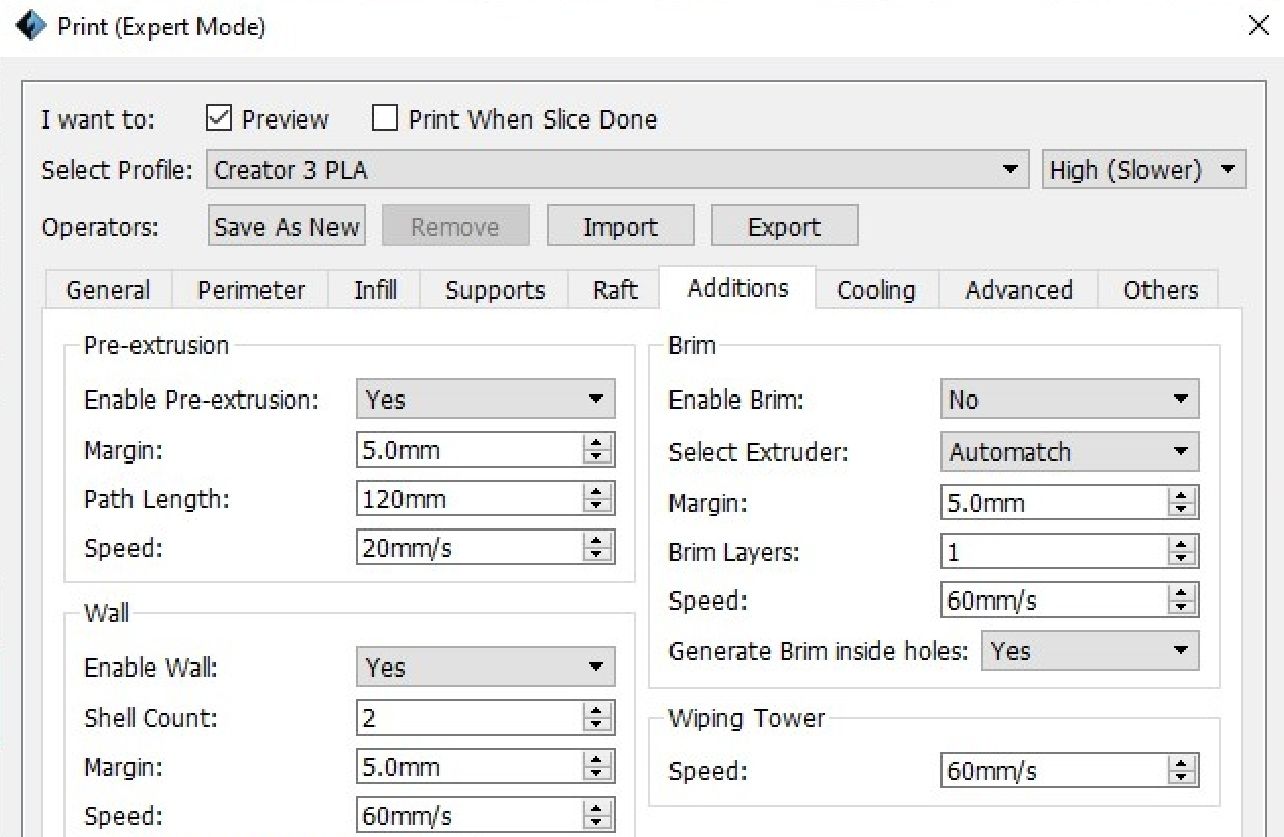
Click Print at the top of the screen, and select the printing profile that you want to use. We picked the standard Creator 3 PLA profile for this, setting the quality to High and reducing the Exterior Speed from 50% to 30% to get a great finish.
-
Go to the Additions tab and set the Wall section to On, changing the Margin option to 5mm. This will give your printer a way to wipe away excess filament as it prints and is generally considered an essential part of multi-color 3D printing.


Finally, you can now click Ok, wait for your software to finish slicing, and export the file to your 3D printer.
Calibrating Your Printer

You need to do some work before you can start printing your new model. IDEX 3D printers are usually very precise, but you’ll need to calibrate them to get the best results. Generally, you can use the software that comes on the printer itself to do this.
In the case of the FlashForge Creator 3, we have to turn the printer on and go to the Tools menu. From here, you can select Settings, followed by scrolling down the list to find the Calibration tool.
It makes sense to go through the process with each axis on your printer. When you select the axis you would like to calibrate, your printer will draw a line with each extruder. These lines should match up perfectly, but you can adjust the offset and draw new lines until they do.
This can be time-consuming and a little bit frustrating, but it will be worth taking the time to make sure that your printer is perfectly calibrated before starting your dual-color print. Failing to do this can result in ugly prints like the one above.
Cleaning Up Your Print

Thanks to the wall that went around your print, it’s likely that you will need to do some clean-up before it looks perfect. There will be strings of filament stuck to the model, though you can usually remove them with your hands. You may also notice rough spots on your print, and these may have to be sanded a little to make them perfect.
3D Printing With More Than One Color

Being limited to a single color has long been one of the few downsides of 3D printing. This doesn’t have to be the case when you are willing to be creative and explore the available options.
We hope this helps you improve your 3D printing projects and gives you new ideas to start working on. Multicolor 3D printing has never been easier, and it’s well worth the results.