The best way to master Django is to use it to develop full-stack applications. You will come across many fascinating features when you work with the framework. One of them is how to render forms in templates using crispy forms.
Using django-crispy-forms is one of many ways you can render forms in Django. The dependency allows you to create forms in templates without writing HTML code. You can easily build reusable layouts without the hassle of writing form code.
You can learn more by installing the library, then configuring it and using it to create a registration form.
How django-crispy-forms Works
The django-crispy-forms library comes with built-in HTML code that you can customize according to your needs. It includes a filter named |crispy that renders div-based forms in the template.
The {% crispy %} tags will render forms according to a specific setup. django-crispy-forms works well with other template dependencies like Bootstrap and Tailwind CSS.
Let's see how that works in a template.
Install Crispy Forms
Start by creating a Django project and app. Then install the latest version of django-crispy-forms using Pipenv with the following command:
pipenv install django-crispy-forms
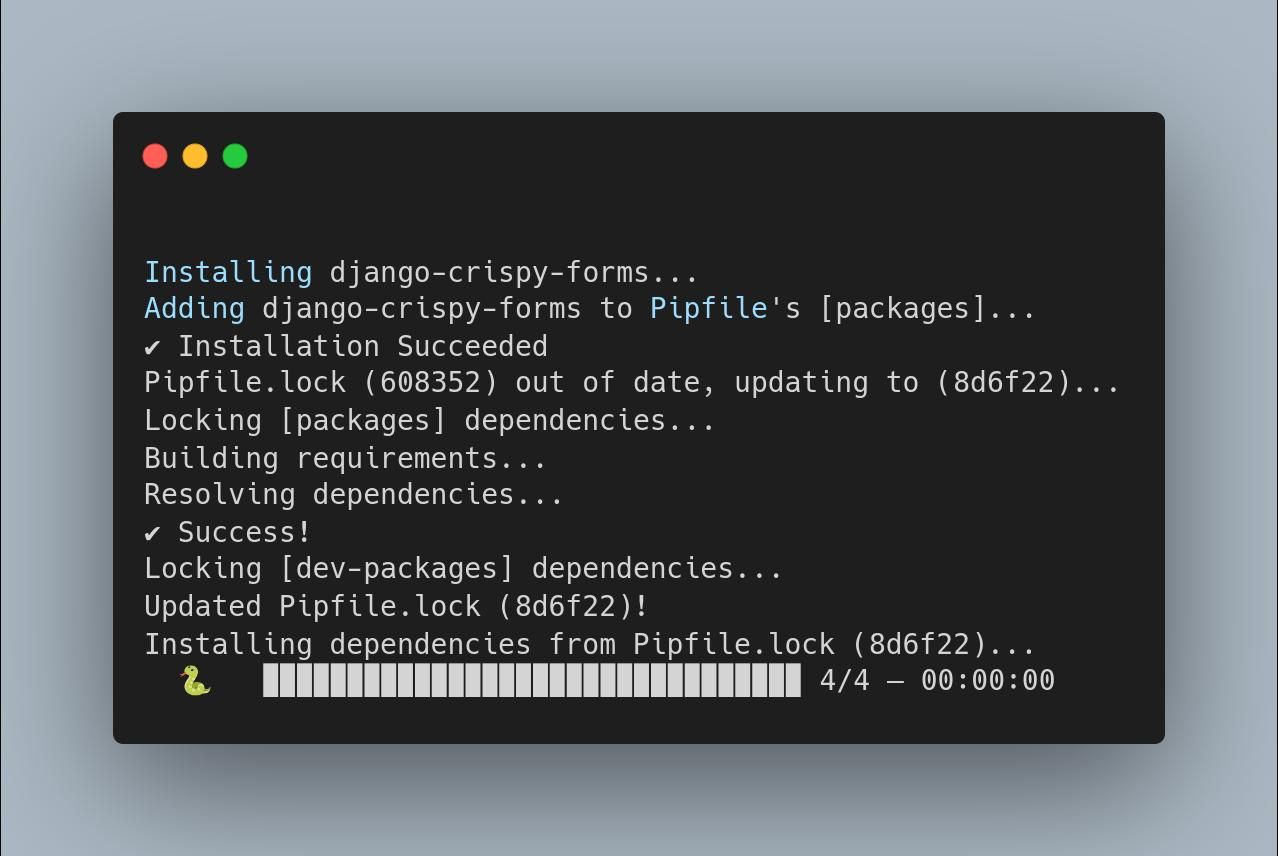
A successful installation will look like the picture below:
Configure django-crispy-forms in the Settings
After installation, you must register crispy forms as a dependency in the project settings. By registering it, the crispy forms library will be available to all apps in the project.
In the project settings.py file, add the string 'crispy_forms':
INSTALLED_APPS = [\n 'django.contrib.admin',\n 'django.contrib.auth',\n 'django.contrib.contenttypes',\n 'django.contrib.sessions',\n 'django.contrib.messages',\n 'django.contrib.staticfiles',\n 'myapp',\n 'crispy_forms',\n]
Create a Form
You need to sync your registration form with the built-in Django user creation form to help with authentication.
The built-in Django user authentication system handles common requirements like validating passwords and issuing permissions.
The system also handles form validation for you. So you get to create forms without the hassle of handling validation yourself. If you have done form validation in other frameworks, you'll know how cumbersome it can be. Not with Django.
The authentication module has a User model or object. The User object is the main component of the user authentication system. It handles permissions, authenticating registered users' profiles, access control, and much more.
The UserCreationForm uses the built-in User object to register new users. It inherits from the ModelForm class.
First, import forms from the Django form module. Then, import the UserCreationForm from django.contrib.auth.forms. Also, import the in-built User model from django.contrib.auth.models. Then import the field inputs from django ModelForm.
from django import forms\nfrom django.contrib.auth.forms import UserCreationForm\nfrom django.contrib.auth.models import User\nfrom django.forms import ModelForm, TextInput, EmailInput,ImageField, Textarea
Next, create a registration object named RegisterUserForm. It takes the UserCreationForm as an argument. Add the User object fields such as email authentication, username, and two passwords.
class RegisterUserForm(UserCreationForm):\n email = forms.EmailField(max_length=254, help_text='Required. Enter a valid email address.')\n class Meta:\n model = User\n fields = ('username', 'email', 'password1', 'password2')
These fields are the primary attributes of a user on the registration form. They are mandatory inputs that users must fill in for the system to authenticate them.
Create a View Function
Next, you'll create a view function for the registration form. First, import the render function as well as the RegisterUserForm from forms.py. Then import the User model from django.contrib.auth.models.
The view function named register takes the RegisterUserForm. It will render it on the register.html template.
from django.shortcuts import render,\nfrom django.http import HttpResponse,Http404\nfrom .forms import RegisterUserForm\nfrom django.contrib.auth.models import User\ndef register(request):\n form=RegisterUserForm\n context={'form':form}\n return render(request,'register.html',context)\n
Create URL Path
Create a URL path for the register.html template. This URL is the path for the view function you just created. Give it the name register, so you can use the name to call it on a template.
from django.urls import path\nfrom . import views\nurlpatterns=[\n path ('register', views.register, name='register'),\n]\n
Load on a Template
Now that you have the view and URL path, you can create the register.html template in the app folder. You will use django-crispy-forms to render the RegisterUserForm.
In the register.html template, extend the base.html. The base.html contains the Bootstrap links you will use to style the registration form. Then load the django-crispy-forms with the register.html using template tags.
{% extends 'base.html' %}\n{% load crispy_forms_tags %}\n{% block content %}\n<div class="container" style="">\n <div class="row">\n <div class="col-md-2"></div>\n <div class="col-md-8">\n <div class="card" style="color:black;">\n <div class="card-body">\n <h5 class="card-title"><a>Register to be a member</a> <span style="float:right">Are you a member? <a href="#" class="text-primary">Login now</a></span></h5>\n <div class="card-text">\n <form action="" method="POST" novalidate>\n {% csrf_token %}\n {{ form|crispy}}\n <button type="submit" class="btn btn-primary btn-sm"> Register</button>\n </form>\n </div>\n </div>\n </div>\n </div>\n </div>\n </div>\n</div>\n{% endblock %}
The form includes the csrf_token, which protects the registration process from hackers. Render the form with the same variable name as in the view function. Then add the |crispy filter to the Django {{form}} variable. This will render the form as crispy form.
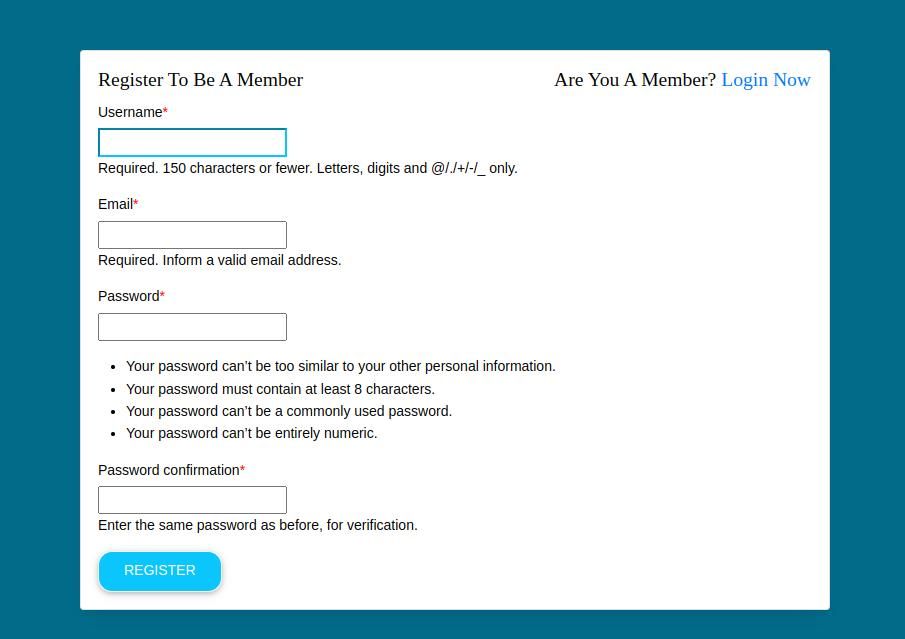
Run the server. Then, check the app in a browser at http://127.0.0.1:8000/register. You should see the form displayed as illustrated below:
You have rendered a registration form using crispy forms! Notice that Django automatically added validation to the form. These include requirements like username and password permissions.
To have a complete sign-up system, add authentication logic to the view function. You can also add a login page to sign in registered users. Users should have to fulfill authentication requirements to sign in to the app.
The django-crispy-forms library lets you quickly and easily render validated forms. Validating data ensures you have accurate data from your users.
The data comes in handy when communicating with users and analyzing performance metrics.
Why Use django-crispy-forms?
Using the crispy forms library to render forms in Django is a great example of how to apply the DRY principle. django-crispy-forms creates reusable components that you can render in templates.
They come with built-in HTML code. The code will save you the hassle of structuring and validating forms. Crispy forms provide a tag and filter that renders forms in a div format. They also provide the capability to configure and control the rendered HTML.
django-crispy-forms works well with the Django authentication system. You can create an authentication system to verify your users without writing much code.


