The smart HomeKit-enabled weather station that we are going to build today works similarly to the official Elgato Eve Degree, which costs ~€80. This is a completely homemade weather station that you can make for under $10 and integrate with the Apple Home app on your iOS and macOS devices, such as iPhone, iPad, and MacBook. It also works with smart home automation software, such as Home Assistant.
Things You Will Need
To build this mart DIY weather station for Apple HomeKit, on which it is recognized as an Elgato Eve Degree, you will need the following components:
- D1 Mini or NodeMCU (ESP8266) board
- BME280 temperature, humidity, and barometric pressure sensor module
- SSD1306 (0.96" or 1.3", 128x64) OLED display (optional)
- Some jumper wires
- Soldering iron and tin
- macOS or Windows PC or laptop
- Micro USB cable
- 5V USB power supply
- 3D printed case (from a design on Printables) to house the components
Flash the Firmware
To make this DIY weather station, we will use the firmware by HomeKid. For this, you will need access to a macOS or Windows system and a micro USB cable. The instructions to flash the firmware are as follows:
On macOS
- Download the NodeMCU-PyFlasher.dmg program (from GitHub) and run it on your macOS system.
- Connect the D1 Mini or NodeMCU board to your macOS machine using the micro USB cable and then choose the Serial port.
- Click Browse and choose the main.bin file (GitHub).
- In Baud Rate, select 115200.
- Select Quad I/O (QIO).
- Choose Erase Flash and yes, wipes all data.
- Finally, click on the Flash NodeMCU button. After some time, the connected D1 Mini or the NodeMCU will be flashed.
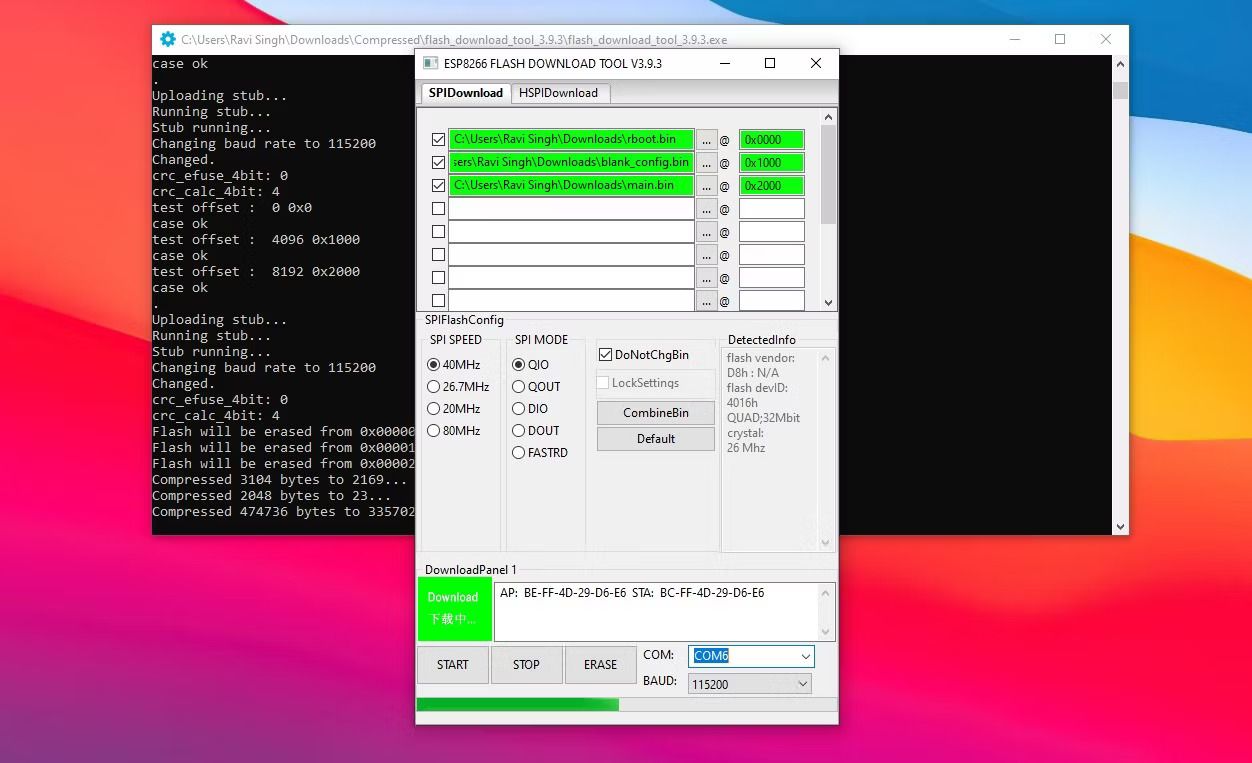
On Windows PC/Laptop
- Use the micro USB cable to connect the D1 Mini board to the system.
- Download the Espressif Flash Download Tools and extract the zip folder.
- Open the extracted folder and run the flash_download_tool_xx.exe file.
- Choose ESP8266 in Chip Type and click OK.
-
Click the first three checkboxes and do the following,
- Type 0x0000 in the first field and click three dots to select the rboot.bin file (GitHub download).
- Type 0x1000 in the second field and select the blank_config.bin file (GitHub download).
- Type 0x2000 in the third field and select the main.bin file (GitHub).
-
Then select the following options,
- Baud Rate: 115200.
- Flash Size: 4MB.
- Flash Mode: DIO or QIO.
- SPI Speed: 40MHz.
-
Choose the COM port where the D1 Mini or NodeMCU board is connected. Click Start. This will start flashing the firmware on the connected D1 Mini or NodeMCU board and may take up to two minutes to finish.

Once the firmware is flashed successfully, you need to restart the device by disconnecting the USB power supply and then following the next instructions to connect the board to your Wi-Fi network.
Connect to the Wi-Fi Network
Close the Flash Download tool and connect the D1 Mini to the power adapter or your system.
- In your iOS device, such as an iPhone, open the Wi-Fi settings and connect to the HomeKid-XXXX Wi-Fi AP. Use the password 12345678.
- In the login window, tap on your WLAN network and then type the Wi-Fi password. Tap Join. The device will stop the AP, disconnect from your smartphone, and connect to your Wi-Fi network using the password you provided.
If the password for the WLAN network is wrong, the device will restart the Access Point (AP) after some time. You can connect to the AP again and enter the correct password.
Connect the Components
Refer to the diagram below to connect the BME280 and SSD1306 OLED display to the D1 Mini or NodeMCU board.

- Connect the D1 pin to the SCL pin of BME280.
- Connect the D2 pin to the SDA pin of BME280.
- Connect the D5 pin to the SDA pin of the SSD1306 OLED display.
- Connect the D7 pin to the SCL pin of the SSD1306 OLED display.
- Connect the 3.3V pin to the VCC and VIN pins of the BME280 and SSD1306 OLED display.
- Connect the G pin to the GND pins of the BME280 and SSD1306 OLED display.
Add Weather Station to the Apple Home App (HomeKit)
Connect the micro USB cable to the D1 Mini or NodeMCU and on your iPhone, iPad, or MacBook, open the Home app. Then follow these steps to add the HomeKit-enabled DIY weather station as an accessory to the Home app. The weather station we made will be recognized and added as an unofficial accessory. However, it will work similarly to an official Elgato Eve Degree sensor for Apple HomeKit.
- Open the Home app, tap on the + icon, and choose Add Accessory.
- Tap on the More Actions… button and then tap on the discovered temperature/humidity sensor accessory.
- Tap Add Anyway and then enter the code 02182017. Tap Continue.
- Select the location or room where you are going to install and use the weather station and tap the Continue button.
- You can edit or change the name of the DIY weather station accessory. Tap Continue > Done.
- The temperature and humidity values will start displaying under the room name. You can tap on the accessory anytime to open the control panel and edit the properties of the weather station sensor.
To view the barometric pressure values and altitude, you will need to install the Eve for HomeKit app on your iOS device. This app provides a much nicer and more intuitive UI. It is highly recommended that you install the app to use this unofficial DIY HomeKit accessory, just like we added the Elgato Eve DIY HomeKit motion sensor.
Troubleshooting Common Issues
In case you encounter one or more of the following issues, you will need to re-flash the firmware:
- Wireless AP is not visible or can’t find the HomeKid-xxxx AP in the Wi-Fi settings.
- The weather station is not visible in the Apple HomeKit app.
In such a case, use the flash tools to erase the D1 Mini or NodeMCU board and re-flash the microcontroller board with the HomeKidd firmware.
Most Affordable Home Weather Station
You can build and use this affordable DIY HomeKit-enabled weather station to measure the temperature, humidity, and barometric pressure at your current location or in a room. You can use this sensor to further automate other devices in your Home app, such as a fan or HVAC unit when the temperature increases or goes down to a certain value. You can also add and integrate this sensor into a Home Assistant server and create multiple automations for your smart home.