Windows has always been very customizable. You can change how Windows looks for aesthetic reasons, or to make elements easier to find or use.
However, not many people know you can change the color of the selection rectangle on Windows. It may not be as obvious a change as something like switching to a new theme, but small changes like this can go a long way towards making Windows work better for you.
How to Edit the Background Color of the Windows Selection Rectangle
There are a few reasons why you might want to change the color of the selection rectangle. But no matter if you find the rectangle hard to see or just want to personalize Windows, the editing process is the same.
You will need to know the RGB code of the color you want to use for the background. You can find this in an app like Microsoft Paint. You can also search for Color Picker in Google to find a tool that shows RGB codes. Note down the color code. For example, 240 123 91.
Alternatively, if you use PowerToys, there is a color picker available. That tool lets you find the RGB value of any color on the screen.
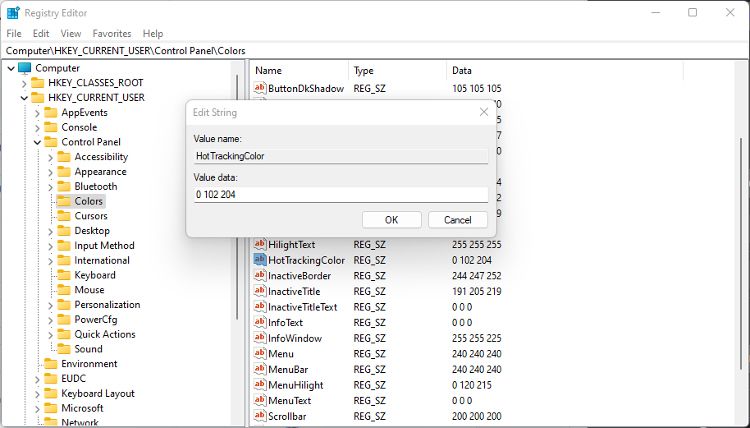
- Open the Registry Editor and navigate to HKEY_CURRENT_USER\Control Panel\Colors.
- The right-hand pane shows a list of Windows elements with their color codes. Look for HotTrackingColor.
- Double-click or tap HotTrackingColor to edit the value. Replace the existing color code with your alternative. Make sure to include the spaces, but remove any commas.
- Click Ok and then restart your computer. You can also sign out and back into your account to apply the changes.
The Registry Editor is a very powerful tool, and if used carefully, you can make registry hacks to make your Windows experience better.
Edit the Border Color of the Selection Rectangle
It is also possible to change the color of the border of the translucent rectangle. That can help make the rectangle easier to see without changing the background color.
- Open the Registry Editor and navigate to HKEY_CURRENT_USER\Control Panel\Colors.
- Look for Hilight in the right-hand list of elements. That controls the color of the border.
- Double-click on Hilight and edit the color code. Bear in mind that the border is a solid color rather than translucent. It will appear much more vividly than the background color.
- Click Ok, close the Registry Editor and restart your computer.
How to Enable or Disable the Selection Rectangle
The selection rectangle can adversely affect how well your computer works, especially if it is old or lacks processing power.
Windows has to generate and animate the rectangle, which requires processing power. Although it is a small amount, when combined with other animations, it can cause lag and jitter. Disabling the selection rectangle can be done in the Performance Options.
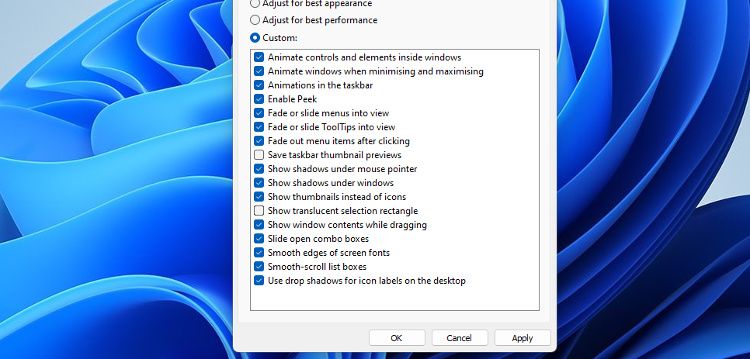
- Type Performance into Windows Search and click on Adjust the appearance and performance of Windows.
- In the Visual Effects tab of Performance Options, uncheck the box next to Show translucent Selection Rectangle.
- Click Apply and then close the Performance Options pane.
You might not see any improvement in performance with the rectangle disabled. If that is the case, you can repeat the steps above to enable it again.
Editing the Translucent Selection Rectangle on Windows
No matter the reason for doing it, editing the translucent rectangle that appears when you click and drag on the desktop is simple. And if you no longer need to see the selection area, or if it affects performance, you can disable it altogether. Small customizations like this can go a long way towards making Windows work better for you.


