NVIDIA fans boast that their GPUs were the first to bring features like raytracing and clever resolution scaling, apart from having the edge performance-wise in many popular games. Still, not everything is rosy in Camp Green since NVIDIA's drivers can also be CPU hogs. That's because of all the features packed into them, like Geforce Now. However, f you're not using those features, why have them eat up your PC's resources?
You can disable some of those features during NVIDIA's drivers' "official" setup. However, NVCleanstall offers more options and allows a genuinely fluff-free, all-around better installation. Let's see how.
Why the NVIDIA Bloat?
NVIDIA surely knows better than us what's best for their hardware, so we shouldn't tamper with their software. Right? Well, no, not really, for this also implies NVIDIA would know what's best for us. However, we're all individuals and don't use our computers the same way.
Just like GPUs evolved from Graphics Processing Units to General Processing Units (helpfully keeping the same acronym), so did their drivers. They're not basic pieces of software that enable other software to show graphics on our screens anymore. Today they're (also) bundles of apps that take advantage of a GPU's advanced features.
And yet, a significant amount of people don't care and will probably never use most of those features. NVIDIA's drivers include "stuff" like support for all of its latest hardware in a wide range of scenarios. For individual users, even up to half of that "stuff" might be useless. "Stuff" like:
- PhysX
- HD Audio via HDMI
- Optimus support (for laptops with dual GPUs)
- Shield Wireless Controller
- Shield Streaming Service
- ShadowPlay
- GeForce Experience
As such, why should you install all the components for NVIDIA's Shield console if you don't own one? Is there a reason to waste storage space for the files needed for HD Audio via HDMI if your monitor doesn't have speakers?
And let's not dive into the Telemetry services, whose only purpose is to inform NVIDIA on how you're using your computer.
NVIDIA's own driver setup won't allow you to remove most of those "features" entirely. Thankfully, NVCleanstall does.
Removing the Fluff With NVCleanstall
There are many ways to update your GPU's drivers, as we covered in our guide on how to update NVIDIA graphics cards. However, all these methods come with some, as many would say, fluff.
Thankfully, there's a solution to that problem. Its name is NVCleanstall, a free tool created and hosted by TechPowerUp.
We suggest you avoid downloading it from elsewhere since it's one of those pieces of software that need full access to your computer to work. You wouldn't want to give low-level access to your PC to strangers.
After downloading and running it, NVCleanstall will ask you which version of NVIDIA's drivers you'd like to install.

You can use the defaults to have the program guess the best version of the drivers for your hardware. Alternatively, change the Install best driver for my hardware selection to Manually select a driver version to do precisely that.

By enabling the Show all versions options on the right, above the pull-down menu, the list of available drivers will also show versions that (theoretically) aren't compatible with your hardware. We suggest you avoid those to minimize any chance of running into problems.

You can also use a driver you've already downloaded by choosing Use driver files on disk and then pointing NVCleanstall to their directory.
The fourth option isn't related to the drivers, but the app itself, since it allows you to install it on your computer instead of using it as a standalone "portable" app.
You can also enable an extra option at the bottom of the window to, as it states, Periodically check for driver updates in background.

We went with the first choice for this guide and let NVCleanstall detect and download the best drivers for our hardware.
The next step is where most of the magic happens. NVCleanstall will present all the components in the drivers and allow you to choose which ones you'd like to keep.

If you don't know what each of them does, NVCleanstall offers an explanation on the right side of its window when you click on them. Use those helpful snippets to make up your mind on what to keep or lose.
NVCleanstall also offers three presets, presented as links close to the bottom of its window.
- All enables everything in the drivers.
- Recommended disables the stuff most people wouldn't notice is missing.
- Minimum keeps only the bare basics to keep the GPU useable (AKA the display driver itself).

Despite seemingly offering a lot of choices, in practice, many components rely on one another. Thus, you can't freely enable and disable anything in the components list. By clicking on a feature, you can see if it relies on other components (and which), under Requires.
For example, to use GeForce Experience, you also have to install NV Container, Telemetry, NV Backend, and NodeJS.

What's worse is that it all works like a chain reaction, where one feature leads into the other. Before you know it, you could end up with a complete driver installation again.
Did you decide to enable ShadowPlay to have support for hardware-accelerated video capture? You'll also need Virtual Audio and Process Monitor. However, you'll need GeForce Experience, too, and as we mentioned above, this, in turn, relies on even more components.

Still, that's the best way to get the cleanest driver installation possible. Start by deselecting everything but the Display Driver (required) or choosing the Minimum preset. Then, add only the features you desire, enabling all needed components. Finally, click on Next.

NVCleanstall will begin preparing the installation files. Afterward, it will offer some more options through which you can customize your driver installation.

We suggest you enable Disable Installer Telemetry & Advertising and Perform a Clean Installation. With those options enabled, you will avoid sending information to NVIDIA and
remove all remnants of your existing drivers.
Enable Install NVIDIA Control Panel App from Windows Store if you want an additional path to the driver's options.
Leave Unattended Express Installation disabled to see every step of the driver installation process. We suggest you also ignore Add Hardware Support as well as everything under Show Expert Tweaks unless you know what you're doing or need a particular tweak.
Leave Rebuild digital signature enabled. Some of the other tweaks might need it.
When ready, click on Next again.

After NVCleanstall customizes your driver installer according to your choices, you can click on Install to launch it.
As for the other options:
- Show in Folder allows you to see the installer with your default file manager.
- Build Package can turn your customized installer into an executable you can use on other PCs.
The customized driver installation process doesn't differ from the official approach, so it should be a familiar affair. Launch it and choose Agree and continue.

Go for Custom (Advanced) instead of Express (Recommended) path, and click Next.

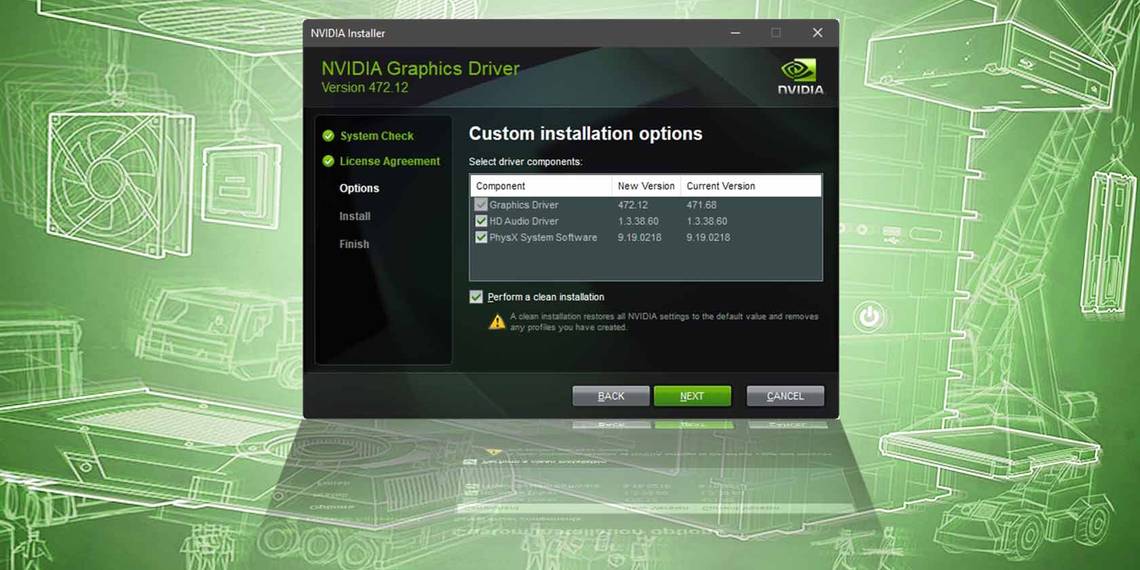
Check that only the components you chose are included and will be installed, and click Next again.

After the driver installation completes and the installer exits, you can return to NVCleanstall and close its window.

Despite losing some components, your core drivers will remain untouched. So, you can still use your GPU as normal, tweak the most important driver options, but without the overhead of stuff you'd never use.
NVIDIA Drivers as They Should Be
Your PC might already feel a bit "lighter", and you'll see fewer NVIDIA-related tasks and services active if you check Windows Task Manager. From here on, it's smooth sailing until the next update.
When NVIDIA releases a new version of its drivers, skip the official installation. Instead, go through the steps we saw to upgrade only the parts you'd prefer. For most people, we can safely guess FrameView SDK won't be among them!
If losing the fluff isn't enough, and you'd like to squeeze more performance out of your GPU, the next step would be looking into how to overclock it... but that's another story.