
Emails are still the best way for professional communication. We use emails every day for our business or profession, and it's the most preferred form of communication for professional contacts.
Have you ever felt that your emails can have more impact if your email address had a professional feel to it?
A professional email address should have @yourwebsite.com instead of @gmail.com the end. So, instead of yourname@gmail.com, your email would appear to come from yourname@yourwebsite.com. For example, instead of techexpert@gmail.com, your emails would appear to come from techexpert@makeuseof.com.
To create a professional email address using Gmail, you'll need to have a custom domain name. Once you have that, keep reading to learn how to set up Gmail to use a custom domain name!
Benefits of a Professional Email Address
.jpg?q=50&fit=crop&w=1500&dpr=1.5)
If you are running a business or offering services, it's advisable to use a professional email address instead of a free one if you're able to.
The following are the primary benefits of a professional email address (including, but not limited to):
- It makes you look legit and gives you an air of professionalism.
- It promotes your brand and acts as an advertisement for your domain.
- It's less susceptible to hacking compared to free email addresses.
What You Need to Make a Professional Email Address
To make a professional email address, you need to have two things.
The first thing is a domain name, and the second thing is web hosting. We recommend the following web hosting service providers due to their numerous benefits:
- Bluehost
- Hostinger
- Inmotion Hosting
- WP Engine (first 4 months free)
Steps to Create a Professional Email Address
Are you ready to create your new email address? Here's how to do it:
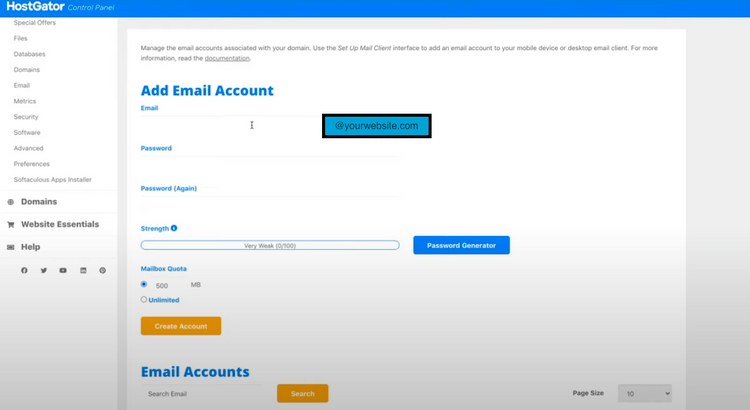
- Log in to your web hosting account. Once you log in, select the domain property for which you want to create your professional email address.
- In your cPanel, navigate to the Email configuration page.
- Click on "Email Accounts" and find the section where you can create a new email account.
- Your hosting provider already provides you the @yourdomain.com. You just need to type in your name that comes before @yourdomain.com.
- Choose your password and confirm it before moving on.
-
Select the "Unlimited mailbox quota" before clicking the "Create Account" button.

Note: The specific individual steps may change depending on which web hosting provider you're using, but the idea and procedure is fundamentally the same no matter what.
Voila! You have just created your professional email address. Now we have to pair it with Gmail so that you can use it with Gmail, allowing you to use Gmail to send emails using @yourdomain.com instead of @gmail.com.
Setting Up Gmail With Your Custom Email Address
Follow these steps to link your new professional E-mail ID with Gmail:
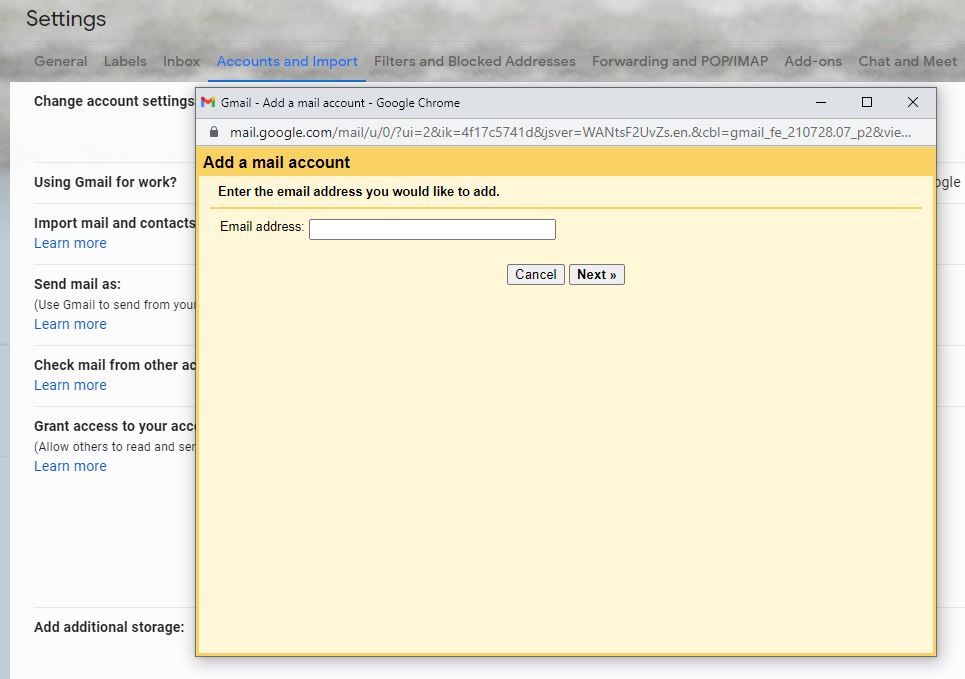
- Sign in to your Gmail account and go to "Settings" on the top right corner.
- Click "See all settings."
- Click on the "Accounts and Import" tab on top.
- Scroll down to find "Check mail from other accounts" and click "Add a mail account."
-
You will see a yellow window pop-up. Here you need to fill in the professional email address you created on your web hosting, and click "Next."
- Click "Next" with the "POP3" option selected.
- In the next window, fill in the same username and password you filled in your web hosting.
- Ensure that the POP server says "mail.yourwebsite.com" and check the box that says "Label incoming messages."
- Click "Add account" and then check "Yes" for sending mail.

How to Create an Alias in Gmail
An alias is the name you see when you receive an email. You can choose it to be your first name, first and last name, brand name, or any other name you wish.
For example, you can create a customer service email address and name your alias "Customer Support." Your email might be support@yourwebsite.com, and when your customers see your email in their inbox, they can see "Customer Support" as the sender in their inbox.
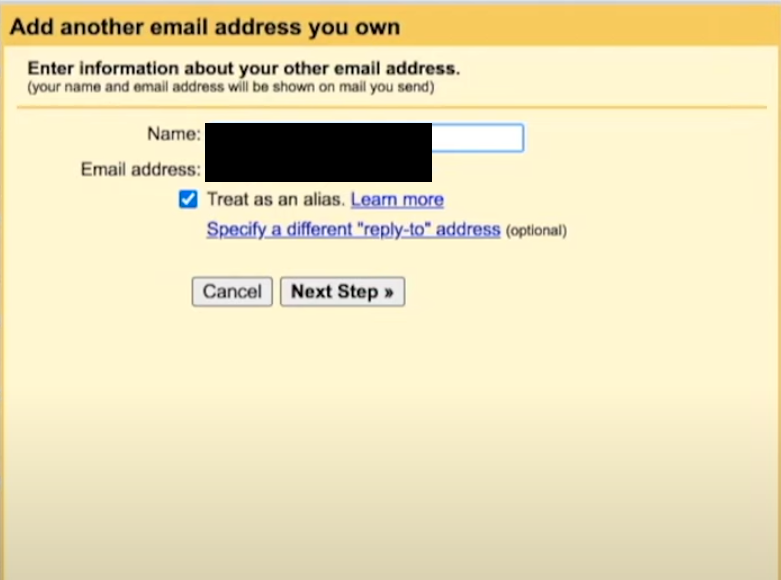
Once you create your professional email address and link it to Gmail, you will be asked to add an alias:
- Do not uncheck the "Treat as an alias" box when the window pops up.
-
Put in the alias name that you want your customers to see when you send mails. Click "Next Step."
- Add the same username and password that you used before for your web hosting and pairing with Gmail.
- Use the TLS method and click "Add Account."

Verifying Your New Email Account
Once you create your professional email account and pair it with Gmail, you need to verify it to start sending and receiving emails. To do this, you need to:
- Go to the "Accounts and Import" tab in Settings.
- Scroll down to "Check mail from other accounts" again, and click "Check mail now."
- Now you will see that you have a new email. The new email that you see is an email that Gmail sends you for verification. Initially, you need to check your emails because it is a new account and does not have any activity history. Once you start sending and receiving emails on this email account, you will not have to do this manually.
- Go to your inbox and you will see the email from the Gmail team. This email contains a link and a one-time password that you need to use for verification.
- Click on the link and it will open a new window. Click on "Confirm" and close the window.
- You will find a code at the end of this e-mail, and you need to copy it before pasting it to the yellow window where it asks for your verification code.

Test Your New Professional Email With Gmail
Now that you are done creating and pairing your new professional email address, it's time to test it before putting it to work.
Use any other email account that you might have and send yourself a test email to your new professional email address. Make sure to send an email reply from your new email account as well to make sure it's able to both receive AND send emails.
Now that you have tested your new professional email account, I hope everything checks out. You can now use your professional email address to send and receive professional emails for your business.
You no longer need to send emails to businesses and feel dejected when you don't get a reply simply because your email came from @gmail.com!
Reap the Benefits of a Professional Email Address
These steps might seem daunting to some of you, but trust me, it should only take about 15-20 minutes of your time. The benefits and rewards you will reap by investing these few minutes in creating your professional email address on Gmail are priceless.
I have personally benefited a lot from having a professional email address, and the benefits are innumerable. Get yourself a new professional email address right away and climb the ladder of professionalism and success!